Whether you are using your GreenGeeks reseller account to host your own websites or sites for customers, the first thing you may want to do is create at least one hosting package. The package determines the specifications and quotas for each new account you set up in WHM.
You don’t necessarily have to create any packages—it’s possible to specify quotas individually each time you set up a new account—but creating packages can make the new account creation process much quicker.
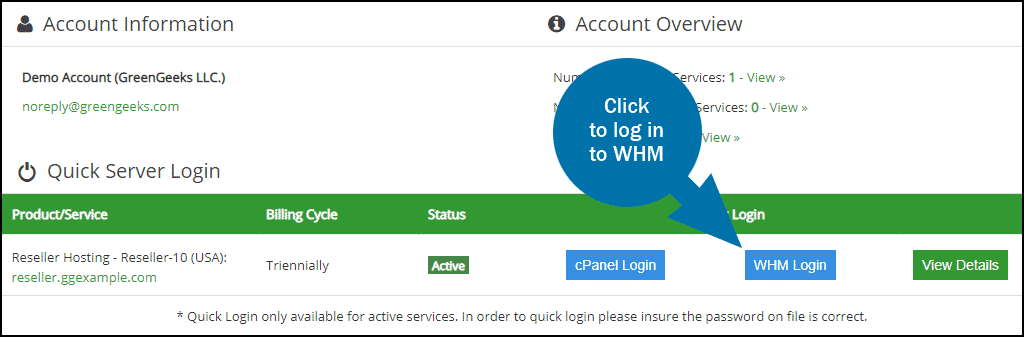
Log in to GreenGeeks and go to WHM by clicking the “WHM Login” button in the “Quick Server Login” section.
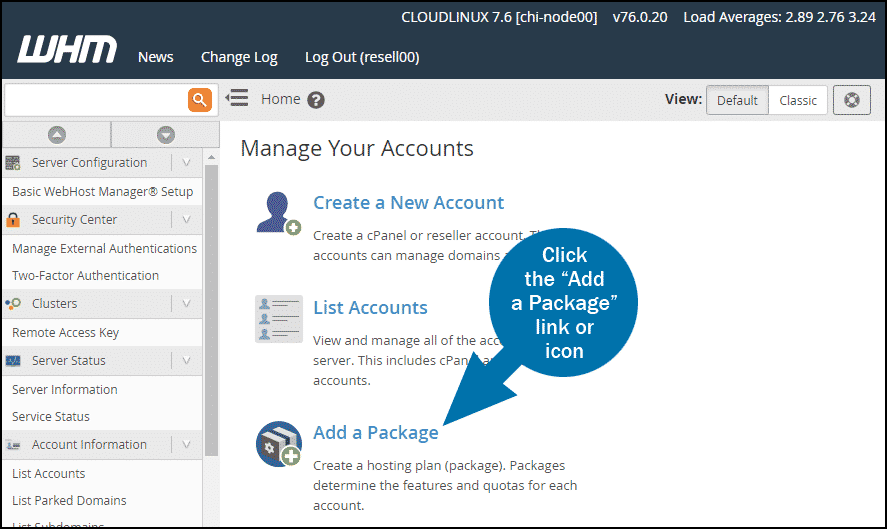
Once you’re logged in to WHM, click the “Add a Package” link or icon.
On the “Add a Package” page a few suggested values are pre-populated, but by default, most values are initially set to “Unlimited.” Typically resellers will limit resources for less expensive accounts, encouraging account upgrades to access more resources.
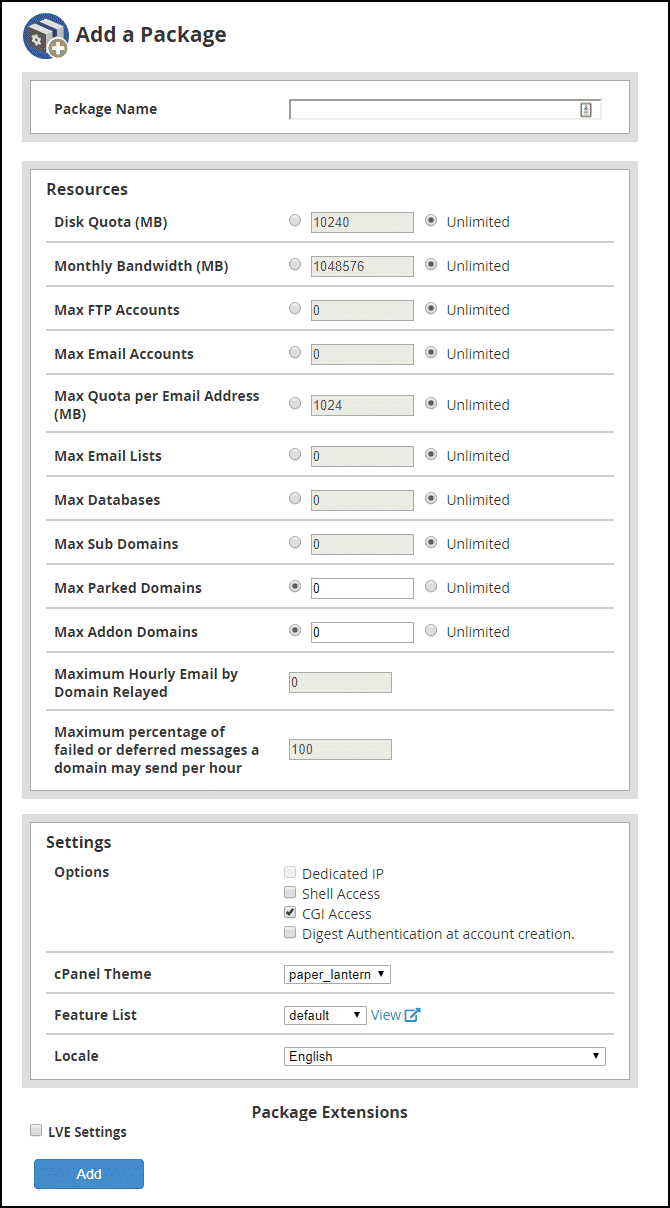
Package Name
Enter the name of the plan here. The name can be whatever you’d like, but you may want to choose something descriptive enough to make the differences between the plans apparent (Small, Medium, Large; Bronze, Silver, Gold; etc.).
Disk Quota (MB)
Enter a disk storage space value in megabytes (1024 MB equals 1 GB). The Disk Quota is the total of both website file storage and email storage.
Monthly Bandwidth (MB)
Enter a monthly bandwidth value in megabytes. Bandwidth is the data transfer quota, the amount of data (images, text, media, database query results, etc.) transferred from the web server to visitors.
Max FTP Accounts
The maximum number of FTP accounts the package user can create.
Max Email Accounts
The maximum number of email accounts the package user can create.
Max Quota per Email Address (MB)
Enter an email account disk storage space quota value in megabytes.
Max Email Lists
The maximum number of email Lists the package user can create.
Max Databases
The maximum number of databases the package user can create.
Max Sub Domains
The maximum number of subdomains (subdomain.ggexample.com) the package user can add to their account.
Max Parked Domains
The maximum number of “parked” domains (referred to as “Alias” domains in cPanel) the package user can add to their account. An Alias domain points to the contents of another domain. For example, if you want ggexample.net to show the content from ggexample.com, ggexample.net would be an Alias (or “parked”) domain.
Max Addon Domains
The maximum number of Add-on domains the package user can add to their account. An addon domain links a new domain name to a new directory in the user’s account and then stores its files in that directory. Add-on domains essentially allow a user to run multiple websites in one account.
Maximum Hourly Email by Domain Relayed
The maximum number of emails that any domain on the account can send per hour.
Maximum percentage of failed or deferred messages a domain may send per hour
The maximum percentage of failed or deferred messages that a domain on the account can send before the server temporarily blocks all outgoing mail from that domain.
Options
- Dedicated IP
Check this if you intend to offer a dedicated IP as part of a specific package. - Shell Access
Check this to allow your users shell or terminal access to the server. - CGI Access
Check this to allow users to execute CGI scripts. - Digest Authentication at account creation
This is for users on Windows Vista, Windows 7, and Windows 8 operating systems who wish to use the Web Disk feature in cPanel. In most cases, you won’t need to select this option.
cPanel Theme
Leave the default setting unless you’ve created a custom cPanel theme.
Feature List
Leave the default setting.
Locale
Select the language that cPanel will use for accounts created with this package.
Click the “Add” button to create the package. Now when you create a new account, this package will be an option.