WooCommerce is the leading way to sell physical and digital goods on a WordPress website. The system comes with a ton of functionality and features right out of the box. However, there is always room for more. You have the ability to streamline and customize your checkout area using a checkout field editor.
What is the WooCommerce Checkout Page?
The WooCommerce checkout page is where you go to checkout and pay for your items when you are in a WooCommerce store. Different checkout form pages have different layouts.
Most of them take the basic info (name, address, phone, etc), but there is also a way to customize your WooCommerce checkout page and make it exactly what you want.
For this, you need to use a smooth plugin that helps you get it all up and running. Let’s take a look at the plugin together and see all that it has to offer.
Checkout Field Editor (Checkout Manager) for WooCommerce
Checkout Field Editor (Checkout Manager) for WooCommerce gives you a way to easily customize a WooCommerce checkout page by giving you the ability to add, edit, delete and change the display order of the fields on a checkout page.
The plugin is lightweight, yet it is packed with all sorts of features. Some of the main ones include:
- Add New Custom Fields
- Edit Fields
- Display Details Page and Email
- Remove Fields
- Enable / Disable Fields
- Change Order of Checkout Fields
- Reset to Default Field Set
It also comes with plenty of available field types including:
- Input Text
- Password
- Phone
- Select
- Textarea
- Radio
The bottom line is that the Checkout Filed Editor plugin gives you everything you need and more to customize your WordPress WooCommerce checkout page.
Customize the WooCommerce Checkout Page
Let’s go ahead and dive into the plugin and see what all we need to do to get it running and in place. Follow the steps below and you will have a customized checkout page in no time at all.
Note: The rest of the tutorial assumes that you have WooCommerce installed and setup. There is also a pro version of this plugin that will give you even more features. Feel free to look into that if you feel it is something you want. The steps below are based on the free version.
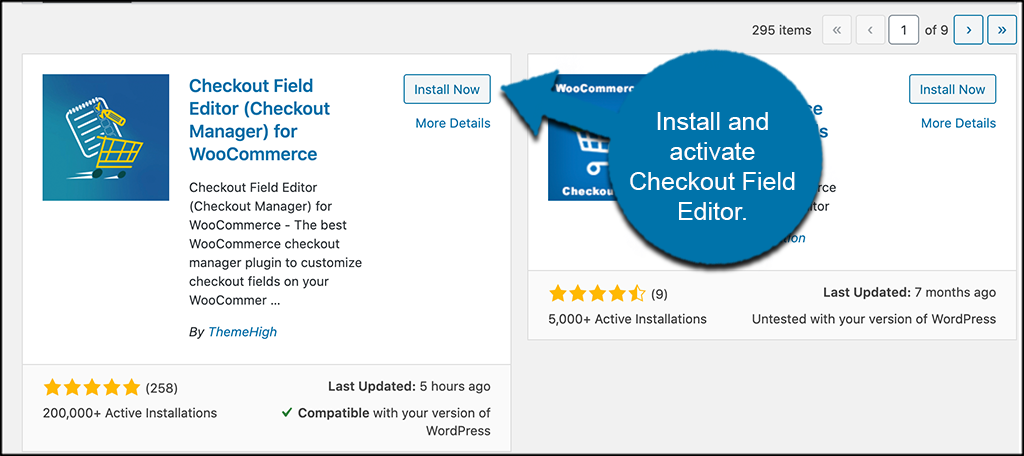
Step 1: Install and Activate the Plugin
In order to start using the Checkout Field Editor plugin, you first need to install and activate it. You can do this by heading over to the Plugins page inside the WordPress admin dashboard.
Simply use the search field to search the plugin by name. Once it pops up, install it directly from there.
Step 2: Access the Main Settings Page
Now that the plugin has been installed and activated, it is time to access the main settings and configuration page.
To do so, click on WooCommerce > Checkout Form, located in the left side menu area of your dashboard. You can see this is now an available option after you activate the plugin.

Step 3: Explore Options
At this point, you are on the main settings and configuration page for the Checkout Field Editor plugin. You will see two main tabs called “Checkout Fields” and “Advanced Settings.” Under that, you will see three sub-link options for billing fields, shipping fields, and additional fields.
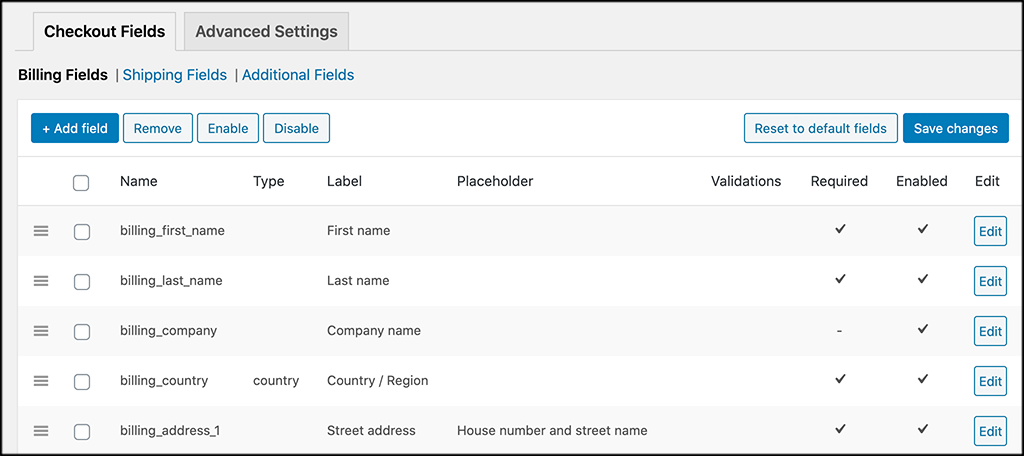
You can also see all the fields that are currently there. Go ahead and go through what is available. You can drag and drop the fields in any order you want.
To enable, disable, or remove a field, simply click on the relevant buttons at the top of the page.
You can click through all of the settings and create customized fields on all areas of the WooCommerce checkout page.
Step 4: Add a Field to Checkout Form
Adding a field is pretty easy. No matter what link you are on, simply click on the “Add Field” button at the top of the page.
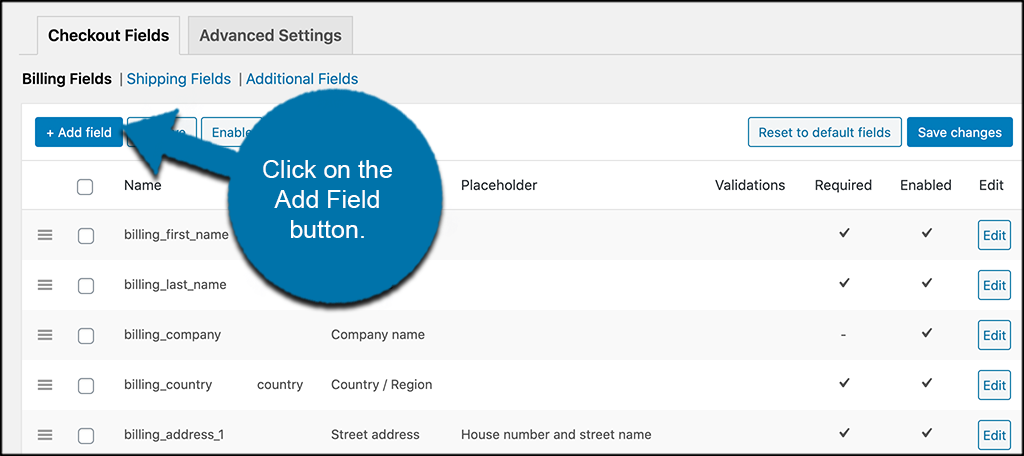
A popup box will appear with several blank fields. You need to add in the fields what you want in the custom field.
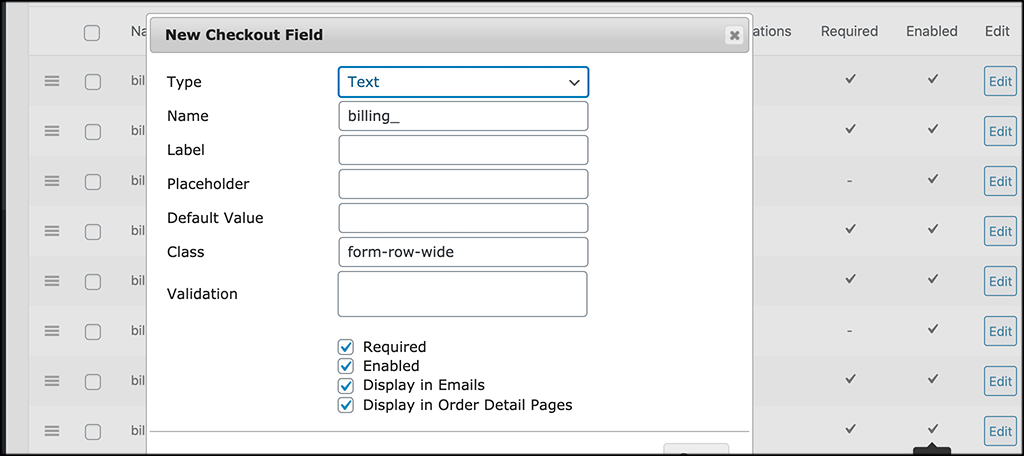
Once you have added all the relevant info required, click on the “Save” button to save the new custom field. It will automatically be dropped in the fields list and you can drag it right to the order you want.
Remember, this is the same process for billing, shipping, and additional fields.
Step 5: Look at Advanced Settings
One last thing you want to do before you are done is click on the “Advanced Settings” tab and take a look at those.

Go ahead and make any changes here you see fit for your site.
That’s it! You are all set and these fields will now display one your WooCommerce checkout page.
Other Questions Answered
Here are some other questions and situations you might come across when using the Checkout Field Editor plugin. Hopefully, these answers will give you all the info you need to run the plugin smoothly on your WooCommerce website.
How Do I Modify the Styling Properties of the Files Created?
The plugin provides a feature, Class, for modifying the styling properties of the fields. This is a three-step process.
- Define a class in the Additional CSS(Appearance >> Customize >> Additional CSS).
- Enter the name of the created class in the field Class of the Add/Edit pop-up
- Save the changes
The style defined in the class will be applied to the default and custom fields for which this class is included.
Am I Able to Apply Price for the Fields Created Using This Plugin?
Well, you can, but you need to be running the pro version of the plugin to do so. The free version does not support this.
Can I Go Back to WooCommerce Default Settings?
Yes, there is a button called “reset to default fields” to go back to the WooCommerce defaults. You can use this at any time you wish to go back.
Can I Display Custom Fields on My Account Page As Well?
With the free plugin, the fields can be displayed and edited only from the Checkout page. Upgrading to the premium version lets you display the fields at the Checkout page, My Account page, and User profile. The value once entered by the user will be saved so that the user need not have to enter the value every time while they are placing the order.
Final Thoughts
If you are running WooCommerce on your website, this means you have the ability to sell physical and digital goods directly on your site. While the WooCommerce plugin comes well-equipped and gives you everything you need to start selling, there are always modifications and customizations you can add.
In this case, Using the Checkout Field Editor plugin will give you the ability to easily add all sorts of customized fields to your WooCommerce checkout page.
I hope this article was able to show you how easy it is to add fields to a checkout page using a plugin. Once you know and understand the process, you can begin to add as many fields as you want.
Have you ever tried using this plugin before? Do you prefer adding customized fields in a different way?