
Do you love using social media websites and want to add a Facebook login button to your WordPress website? If so, then you are not alone!
Facebook is the largest social media platform and plenty of websites are making sure their website is compatible with all of the latest features this social media juggernaut has to offer.
One of the best features that many websites have adopted is the ability to log in with Facebook in WordPress. When you allow your site visitors to log in this way, they can skip the sign-up form on a website and sign up by linking their Facebook account.
This will save your visitors a lot of time and you can encourage them to follow you on Facebook at the same time. There are a few different ways to add a Facebook login button to WordPress.
You can use custom coding and combine that with the Facebook developer API platform and build your own.
Or, you can go the route of a WordPress plugin.
Today we are going to explore a plugin together. This is the fastest and easiest way to add a Facebook login button to your website and allow your site users to login using that particular social media platform.
Why Add Facebook Login for WordPress?
The main purpose for adding a WordPress Facebook login is to speed up the sign-up process for creating an account on your website, but there is a more important reason. When you look at social media platforms as a web developer, you should be seeing them as platforms to grow your website.
By getting visitors to log onto Facebook through your website you can lead them to follow you and leave a like on your Facebook page. This is important because everyone on their friend’s list will be able to see that they liked your website.
This is where large social media websites like Facebook really start to shine. All of those friends will now be able to view your Facebook page. And if they leave a “like,” then all of their friends will be able to see and the cycle continues.
Simply put, the login button is a simple way to trigger the Facebook login process on your website or web app. This allows you to track visitors and reach out to them easier, and it allows users to quickly and easily login.
I have found a powerful, yet simple-to-use plugin for this very thing. Let’s take a look at it and see all that it has to offer
WordPress Social Login
WordPress Social Login gives you the ability to enable social login using Facebook. However, this particular plugin also has a lot more functionality than others, as it also allows you to set up other social logins if you want.
Furthermore, WordPress Social Login also includes tools that allow you to configure social sharing and social comments using all of the most well-known social networks.
So, if you are interested in more than just offering Facebook login for WordPress, then this is definitely a plugin you should take a look at. The free version of this plugin is pretty comprehensive, as it supports 10 apps. These include:
- Vkontakte
- Windows Live
- Amazon
- Salesforce
- Yahoo
As you can see, it is pretty comprehensive and is a fantastic option for a Facebook login plugin. While the plugin does offer a lot of other functionality, which I will mention below, today we are actually going to focus on how to set up the Facebook login option for your WordPress site.
Let’s get the plugin installed and running together so that you can allow this functionality.
Note: There is a pro version of this plugin. It offers a bit more functionality and has more social networks and applications to choose from. If you are interested in this, then feel free to go check it out. The tutorial below is based on the free version of the plugin.
Configure Facebook Login for Your WordPress Website
Step 1: Install and Activate the Plugin
In order to add a Facebook login page for WordPress, you first need to install and activate the plugin. You can do this by going to the Plugins page of your WordPress admin dashboard.
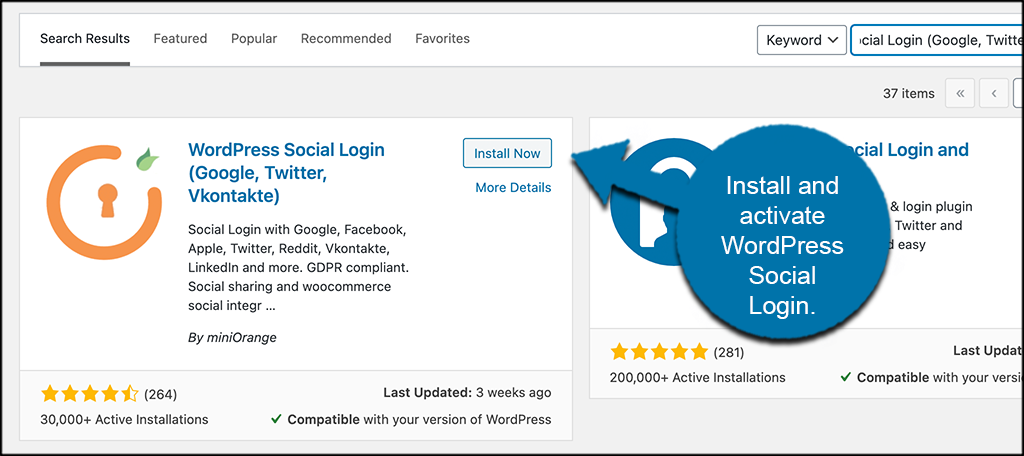
Simply search the plugin name using the available search field. Once you see it pop up, go ahead and install and activate right from there.
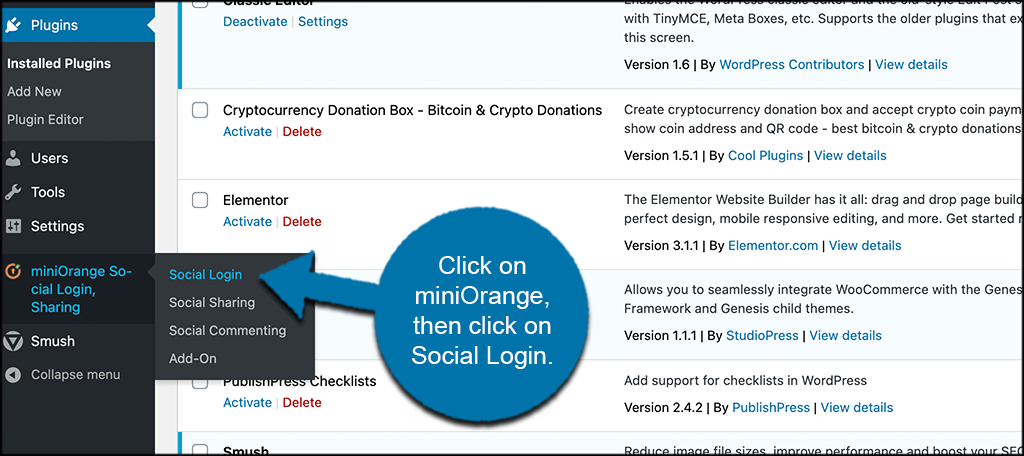
Step 2: Go to Social Login Page
Once the plugin has been installed and activated, you want to access the main social login page so that you can start to configure the login for Facebook.
To do this, click on miniOrange Social Login, Sharing > Social Login, on the left side menu area of the dashboard. You will find this is now an available option because you activated the plugin.
This will take you to the main setup page where you can easily put all the configurations you want.
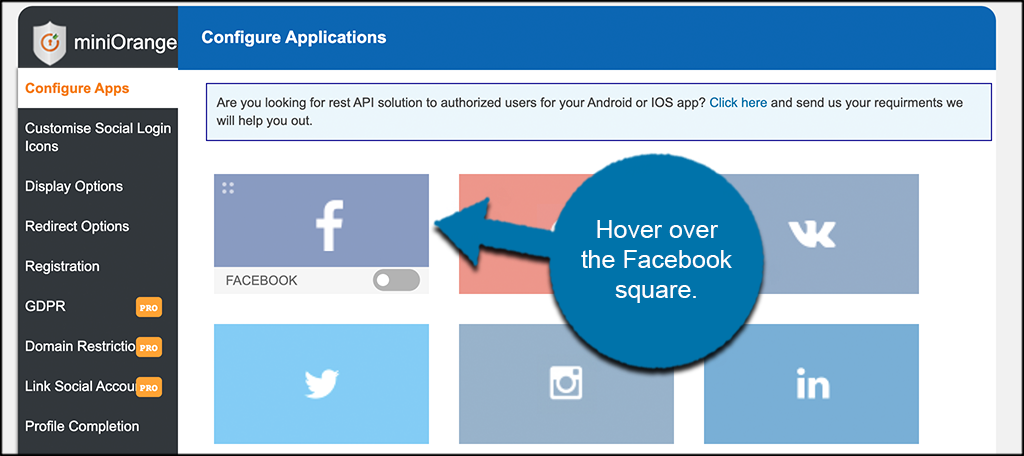
Step 3: Configure the Facebook Login App
At this point, you have arrived on the main settings page for the entire plugin. There is a lot to see, as there will be several tabs to the left of the screen. By default, we have landed on the “Configure Apps” tab.
As you can see, there are 10 available networks that you can configure and add as one-click social login options to your website. However, we are concentrating on the Facebook login, so go ahead and click on the main Facebook icon.
A configuration popup box will appear with detailed instructions on how to configure the Facebook login option.
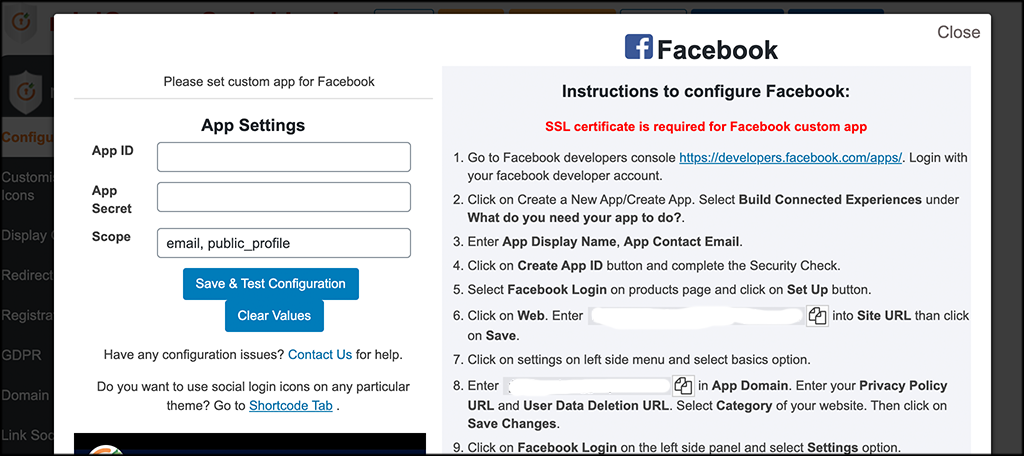
Simply follow these steps and ad the correct app id and app secret that is generated when you follow the steps in the box.
If you are more of a video person, then there is also a video within the popup box that shows the steps being done visually.
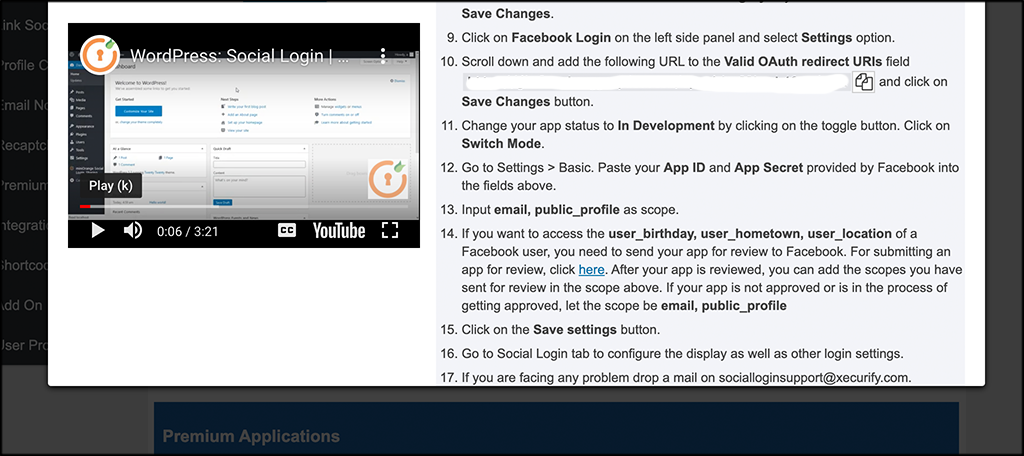
Once you complete the instructions and get your app id and secret, you are all set.
Note: A couple of important things to remember at this point. If you want to configure any of the other available social platforms available for login, then click on the box and follow the instructions given. Each platform will differ some. Also, you will not be able to configure and activate Facebook login or any of the other log-in options unless you have a running SSL certificate.
Step 4: Customize the Social Icons
After you have configured the Facebook login, go ahead and click on the “Customize Social Login Icons” tab. Here, you will customize the look and feel of the icons based on how you want them to display on your site.
Customizations will include things like shape, theme, size, and text of the icons.
Step 5: Configure Display Options
Now on to the next tab. In the “Display Options” area, you will be able to configure the display option for the icons you have set up.
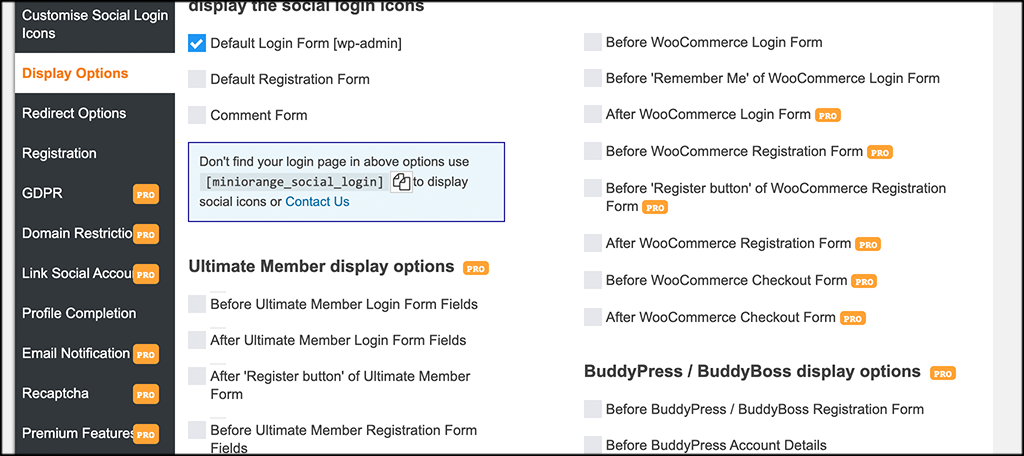
You can see that the pro version offers many more display options for things like BuddyPress and WooCommerce.
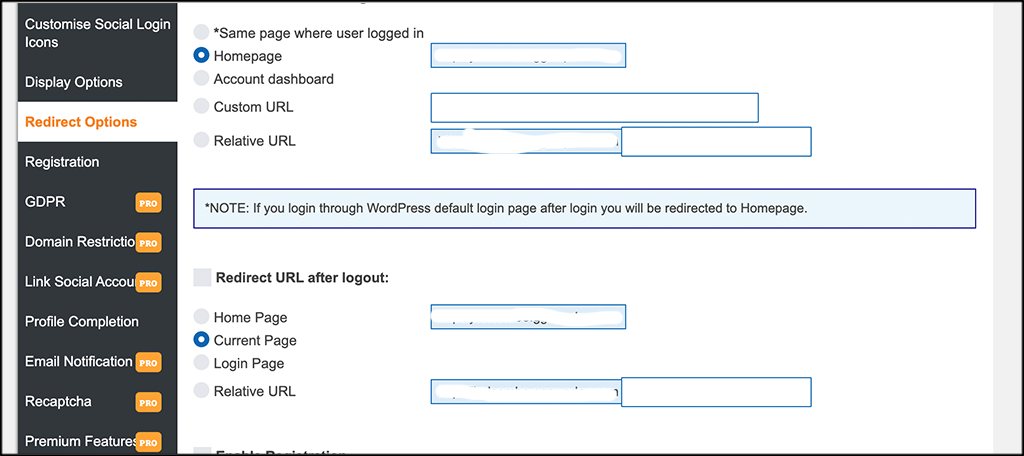
Step 6: Enter Redirect Options
The plugin allows you to enter a number of different redirect options based on what you want to happen on user login. Feel free to set those here.
Step 7: Enter Registration Options
There are a number of different registration options available as well. You can set and configure these how you see fit on this tab.
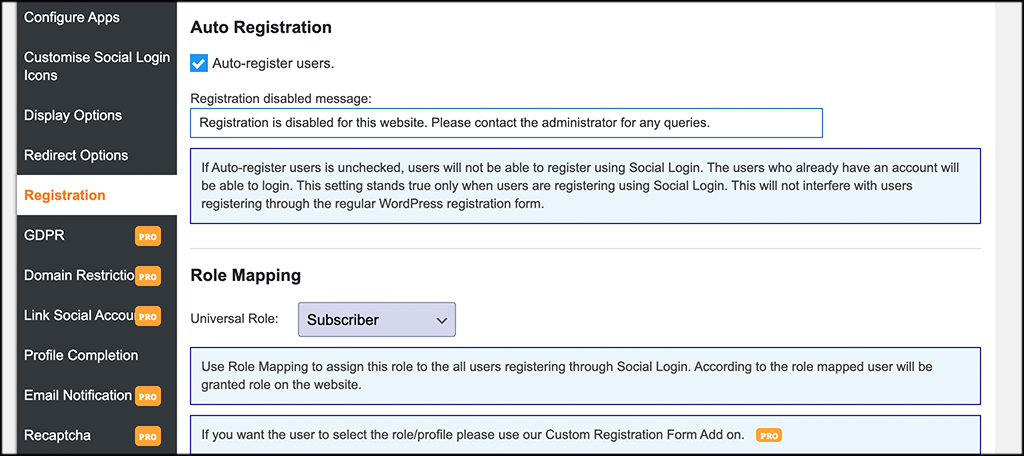
That’s it! You have now created a Facebook login homepage option. The rest of the available tabs except a couple on the bottom are all available for pro users only. If you have the pro version, go ahead and go through them. For free version users, you are all set.
Shortcodes
If you scroll down to the bottom of the main settings page, you will see a “Shortcodes” tab. Click on it.
You can see that the plugin actually runs on a set of available shortcodes.
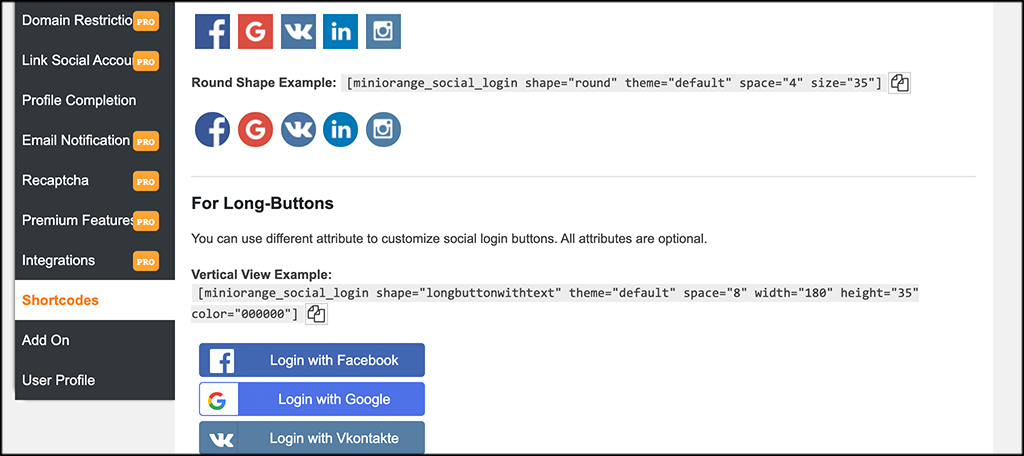
The default shortcode to show the login panel anywhere you want is actually instead of just on the login page is actually [miniorange_social_login]. However, you will see all the other available shortcodes as well. Use these if you want the different styling and other options they offer.
Final Thoughts
Facebook may be the largest social media platform, but it is not the only one. Twitter and Instagram are also huge social media platforms. They both have their own unique systems and can help your website grow.
For example, Instagram has a smaller user base than Facebook, but companies have noted they get more visitor interactions with their posts than other platforms. Depending on the nature of your website and the services you provide, this may suit your website better than Facebook.
Regardless of which platform you use, you need to keep in mind that just because you use Facebook does not mean you cannot use Twitter or Instagram as well. Building a social media following is not an easy task, and focusing on one platform is not enough. Remember, as long as you make your social media pages fun and enjoyable, they will grow.
Do your visitors like logging in with their Facebook account instead of the normal way? Have you noticed any growth to your Facebook page after introducing this sign-in method?