
If you currently use Gravity Forms, you may be aware that trying to export a Gravity form to Excel is not streamlined. It always requires an admin and you have to go through the process again every time new data is necessary.
The Gravity View team has aimed to fix this by creating a plugin to bypass the login portion of the process. It is Gravity Forms Entries in Excel. This plugin will allow you to easily export entries from all Gravity forms.
Today, I will demonstrate how to do this.
What Is Gravity Forms?
Gravity forms is a premium contact form plugin for WordPress. It allows you to create any type of contact form in a stylish and professional manner.
Contact forms allow users to enter personal information for the website to collect. These can come in a variety of forms with the most common being a registration form.
However, there are hundreds of options available.
Collecting the information is only half of the battle. The other half is assembling that information into a readable format that can be used for analytics, which is most common in the Microsoft Excel format.
While Gravity Forms provides a built-in way to export form data to Excel, many users feel that it can be annoying to access. Luckily, there are other options available.
Is It Really That Hard to Export Data From A Gravity Form?
To be honest, not really.
The process is actually pretty straightforward. The issue that many people have with the process is that you have to log in to the Gravity Forms website. While this doesn’t take very long, it can get annoying if you plan to export regularly.
This problem is made worse if the person who needs the CSV file is not an admin because you would need to sign in with an admin account to do this.
The plugin avoids this by allowing you to create a CSV export directly from the forms section of the plugin. In total, it will take less than a minute and can be set up so that any user role in WordPress can get the file for themself.
How to Export Gravity Forms with Gravity Forms Entries
Step 1: Install Gravity Forms Entries
It should go without saying that you do need to have the Gravity Forms plugin installed to use GravityExport Lite. This plugin was specifically designed as a free add-on for Gravity Forms and will allow you to easily export CSV files.
Thus, all of the settings are available with the Gravity Forms settings section. It is compatible with all of the premium add-ons available in Gravity Forms.
Let’s start by clicking on Plugins and selecting the Add New option on the left-hand admin panel.
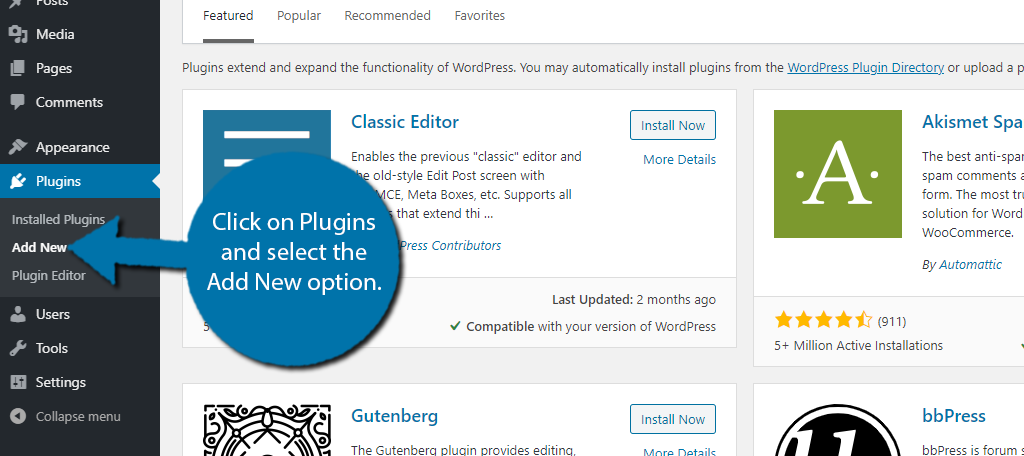
Search for GravityExport Lite in the available search box. This will pull up additional plugins that you may find helpful.
Scroll down until you find the GravityExport Lite plugin and click on the “Install Now” button and activate the plugin for use.
Note: Without Gravity Forms installed, you cannot do anything with this plugin.
Step 2: Access Entries in Excel
With the plugin activated, you are ready to begin. The first part is to actually find the section the plugin adds to your website.
On the left-hand admin panel, click on Forms and select the Forms option.
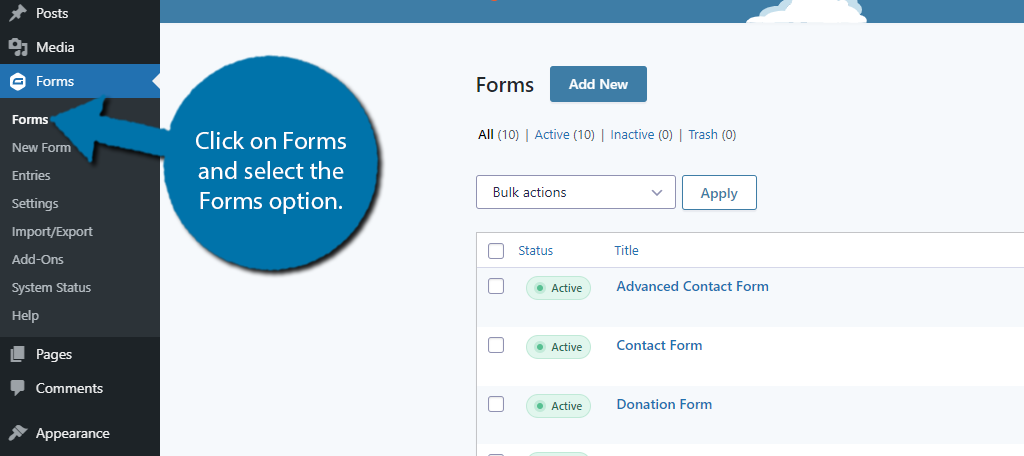
Here you will see a full list of forms you have on your website. Hover your mouse over the form of your choice to reveal additional options. Click on the Settings option.
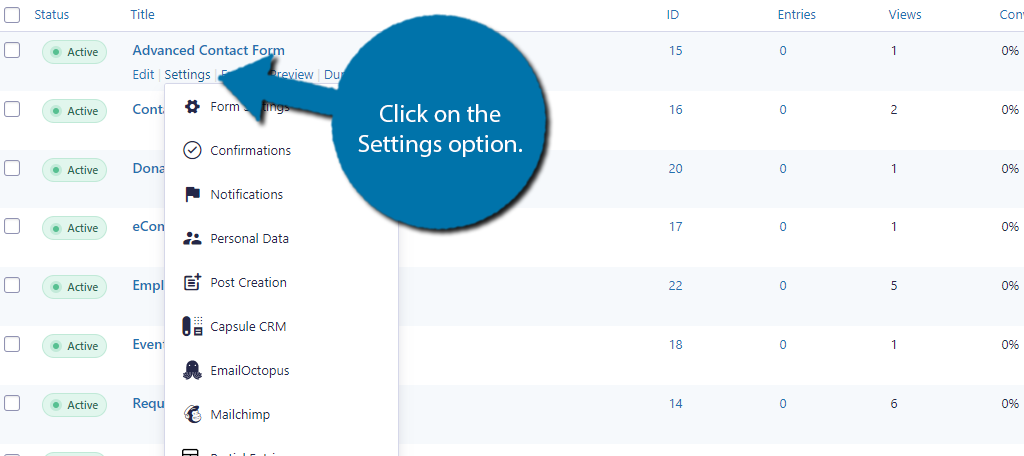
Click on the Entries in Excel option at the bottom.
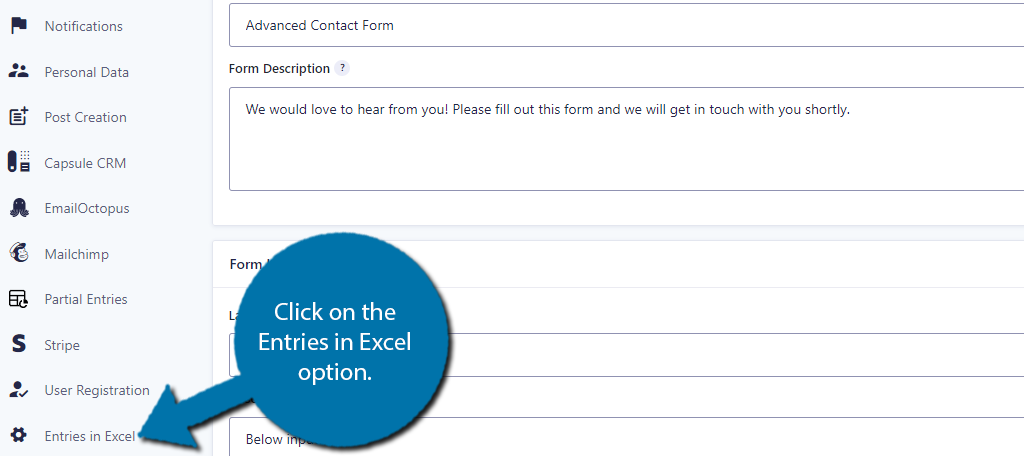
Step 3: Settings
This section contains all of the settings the plugin offers. It only needs to be configured once. After that, you can simply click the download button. Of course, you can change the settings at any time.
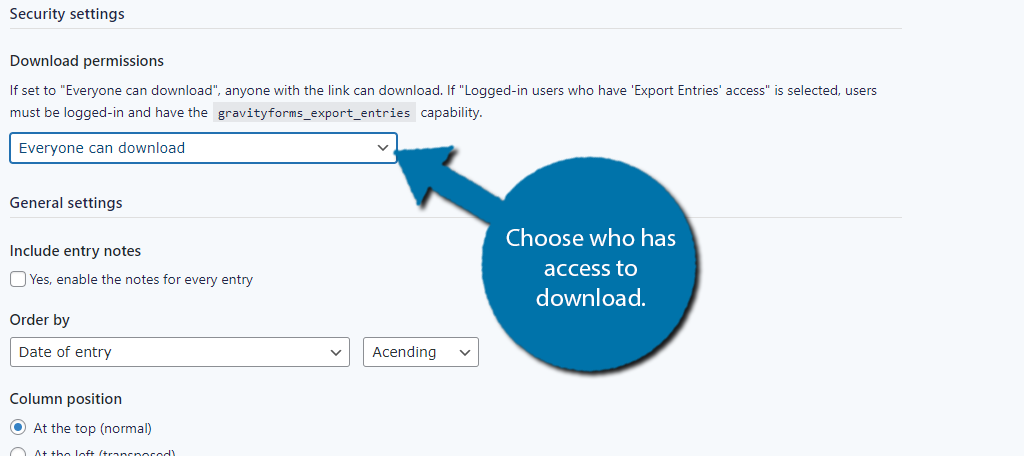
The first thing you will see is an “Enable download” button, but let’s ignore that for now. Instead, below this, you will find the Security and General Settings sections.
The security section allows you to choose if everyone has access to the download feature or only logged-in users have access. Simply pick the best option for your website.
The general settings include a variety of simple options that you can configure. The first is if you want to include entry notes with the download. This is off by default, but feel free to enable it.
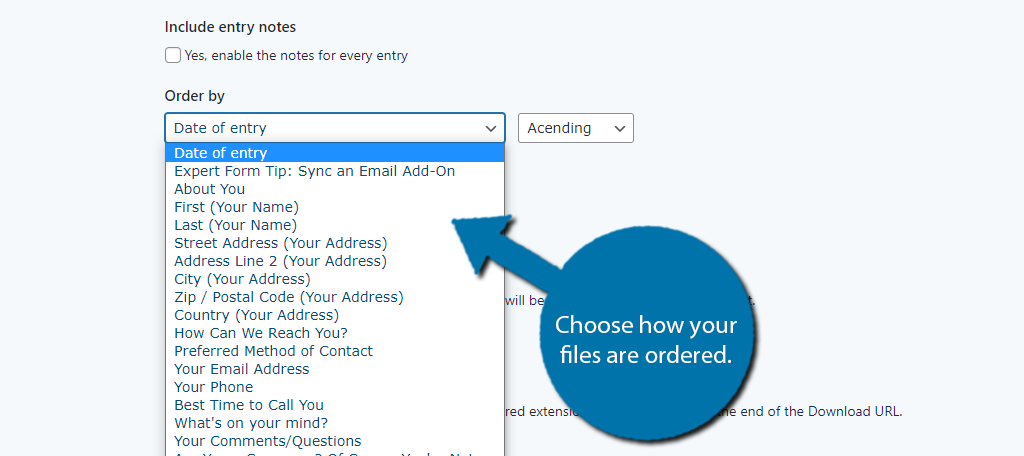
Next, you can choose how you want the order to appear in Excel. The plugin offers you a lot of choices including dates, telephone numbers, cities, and more. Use the drop-down to make your choice.
The next couple of choices allow you to select the column position, enter a custom filename, choose the type of file extension (.csv or .xlsx), and choose if a notification is sent out when a download is created.
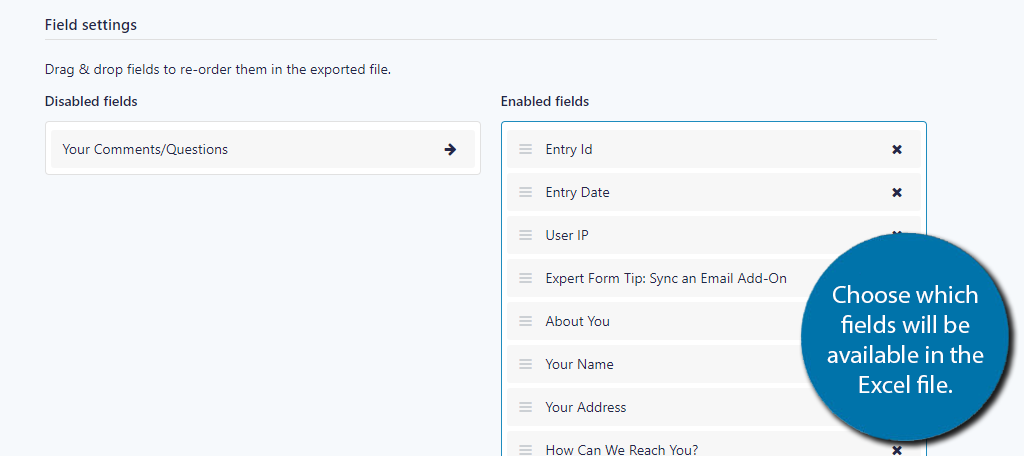
Underneath this, you will find a Field Settings section. Here, you can select any fields that you do not want to be included in the excel file. Simply drag the fields you do not want to include into the Disabled fields section.
I would recommend excluding any fields that do not have quantifiable data. For instance, the Your Comments/Questions fields allow visitors to leave a comment on the form. While this is valuable information, it might not be great in an excel format.
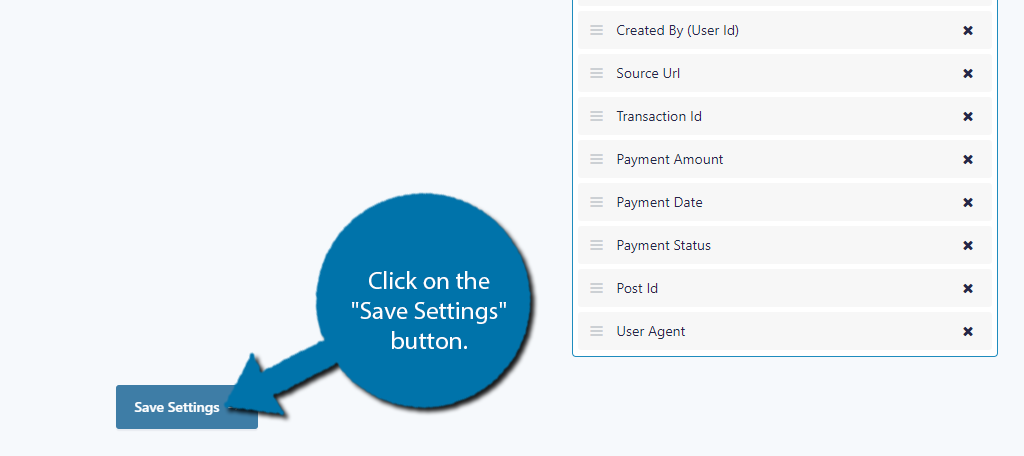
When you are done, click on the “Save Settings” button.
Step 4: Download the File
At this point, all you need to do is actually download the file. Going forward, this is all you will need to do to create an Excel export for anything in Gravity Forms.
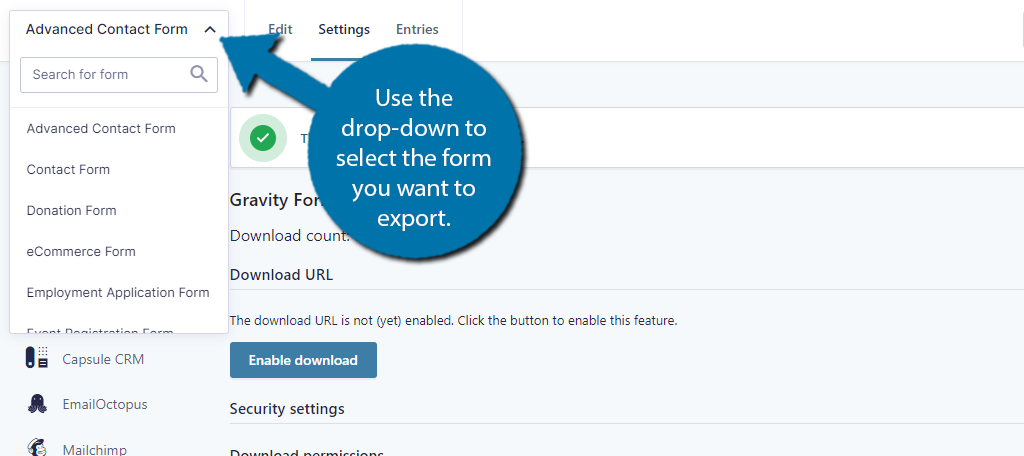
At the top left, you will find the form selector. This is how you select the form you want to use. Simply use the drop-down to select the form you want to export.
Next, we need to actually enable the ability to download a form. To do so, click on the “Enable download” button.
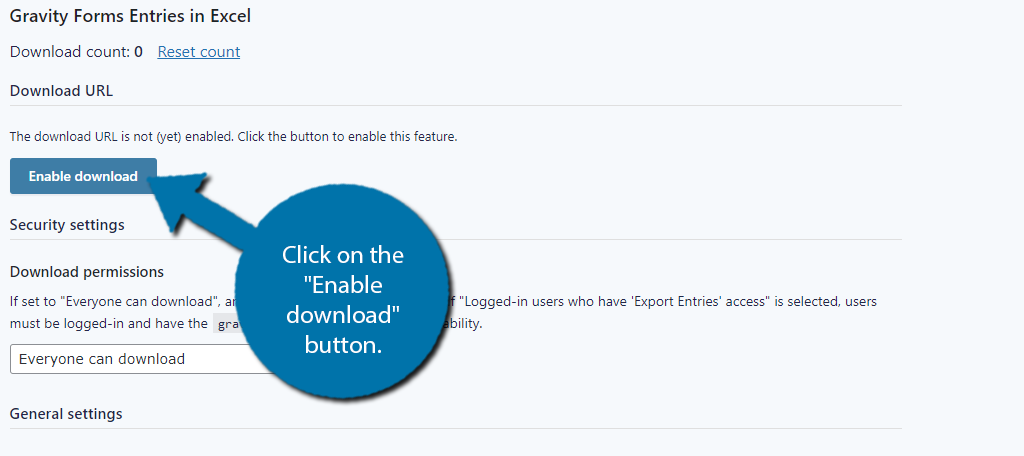
This will generate a download URL for your website. You can disable this ability at any time by clicking on the “Disable download” button.
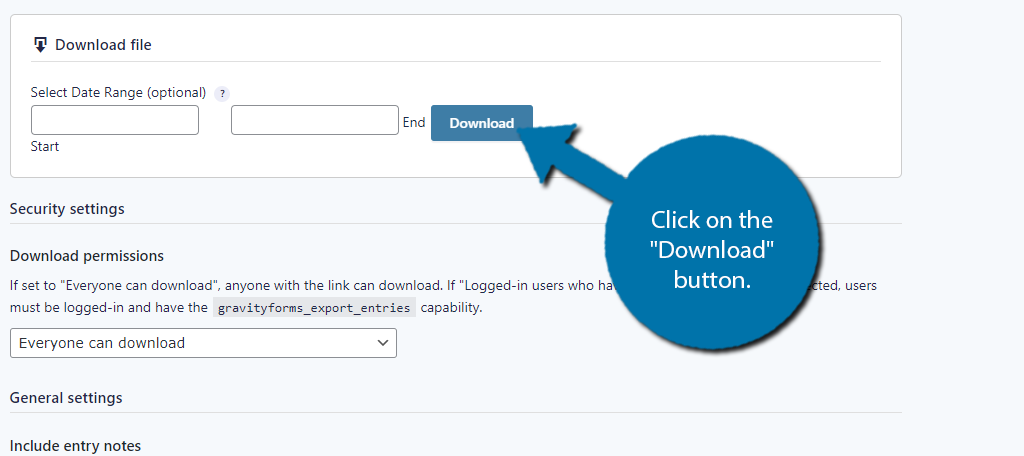
Below this, you will find a download file section. Here, you can enter a range of dates to choose which information you want to export. Alternatively, you can leave it blank. Doing so will export all of the data available.
Click on the “Download” button. The file can be found within your computer’s Downloads folder.
That’s it, your Gravity Form is now ready for use in Excel, congratulations!
Analytics Is Critical For All Websites
One of the biggest misconceptions that new website owners have is how much work goes into managing analytical data.
Let’s not beat around the bush, it’s getting harder and harder to get visitors to fill out contact forms. Most visitors have become more guarded about their personal information, which makes them more reluctant to share.
Yet, this is only half of the battle. The information you do collect needs to be converted into easily readable data. If it is not, then the information you collected is useless.
The good news is that there are so many programs and sites available to help you get the most out of your data.
Why did you need to export a form in Gravity Forms? Do you find this method easier than the built-in one?
Gravity Forms Entries in Excel is now called “GravityExport Lite”. Thanks for highlighting our plugin in your post! 🙂
Hello, I changed the name in the tutorial, but we’ll rewrite it soon for the changes to your plugin. Thank you for letting us know. 🙂