Have you found that over time you enjoy adding custom CSS to your WordPress website? Have you found that adding custom CSS classes has become easier over time as well? CSS can be used to manipulate all sorts of functionality all over a WordPress website. Today I am going to show you how to add a custom CSS class to WordPress menus.
This tutorial is perfect for those of you who have been trying to figure out how to add classes to your menus, but you aren’t quite sure where or how to do it. There are a few different CSS classes you could add to a WordPress menu, but let’s focus on adding “first” and “last” CSS custom classes to a WordPress menu.
Aside from this technique, there are also other ways to add custom styles to WordPress.
What is a Custom CSS Class?
CSS, or ” Cascading Styles Sheets,” is a way to apply style rules to HTML content. When you apply custom rules you give your website the ability to do different things outside the default settings offered.
You can add custom CSS to just about any part of a site, as long as you know how to access the stylesheet.
Add .First and .Last Custom CSS Class to Menus
Sometimes you come across a design requirement while working on a website that you have to perform a little differently than normal.
Say you are working on a website for a client and need to add a WordPress custom CSS class in a different way than you normally would because you are going to be handling that website over when finished and will not have access anymore.
You can easily go into the WordPress admin area and add a custom CSS class to the first and last menu items, but since the client will more than likely rearrange the WordPress menu over time this probably wouldn’t be the best option.
That being said, in this article I will show you how to add these classes by combining filters with the .first and .last CSS class.
You can complete this task a couple of different ways, so let’s look at both of them.
Access Functions.php File
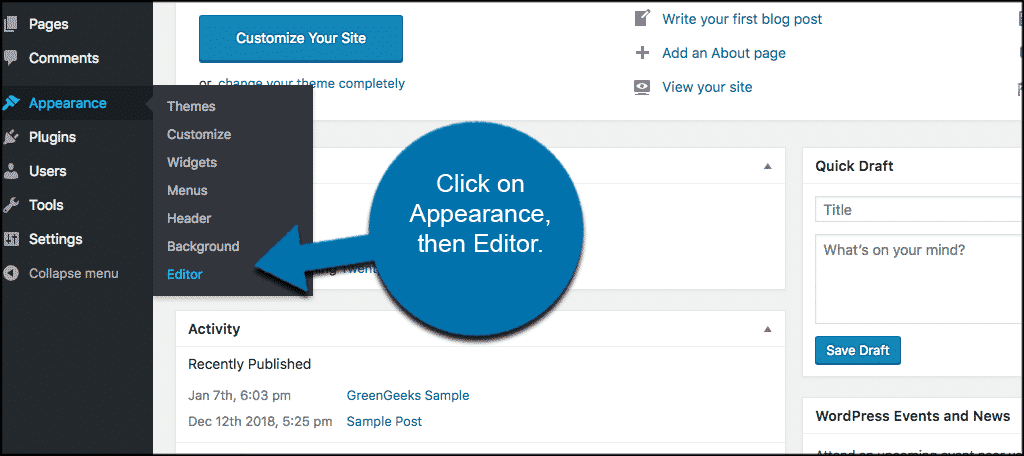
Your first option is to go open the functions.php file located in the WordPress website backend. Not to be confused with the WordPress configuration file. To access the file, just click on Appearance > Editor.
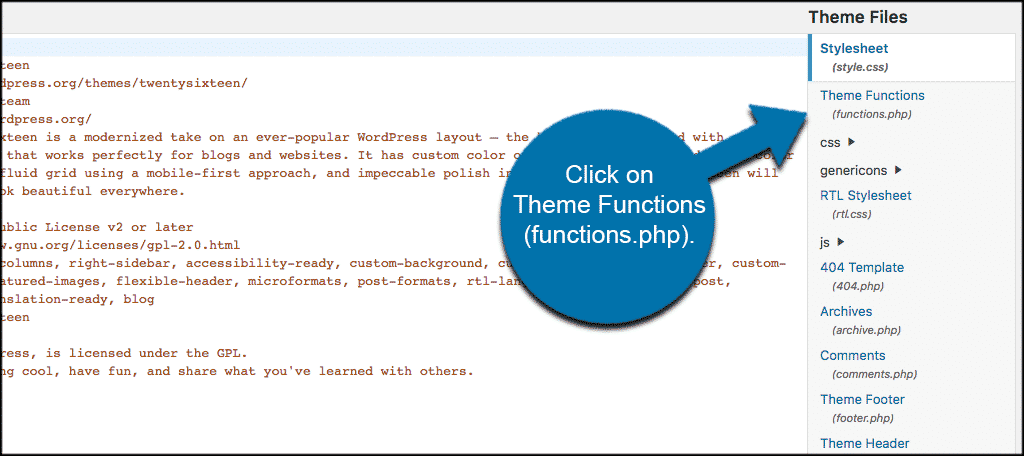
Once you are in the WordPress website files section of the site click on the Theme Functions (functions.php) file to open it up.
With the functions.php file now opened simple add the following code into the file[ht_message mstyle=”info” title=”” show_icon=”” id=”” class=”” style=”” ]
function wpb_first_and_last_menu_class($items) {
$items[1]->classes[] = ‘first’;
$items[count($items)]->classes[] = ‘last’;
return $items;
}
add_filter(‘wp_nav_menu_objects’, ‘wpb_first_and_last_menu_class’);
[/ht_message]
Use CSS Selectors
Another option for styling the menus and adding WordPress CSS classes is to use CSS selectors. These selectors will work in most (if not all) modern browsers. Add these selectors if you want to perform the function this way:[ht_message mstyle=”info” title=”” show_icon=”” id=”” class=”” style=”” ]
ul#yourmenuid > li:first-child { }
ul#yourmenuid > li:last-child { }
[/ht_message]
Just replace “yourmenuid” with the actual menu ID and you are all set.
Please note that if you are using Internet Explorer (especially an older version), then you will probably want to use the first option, as the CSS selector option probably won’t work properly.
I hope this article has shown you a way to easily add WordPress custom CSS classes to menus.
Below this, you will also find a list of default WordPress generated CSS classes. This list should come in handy when you are styling your WordPress menu, and also when styling or working with WordPress CSS classes across the board.
Default WordPress CSS Body Class Styles
[ht_message mstyle=”info” title=”” show_icon=”” id=”” class=”” style=”” ]
.rtl {}
.home {}
.blog {}
.archive {}
.date {}
.search {}
.paged {}
.attachment {}
.error404 {}
.single postid-(id) {}
.attachmentid-(id) {}
.attachment-(mime-type) {}
.author {}
.author-(user_nicename) {}
.category {}
.category-(slug) {}
.tag {}
.tag-(slug) {}
.page-parent {}
.page-child parent-pageid-(id) {}
.page-template page-template-(template file name) {}
.search-results {}
.search-no-results {}
.logged-in {}
.paged-(page number) {}
.single-paged-(page number) {}
.page-paged-(page number) {}
.category-paged-(page number) {}
.tag-paged-(page number) {}
.date-paged-(page number) {}
.author-paged-(page number) {}
.search-paged-(page number) {}
[/ht_message]
Default CSS WordPress Post Styles
[ht_message mstyle=”info” title=”” show_icon=”” id=”” class=”” style=”” ]
.post-id {}
.post {}
.page {}
.attachment {}
.sticky {}
.hentry {}
.category-misc {}
.category-example {}
.tag-news {}
.tag-wordpress {}
.tag-markup {}
[/ht_message]
Default CSS WordPress Post Formats
[ht_message mstyle=”info” title=”” show_icon=”” id=”” class=”” style=”” ]
.format-image {}
.format-gallery {}
.format-chat {}
.format-link {}
.format-quote {}
.format-status {}
.format-video {}
[/ht_message]
Default CSS WordPress Menu Styles
[ht_message mstyle=”info” title=”” show_icon=”” id=”” class=”” style=”” ]
#header .main-menu{} // container class
#header .main-menu ul {} // container class first unordered list
#header .main-menu ul ul {} //unordered list within an unordered list
#header .main-menu li {} // each navigation item
#header .main-menu li a {} // each navigation item anchor
#header .main-menu li ul {} // unordered list if there is drop down items
#header .main-menu li li {} // each drop down navigation item
#header .main-menu li li a {} // each drap down navigation item anchor
.current_page_item{} // Class for Current Page
.current-cat{} // Class for Current Category
.current-menu-item{} // Class for any other current Menu Item
.menu-item-type-taxonomy{} // Class for a Category
.menu-item-type-post_type{} // Class for Pages
.menu-item-type-custom{} // Class for any custom item that you added
.menu-item-home{} // Class for the Home Link
[/ht_message]
Default CSS WordPress WYSIWYG Editor Styles
[ht_message mstyle=”info” title=”” show_icon=”” id=”” class=”” style=”” ]
.entry-content img {}
.alignleft, img.alignleft {}
.alignright, img.alignright {}
.aligncenter, img.aligncenter {}
.alignnone, img.alignnone {}
.wp-caption {}
.wp-caption img {}
.wp-caption p.wp-caption-text {}
.wp-smiley {}
blockquote.left {}
blockquote.right {}
.gallery dl {}
.gallery dt {}
.gallery dd {}
.gallery dl a {}
.gallery dl img {}
.gallery-caption {}
.size-full {}
.size-large {}
.size-medium {}
.size-thumbnail {}
[/ht_message]
Default CSS WordPress Widget Styles
[ht_message mstyle=”info” title=”” show_icon=”” id=”” class=”” style=”” ]
.widget {}
#searchform {}
.widget_search {}
.screen-reader-text {}
.widget_meta {}
.widget_meta ul {}
.widget_meta ul li {}
.widget_meta ul li a {}
.widget_links {}
.widget_links ul {}
.widget_links ul li {}
.widget_links ul li a {}
.widget_archive {}
.widget_archive ul {}
.widget_archive ul li {}
.widget_archive ul li a {}
.widget_archive select {}
.widget_archive option {}
.widget_pages {}
.widget_pages ul {}
.widget_pages ul li {}
.widget_pages ul li a {}
.widget_links {}
.widget_links li:after {}
.widget_links li:before {}
.widget_tag_cloud {}
.widget_tag_cloud a {}
.widget_tag_cloud a:after {}
.widget_tag_cloud a:before {}
.widget_calendar {}
#calendar_wrap {}
#calendar_wrap th {}
#calendar_wrap td {}
#wp-calendar tr td {}
#wp-calendar caption {}
#wp-calendar a {}
#wp-calendar #today {}
#wp-calendar #prev {}
#wp-calendar #next {}
#wp-calendar #next a {}
#wp-calendar #prev a {}
.widget_categories {}
.widget_categories ul {}
.widget_categories ul li {}
.widget_categories ul ul.children {}
.widget_categories a {}
.widget_categories select{}
.widget_categories select#cat {}
.widget_categories select.postform {}
.widget_categories option {}
.widget_categories .level-0 {}
.widget_categories .level-1 {}
.widget_categories .level-2 {}
.widget_categories .level-3 {}
.recentcomments {}
#recentcomments {}
#recentcomments li {}
#recentcomments li a {}
.widget_recent_comments {}
.widget_recent_entries {}
.widget_recent_entries ul {}
.widget_recent_entries ul li {}
.widget_recent_entries ul li a {}
.textwidget {}
.widget_text {}
.textwidget p {}
[/ht_message]
Default CSS WordPress Form Styles
[ht_message mstyle=”info” title=”” show_icon=”” id=”” class=”” style=”” ]
/*Comment Output*/
.commentlist .reply {}
.commentlist .reply a {}
.commentlist .alt {}
.commentlist .odd {}
.commentlist .even {}
.commentlist .thread-alt {}
.commentlist .thread-odd {}
.commentlist .thread-even {}
.commentlist li ul.children .alt {}
.commentlist li ul.children .odd {}
.commentlist li ul.children .even {}
.commentlist .vcard {}
.commentlist .vcard cite.fn {}
.commentlist .vcard span.says {}
.commentlist .vcard img.photo {}
.commentlist .vcard img.avatar {}
.commentlist .vcard cite.fn a.url {}
.commentlist .comment-meta {}
.commentlist .comment-meta a {}
.commentlist .commentmetadata {}
.commentlist .commentmetadata a {}
.commentlist .parent {}
.commentlist .comment {}
.commentlist .children {}
.commentlist .pingback {}
.commentlist .bypostauthor {}
.commentlist .comment-author {}
.commentlist .comment-author-admin {}
.commentlist {}
.commentlist li {}
.commentlist li p {}
.commentlist li ul {}
.commentlist li ul.children li {}
.commentlist li ul.children li.alt {}
.commentlist li ul.children li.byuser {}
.commentlist li ul.children li.comment {}
.commentlist li ul.children li.depth-{id} {}
.commentlist li ul.children li.bypostauthor {}
.commentlist li ul.children li.comment-author-admin {}
#cancel-comment-reply {}
#cancel-comment-reply a {}
/*Comment Form */
#respond { }
#reply-title { }
#cancel-comment-reply-link { }
#commentform { }
#author { }
#email { }
#url { }
#comment
#submit
.comment-notes { }
.required { }
.comment-form-author { }
.comment-form-email { }
.comment-form-url { }
.comment-form-comment { }
.form-allowed-tags { }
.form-submit
[/ht_message]
Final Thoughts
Adding a custom CSS class to a WordPress menus does not have to be difficult. It is all a matter of knowing what to access, and what class codes to add to your stylesheet.
Change colors, styles, text, padding, margins, and just about anything else you want in your WordPress headers by adding custom CSS classes.
I hope this tutorial was easy to follow and showed you just how much you can accomplish when you add a custom CSS class to WordPress menus.
Have you ever added custom CSS classes to a stylesheet before? Did you find it difficult or were the directions easy to follow?