
Have you considered rotating testimonials to display more of them in a smaller area? Testimonials are among some of the most important content you can put on a business website.
In fact, 84% of people trust reviews on the Internet as much as the opinions of friends and family.
This lets your past customers help market your business. And because you’re using WordPress, a testimonials page is relatively easy to set up. All it takes is the right plugin and a few minutes to set it up.
In this tutorial, I’m going to teach you how to show rotating testimonials in WordPress.
How Can I Collect Testimonials in WordPress?
Before you can actually rotate your testimonials, you actually need to have some.
There are multiple ways to go about it, but one of the best ones is to just ask customers to fill it out. I know that sounds obvious, but it really does get results.
For example, do you notice that most YouTube videos ask you to Like & Subscribe? Well, that’s because it actually gets a lot of results. Asking for reviews or testimonials is no different.
Of course, you can spice it up if you are desperate.
Some places may offer a small discount code for shoppers who leave reviews often. This not only gets you the feedback but can hopefully bring that customer back quicker than usual.
It really depends on your website. Just make sure you actually have a form in place that customers can fill out, otherwise, you can’t actually collect any testimonials.
Using Rotating Testimonials in WordPress
Step 1: Install Testimonial Grid and Testimonial Slider
The Testimonial Grid and Testimonial Slider plugin is a great choice to not just add testimonials in WordPress, but to add them with style. You can use this plugin to display them in a variety of ways including rotating them.
This allows customers to see a variety of testimonials in the same location, which can help boost user trust. And that by itself can lead to more sales!
Note: This plugin does not allow visitors to leave testimonials. You will need a separate plugin for that.
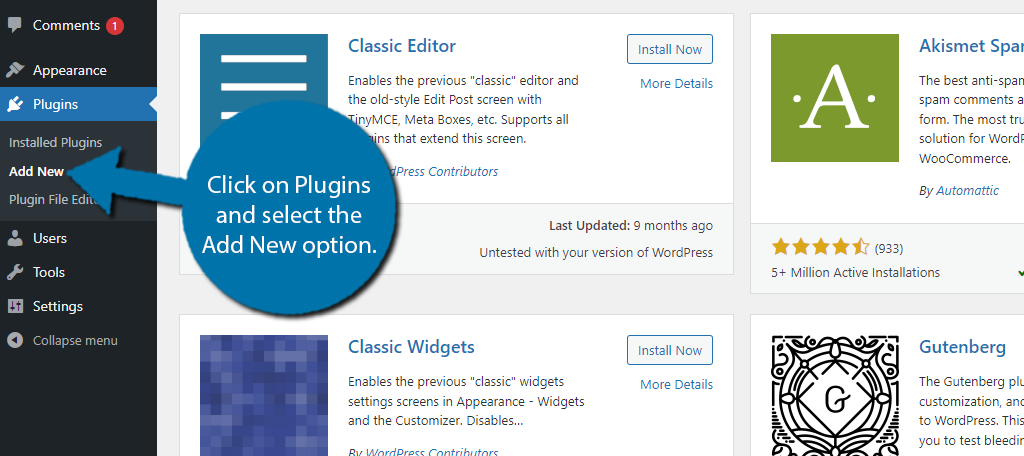
Let’s start off by installing the plugin. To begin, click on Plugins and select the Add New option on the left-hand admin panel.
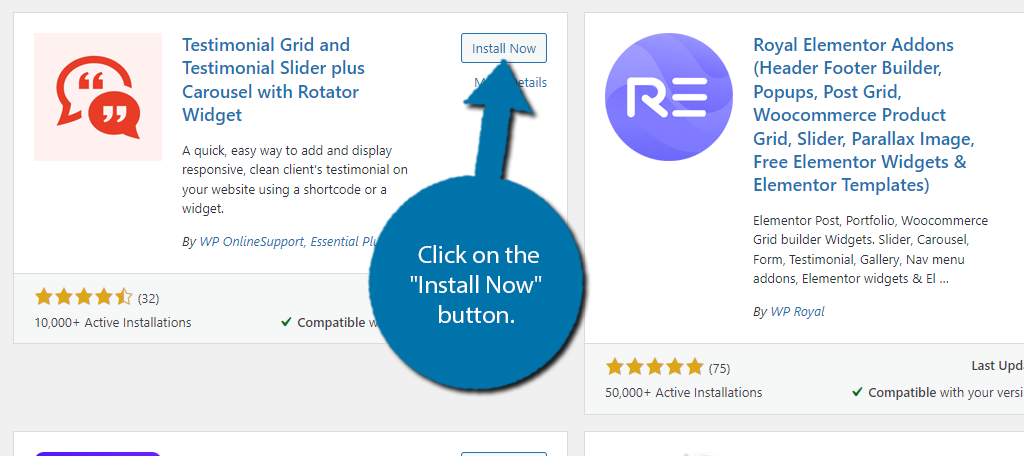
Search for Testimonial Grid and Testimonial Slider in the available search box. This will pull up additional plugins that you may find helpful.

Scroll down until you find the Testimonial Grid and Testimonial Slider plugin and click on the “Install Now” button and activate the plugin for use.
Upon activation, you will be asked if you would like to opt-in for email notifications. Feel free to sign-up or skip it as it will not have an impact on using the plugin.
Step 2: Add Testimonials
The first thing you need to do when setting up a WordPress page for testimonials is to actually add testimonials. This is very easy to do but could take quite a bit of time depending on how many you add.
The good news is that it is very easy to do, so let’s begin.
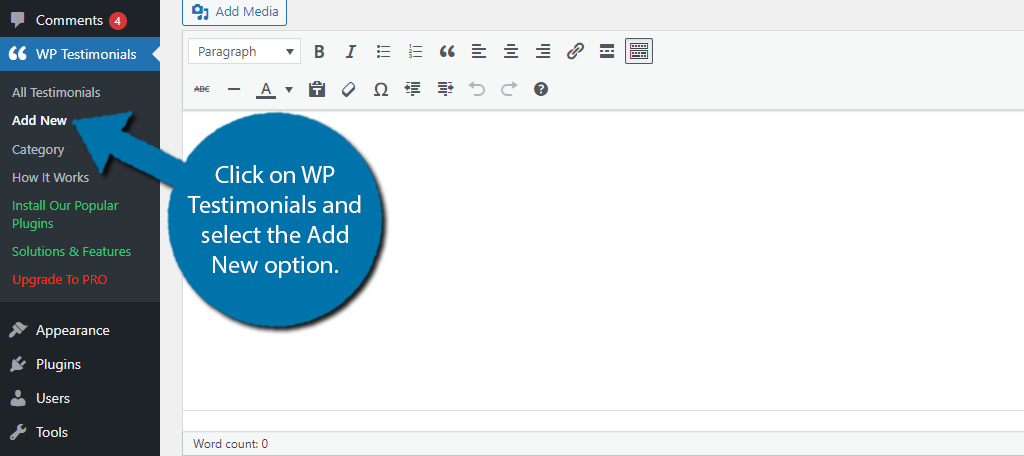
On the left-hand admin panel, click on WP Testimonials and select the Add New option.
Here, you will see a classic editor you can use for entering information. Enter a title at the top and add the testimonial into the text area. Below this, you will find some additional fields to fill out.
These include the client’s name, job title, company, and URL. There are also some pro options that I will not cover. Fill out the fields that apply to your testimonials.
When you are done, click on the “Publish” button.

Repeat this to add as many testimonials as you want. Since the plan is to rotate them, you should try to add quite a few.
The plugin provides several ways to actually display the testimonials. You can use the dedicated plugin widget to add them in widget areas, or you can use the block in Gutenberg shortcodes to add them to posts and pages.
Let’s start with posts and pages.
Step 3: Rotating Testimonials in Posts and Pages with Shortcodes
You have two main options here, the Gutenberg block or using shortcodes.
Let’s start with shortcodes.
The main shortcode we will be using is this:
[sp_testimonials_slider design="design-1" slides_column="2"]
There are just two things you may need to change in the shortcode. The first is the “Design” option. The plugin actually has four design options to choose from. The above example is for “design-1”, thus you just need to change the number to 2, 3, or 4.
Take a moment to check out what each one looks like before deciding.
The other part of the shortcode is the number of columns. Each column holds one testimonial. Thus, this example has two testimonials displayable at all times.
You can change the number from 2 to whatever value you want. But make sure there is enough room.
My recommendation is to use 1, 2, or 3 as more than that makes the page a little too busy.
Here is what the example shortcode will look like:

Step 4: Rotating Testimonials in Posts and Pages with A Block
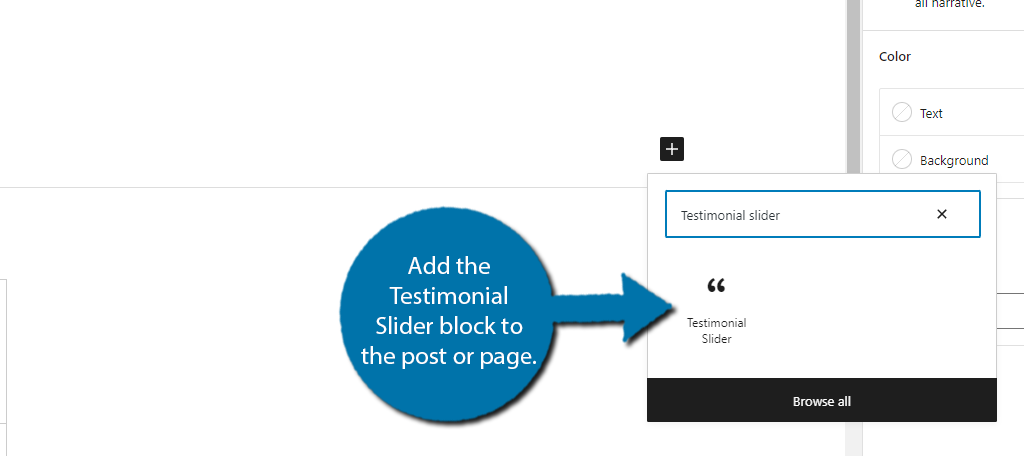
The other way to show rotating testimonials is to use the plugin’s block. There are actually two blocks. One is Testimonial Grid, which is for grid view, and the other is Testimonial Slider.
We are going to use the Testimonial Slider.
This block basically adds the shortcode for you and allows you to just configure a few settings. It’s much easier overall, but it all comes down to preference.
Add the Testimonial Slider block to the post or page.
The block itself just contains the shortcode and some helpful links that explain how to use the plugin. If you click on the block, you can edit the settings on the right-hand side.
Here, you can configure the appearance by deciding the number of columns and what information you will display.
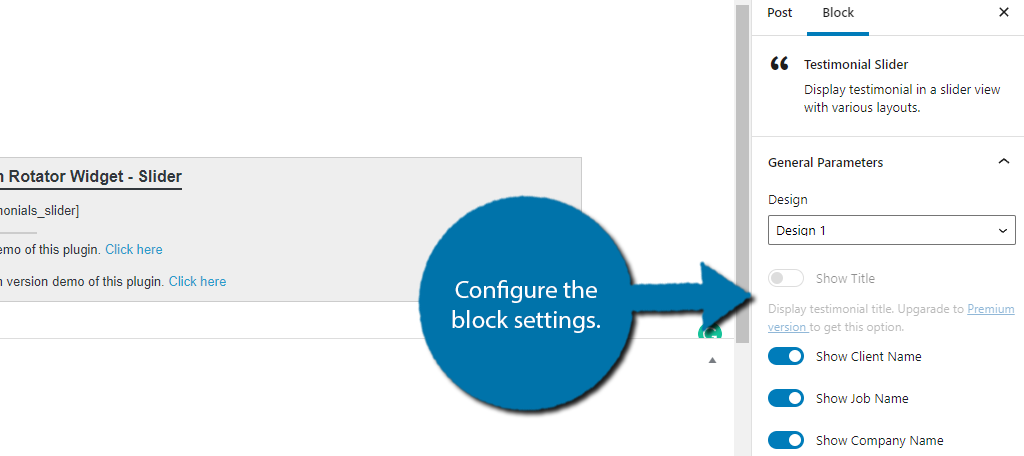
Unfortunately, just like the shortcodes, you can’t actually see what it looks like. You can use the Preview option to see it in action. Once you are satisfied, save the changes and you can view the slider on your live website.
Step 5: Rotating Testimonials With Widgets
Due to the latest changes to the WordPress widget system, this process is identical to the last step. And that’s because you can now use Gutenberg blocks as widgets.
The main thing you need to look out for is the size. Widget areas vary by theme, but for the most part, you will only have room for one testimonial. Thus, make sure to size it appropriately.
Also, remember it might not make a lot of sense to display these testimonials on a dedicated testimonial page. So, be sure to adjust the visibility options.
Other Testimonial Plugins to Try
Of course, this is just one of many WordPress plugins you can use. Let’s take a look at three others that are worth trying.
Testimonials Widget

The Testimonials Widget is a great choice to add rotating testimonials to WordPress. You can use the carousel feature to rotate through a variety of content that includes images, quotes, or testimonials.
This can be at random, or you can manually select which ones to display by using Shortcodes. Overall, it’s an easy plugin to learn and does a lot more than just testimonials.
BNE Testimonials

The BNE Testimonials plugin is another great option. You can add testimonials in either a vertical list or a slider. Both methods are achieved using shortcodes.
Of course, before you can do this, you will have to manually add the testimonials you want to display. The plugin will display them at random, so simply enter the ones you want to share with users.
GS Testimonial Slider

Another great plugin to consider is the GS Testimonial Slider. This one adds a rotating vertical slider that you can customize to meet your needs.
The slider is placed by adding a simple shortcode anywhere on your website, which makes it extremely easy for beginners. Thus, all you need to do is add the testimonials, add the shortcode, and you are done.
Engaging the Visitor
Testimonials and reviews are effective at driving traffic and influencing sales. It’s the reason why they’ve been a part of marketing for decades. Now, you can take advantage of the same platforms some of the largest brands in the world implement.
And all it takes is a few moments of your time.
Has your testimonial section helped boost sales? How often do you write review articles to improve your content marketing strategy?
I like very much the testimonial rotator. It looks very nice for some time but it has big problems. I created a page with this plugin and I have to re-create 2 times because after some days does not work. I think is not compatible with the last version of WordPress and before it, the plugin may have some problems with the free version of Elementor.
Great blog. Thanks for sharing informative blog.
Thank you for this article. I have been trying to find a testimonial carousel for months and this is the only thing that has worked for me.
I’m glad you find it useful. 🙂