The traditional “blogroll” was removed from WordPress some time ago, but that doesn’t mean you can’t post links to your favorite resources or give shout-outs to relevant websites. Now, you have a few options to organize your WordPress links like a blogroll that are easier to manage in many cases.
In reality, some prefer the new system of adding relevant links to menu bars or using a widget for the sidebar. A lot of developers would even argue how the blogroll feature was obsolete and pointless.
In this tutorial, I’ll show you how to organize and manage your WordPress links to clean up the site. The hardest part is picking which method fits your design ideas.
Using Menus
Creating a custom menu bar is a common practice among many for showing links. Not only does it help keep the site’s appearance clean, but it’s also much easier to tap these elements from mobile devices.
And because more than 55% of people online use hand-held devices for browsing the web, it’s vastly important to make mobile a priority in designs.
Go to the Appearance section and click, “Menus.”

Change the menu you want to edit by using the drop-down box. This will depend on where you want to place the links. It will also depend on the theme you’re using and whether you’ve created custom menus in the past.
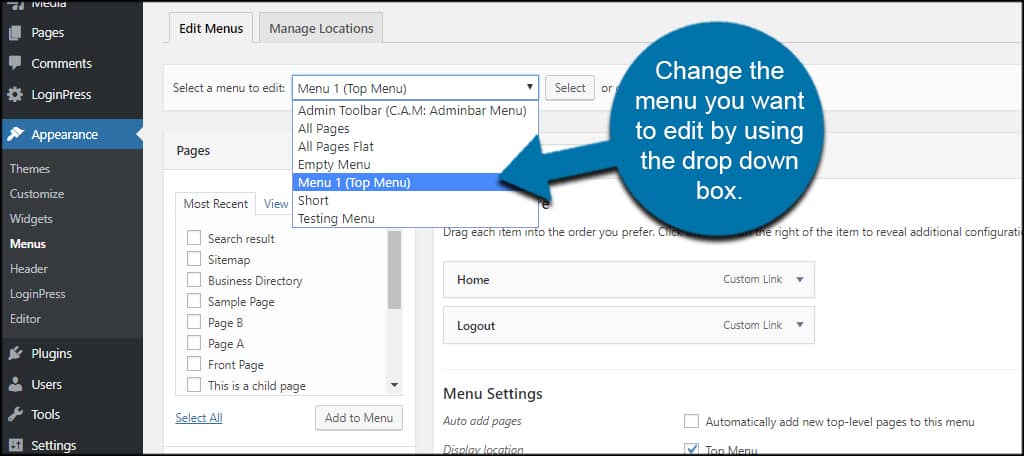
If you only have one menu available, then you really don’t need to do anything. You can skip to adding the custom links.
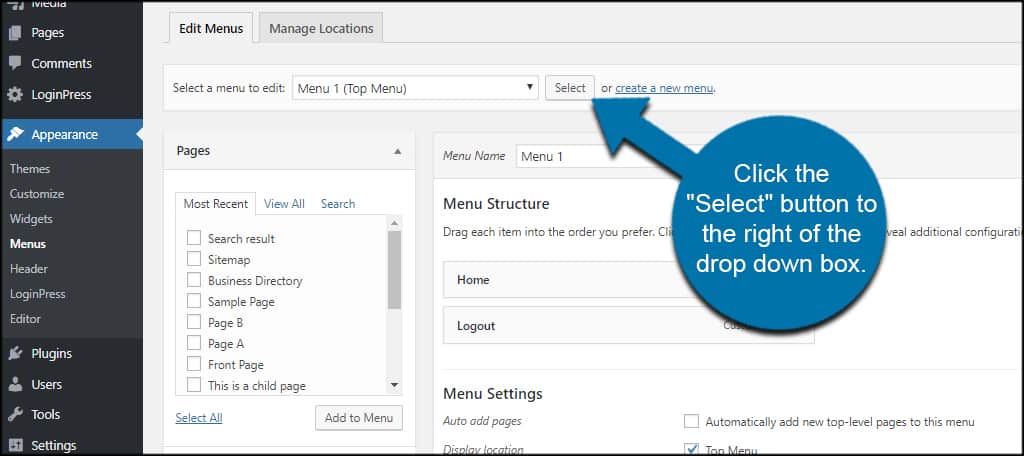
Click the “Select” button to the right of the drop-down box.
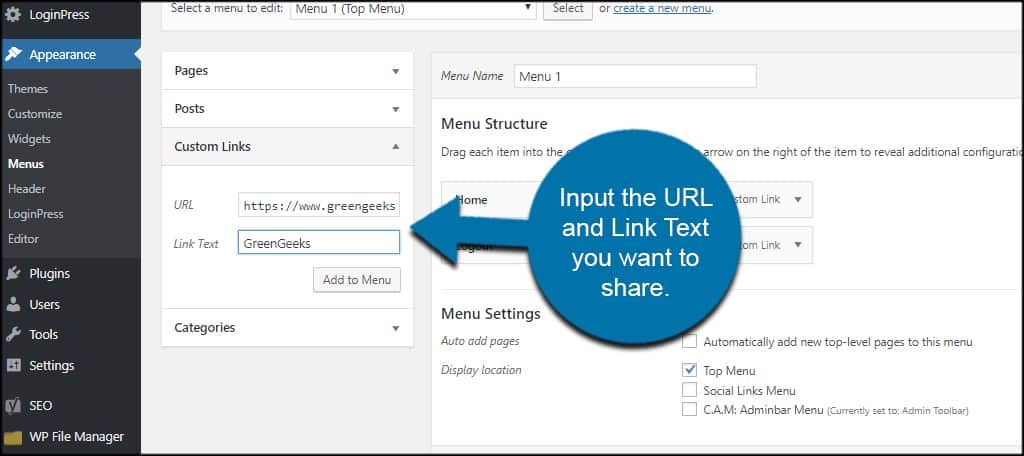
Click to expand “Custom Links” on the left.

Input the URL and Link Text you want to share.
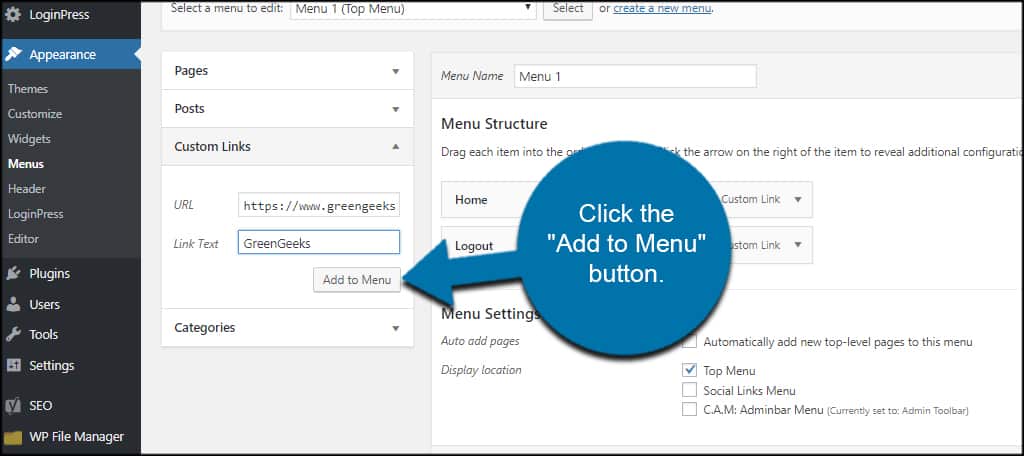
Click the “Add to Menu” button.
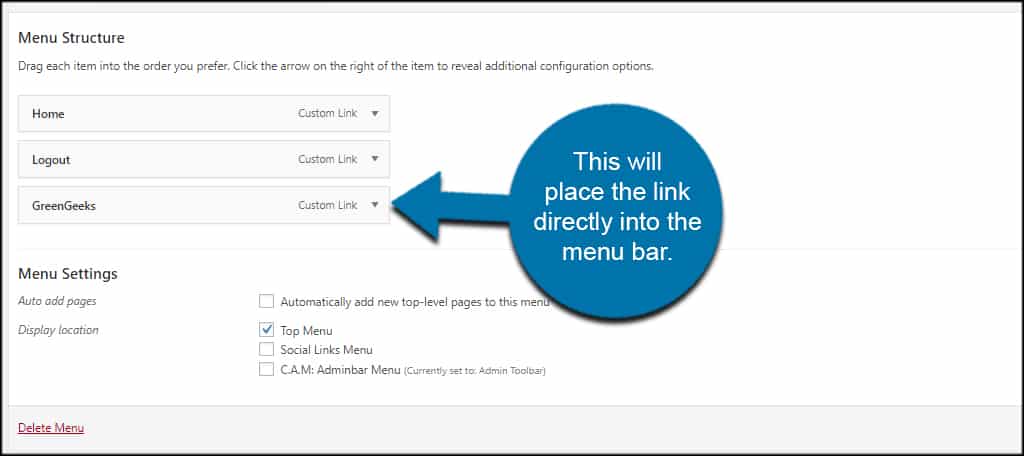
This will place the link directly into the menu bar. But what if you want to show a list? You can quickly fill the menu bar to the point where it looks ugly and unappealing.
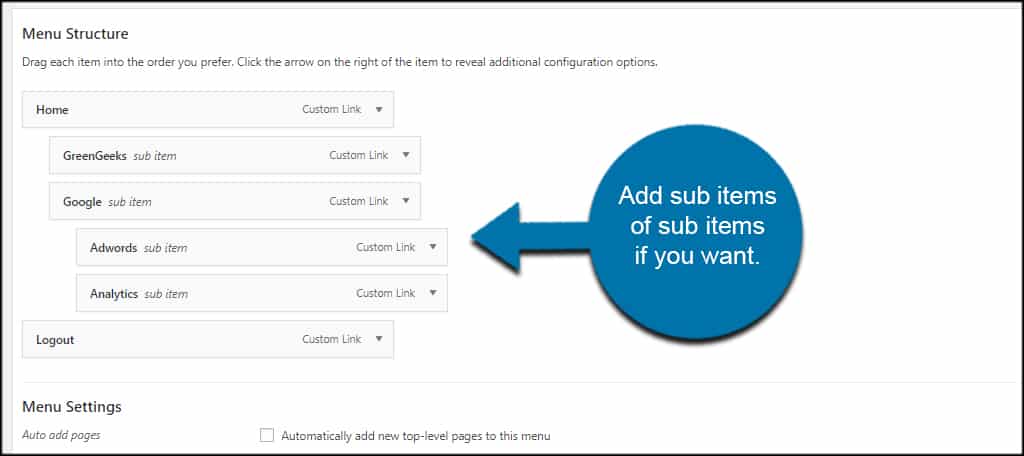
Drag and drop the link to create a sub item.

You can create as many sub items as you’d like to share all the links you want visitors to see. In fact, you can add sub-items of sub items if you want further organization.
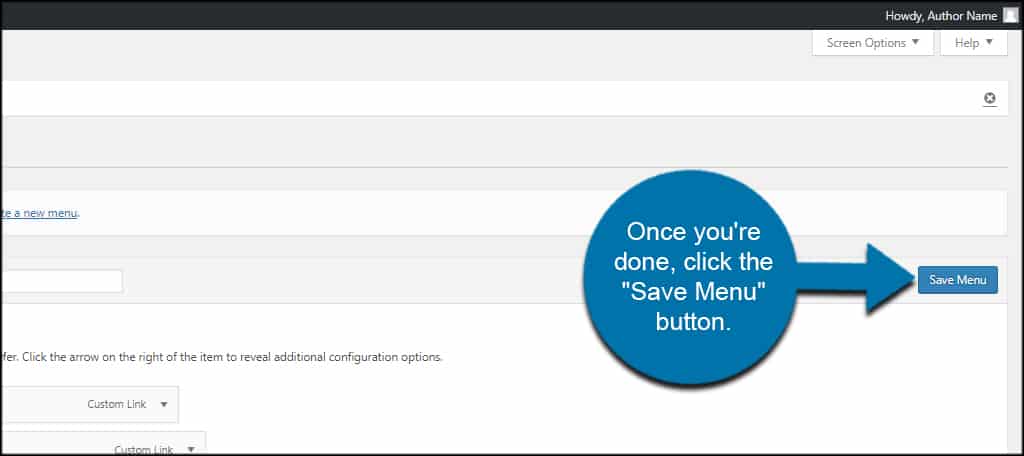
Once you’re done, click the “Save Menu” button.
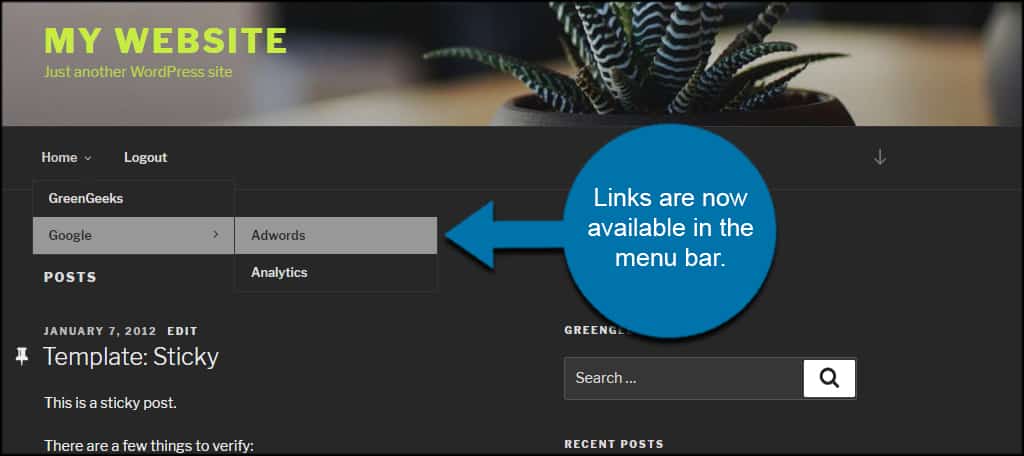
Links are now available in the menu bar.
Using HTML or Text Widgets
Another easy method to add and organize is to use a WordPress links widget. You can do this with either the HTML or Text widgets available within the system.
For this tutorial, I’ll use the HTML widget.
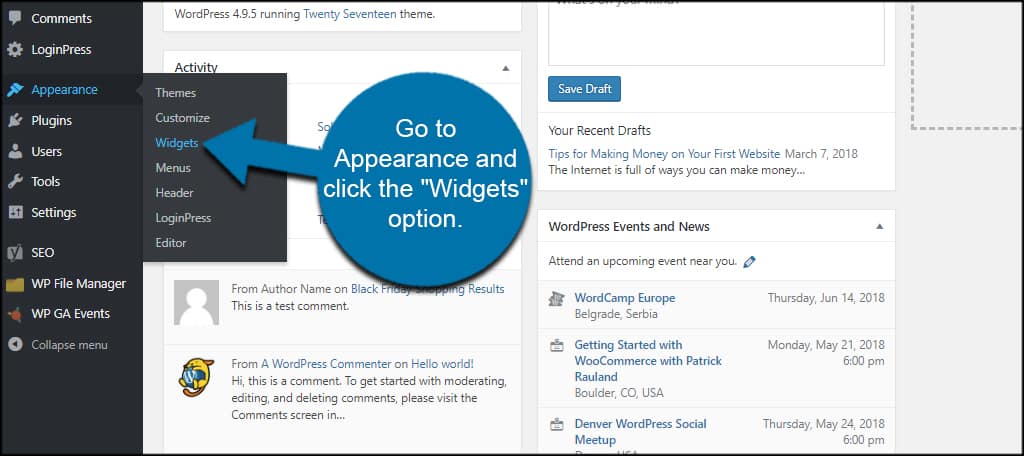
Go to Appearance and click the “Widgets” option.
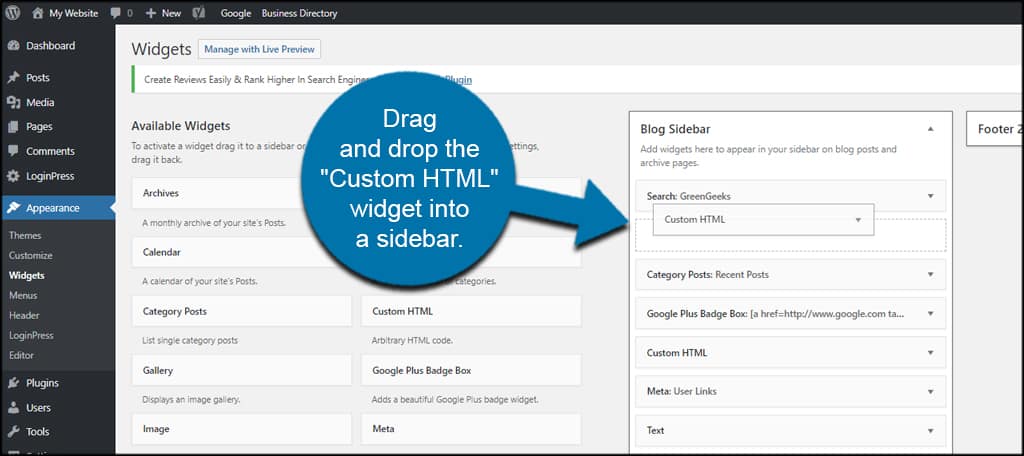
Drag and drop the “Custom HTML” widget into a sidebar. This can be any sidebar you like, and you might be limited by the theme you’re currently using.
Add the HTML of your link to the content field.
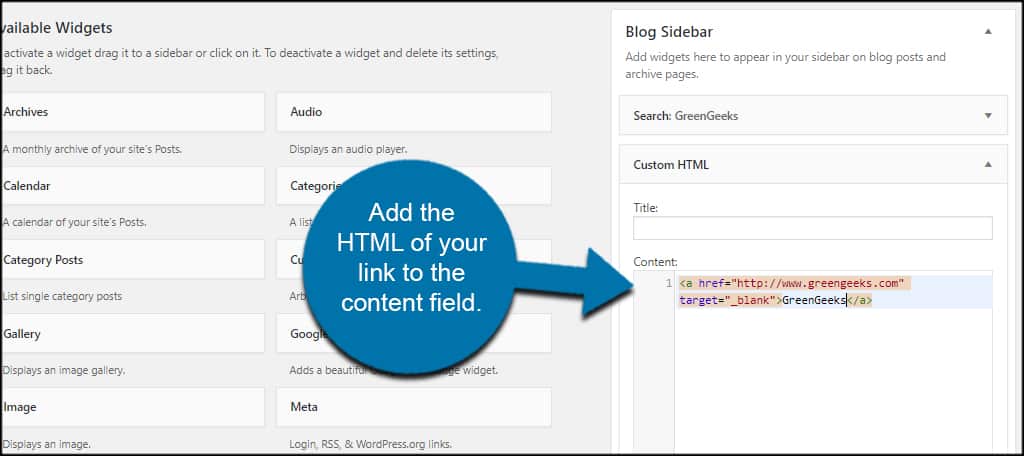
The coding for a link is:[ht_message mstyle=”info” title=”” show_icon=”” id=”” class=”” style=”” ]<a href=”https://ggexample.com” target=”_blank”>YourWebsite</a>[/ht_message]
Replace “ggexample.com” with your own URL and site name.
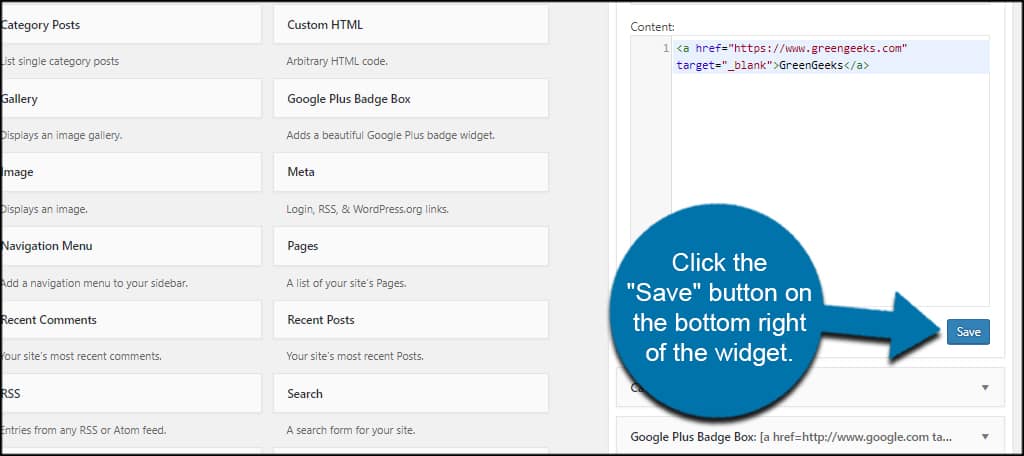
Click the “Save” button on the bottom right of the widget.
You can add as many links as you’d like. However, you want to make sure they are relevant to your site’s content. Otherwise, Google may penalize your site by dropping your page ranking.
Using the Link Library Plugin
What if you want to organize your WordPress links in a blogroll using a page or other display? That’s when you’ll have to sift through the plugins available.
Today, I’ll go over a bit of what the Link Library plugin can do for you. It’s a flexible tool that includes customization options and shows RSS feeds of links if any are available.
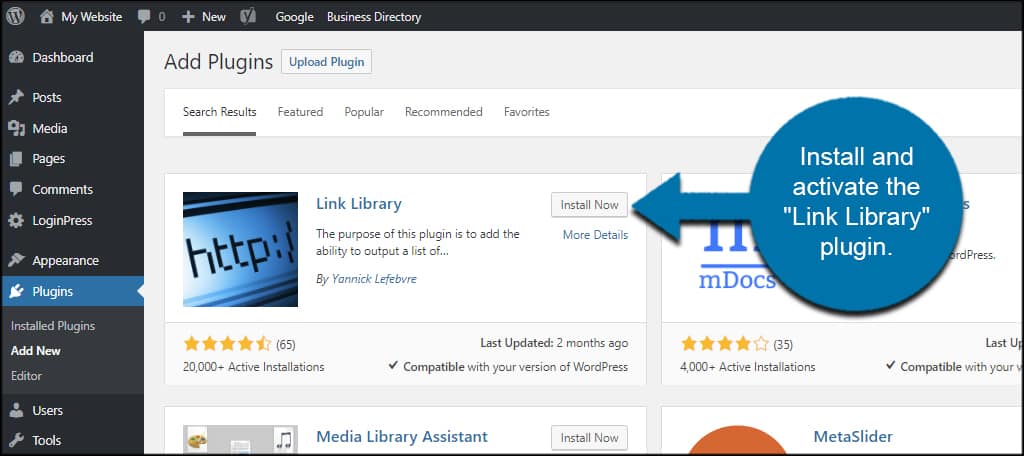
Install and activate the “Link Library” plugin.
Setting Up Link Library
Before displaying links in WordPress, you’ll need to set up your custom options in Link Library. This has a lot of things you can adjust to produce the perfect layout for your website.
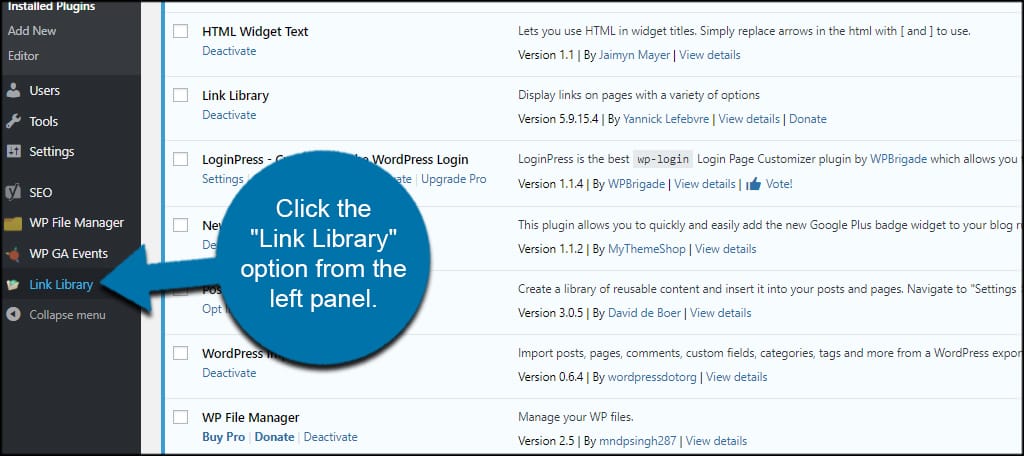
Click the “Link Library” option from the left panel.
- General Options
Here, you can select custom roles to manage the library, enabling reCAPTCHA for user submissions, and how the thumbnail generator works. - Library Settings
In this section, you manage how the library behaves. You can change how everything from pop-ups to the RSS feed is displayed. It is here that you also copy the shortcodes to use in a page to display WordPress links. - Moderate
In the Moderate area, you can approve or delete link submissions if you choose to allow others to add links. - Stylesheet
If you’re good at using CSS, you can make custom adjustments in the Stylesheet section. From here, you can modify anything from font size to colors. - Reciprocal Check
Reciprocal links are those created by two website developers who link to each other’s site. Here, you have a button to check for those links and the option to automatically delete them if a 403 error is given. You can also check for broken and duplicate links from this tool.
The settings may take a bit of time to customize as there are a ton of options. However, it’s worth the effort to create a layout that is ideal for your site.
Adding Links
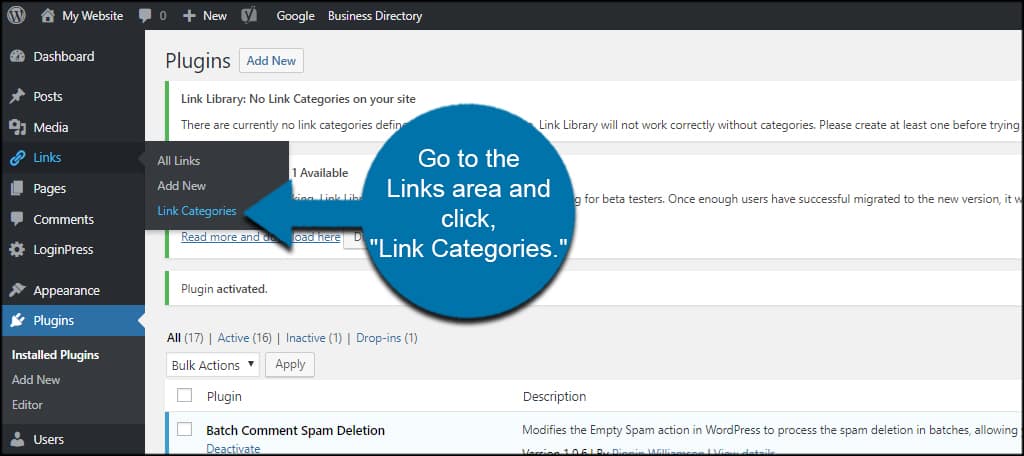
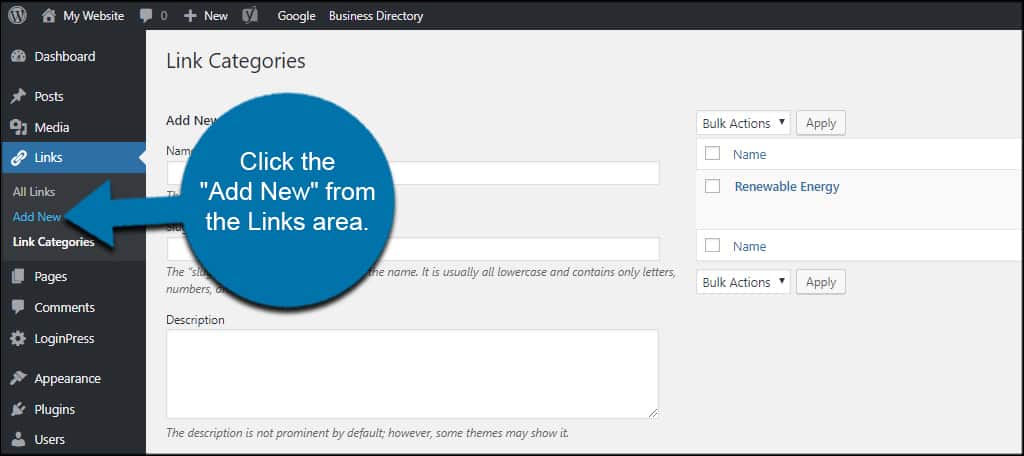
First, you’ll need categories for your links. This is how Link Library helps organize your material. Go to the Links area and click, “Link Categories.”
These categories are similar to the ones you may create in WordPress. However, they are completely separate from posts.
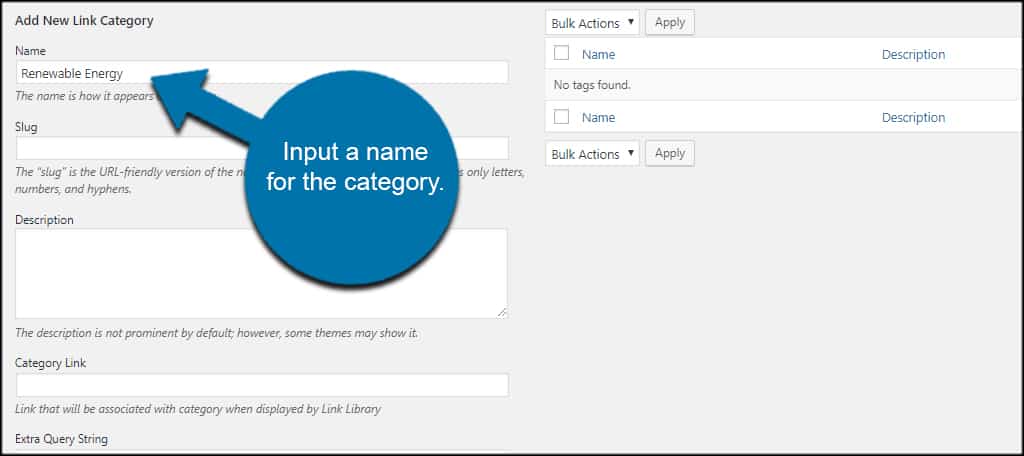
Input a name for the category. This will depend on what you want to offer on your site.
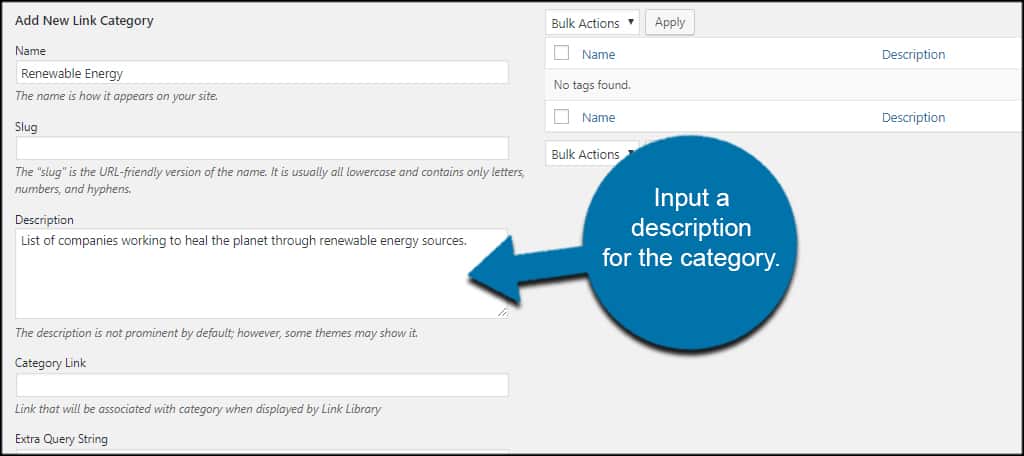
Input a description for the category. This is optional, and you don’t need to include the description. It simply helps visitors and yourself know what the links are relating to.
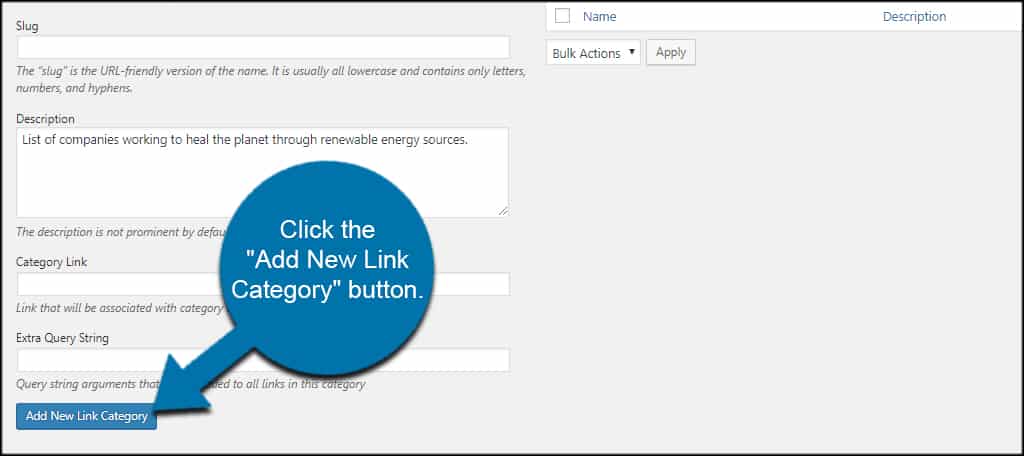
Elements like Slug, Category Link and Extra Query String will be created automatically by WordPress when you save. However, you can customize these if you want the options set up a specific way.
For this tutorial, I’m just going to leave them blank and let WordPress assign the values.
Click the “Add New Link Category” button.
Once the category is built, click the “Add New” from the Links area.
You can also create new categories on the fly when setting up new links. It’s kind of like how you can add new categories to posts when creating them.
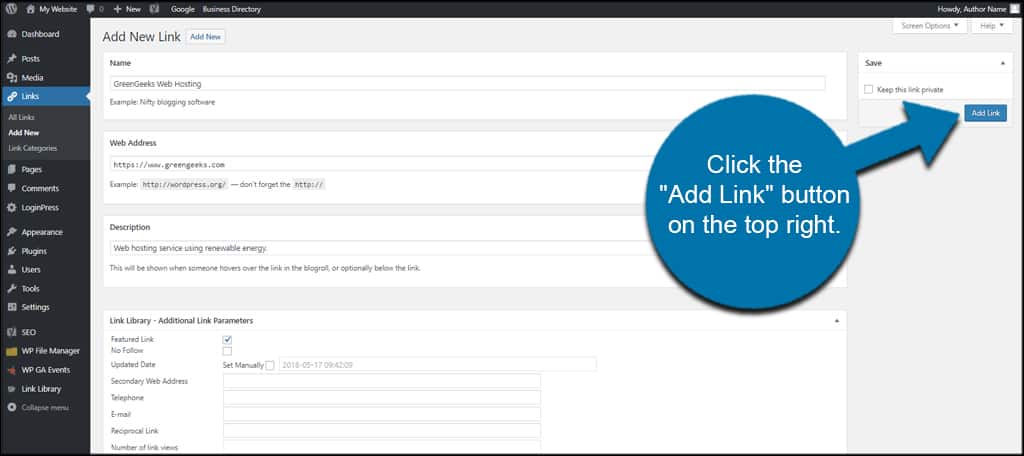
Input the information for the link. This includes name, web address, a short description and other information.
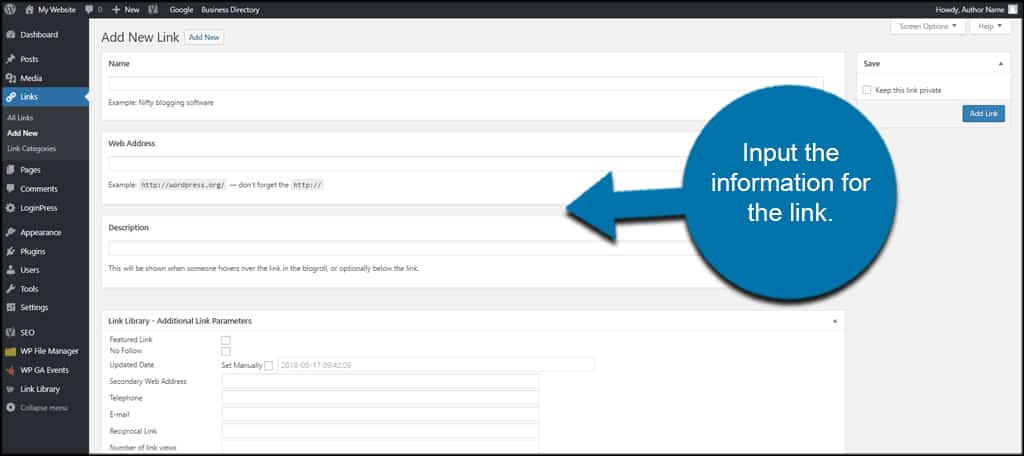
You can add things like the RSS feed’s address, logo images, notes and even a rating on each link.
Just don’t forget to assign a category. Otherwise, the link will not show.
When you’re done making your changes, click the “Add Link” button on the top right.
Adding the Links to a Page
Now that your settings and links are ready, it’s time to show them on the site. And the Link Library plugin makes it easy.
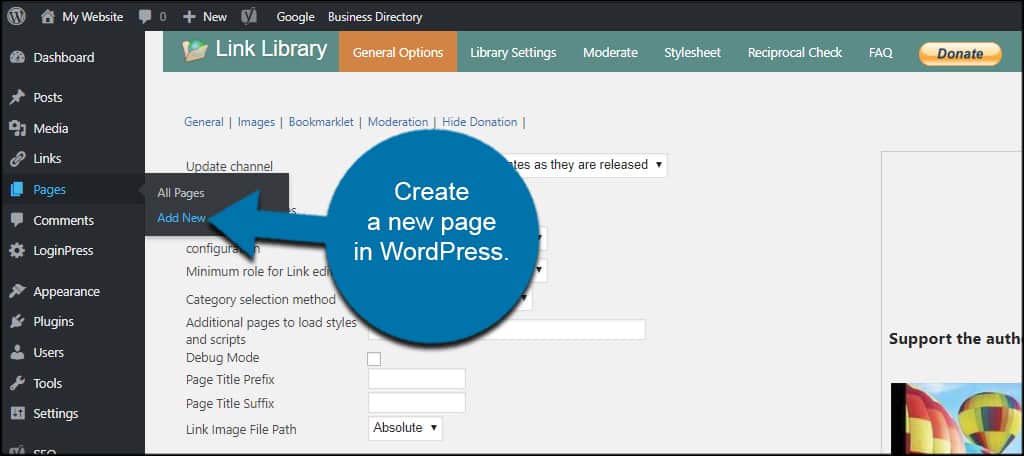
Create a new page in WordPress.
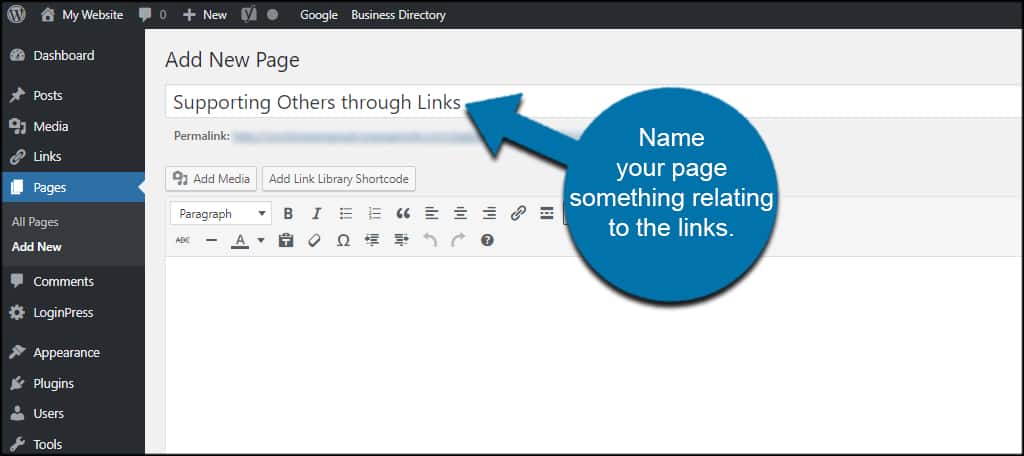
Name your page something relating to the links. It can be anything you like, but make it something obvious for visitors.
Place the cursor where you want the links and click the “Add Link Library Shortcode” button. This button is available in both Visual and Text editors of WordPress.
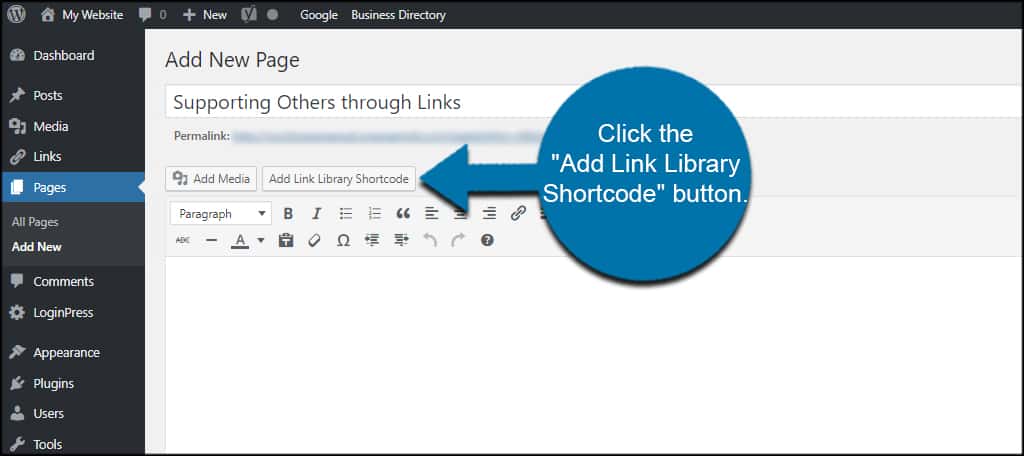
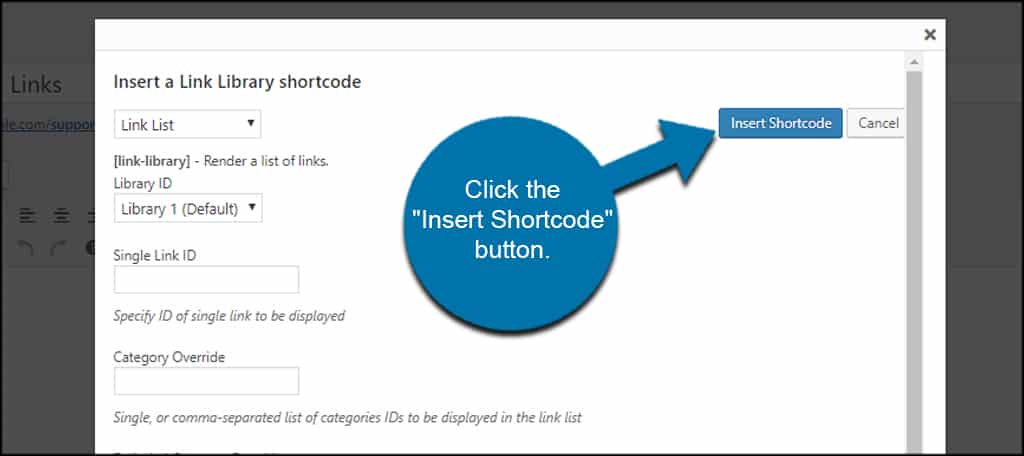
A new window will show where you can select various options for the library. This includes overriding categories, excluding elements and options to make it unique from what you have in the settings screen.
This way, you can customize more than one library to show visitors while using separate data.
When you’re done, click the “Insert Shortcode” button. I’m going to keep my list simple and leave everything as default according to the plugin’s settings screen.
Click the “Publish” button and your page is ready to go.
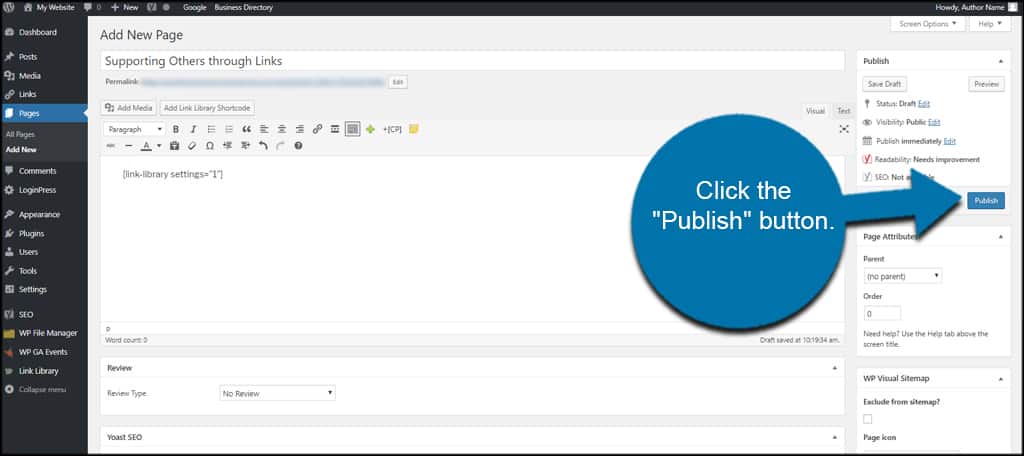
I would suggest adding a page like this to your menu bar or linked from a sidebar. It makes it easier for visitors to find.
Organize Your WordPress Links
Keeping any content on your website organized is ideal. In fact, WordPress gives you a myriad of methods for keeping the site clean ranging from links to images. Even though the “blogroll” itself is gone, you can still create a similar effect on your site.
What links would you share in a blogroll? How often do you display external links from your WordPress website?