Git is a vast open source network with a ton of stuff to learn. If you are new to Git and don’t quite know how to start, then view the steps below that cover how to manage a Git repository.
Managing a Git repository comes with several aspects. Create a project, add files, commit modifications and upload them in the remote repository at GitHub are all things you will need to know to be able to manage your Git repository.
Create and Manage a Git Repository
The first thing you need to do is generate an SSH key. GitHub has some very detailed instructions on how to do this for MAC OS, Windows and Linux systems. You must have at least one SSH public key to push your git repository to GitHub
Once you have generated the SSH key you need to add it through the GitHub interface.
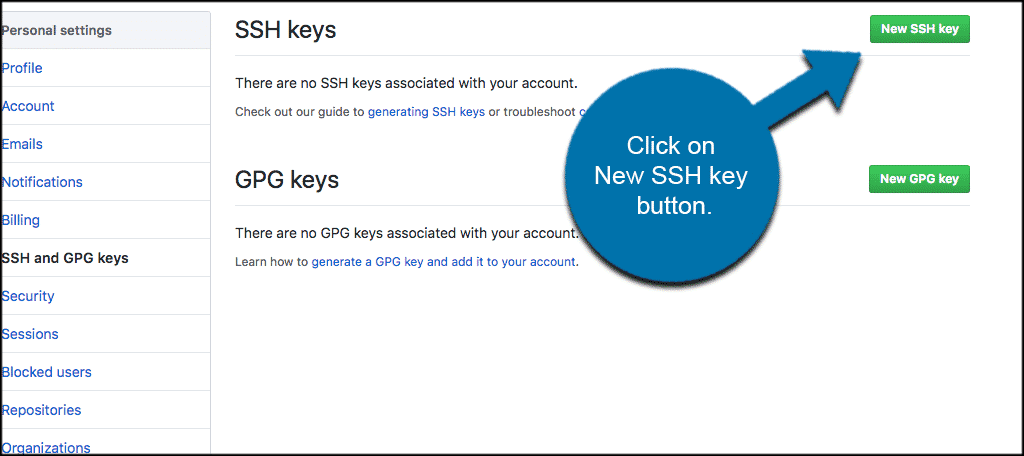
Click on the Settings page for your account, then on the SSH and GPG Keys section. On that page, click the “New SSH key” button.

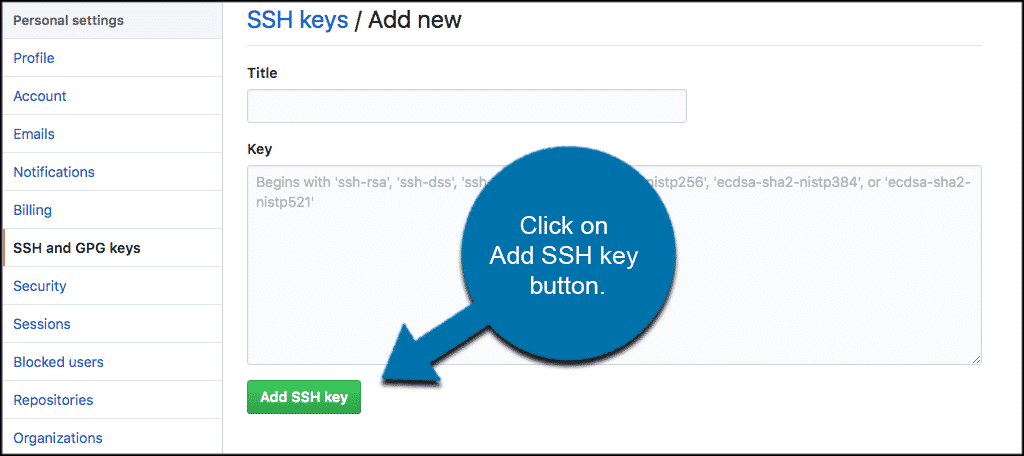
After you have clicked on the New SSH key button a panel will appear in which you should then input a Title for the key and the private key itself. Once done, press the “Add SSH key” button.

Once you have added the SSH key you are ready to open a new Terminal window on your computer.
You should create a new folder to develop and manage the repository. This can be done by using the following command:[ht_message mstyle=”info” title=”” show_icon=”” id=”” class=”” style=”” ]user@user [~]# mkdir GIT[/ht_message]
That command will create a folder named “GIT” in the current working directory. You can then access that folder with:[ht_message mstyle=”info” title=”” show_icon=”” id=”” class=”” style=”” ]user@user [~/GIT]# git init
Initialized empty Git repository in /home/username/GIT/.git/[/ht_message]
You should also create files and folders for your git repository. For example, to create a README file use the following command:[ht_message mstyle=”info” title=”” show_icon=”” id=”” class=”” style=”” ]user@user [~/GIT]# touch README[/ht_message]
That command will create an empty file named “README” in the Git repository folder.
That being said, this does not automatically add the file to the Git repository. You can compare the list of files in the actual Git repository and the list of current files you have created with this command:[ht_message mstyle=”info” title=”” show_icon=”” id=”” class=”” style=”” ]user@user [~/GIT]# git status
On branch master
Initial commit
Untracked files:
(use “git add <file>…” to include in what will be committed)
README
nothing added to commit but untracked files present (use “git add” to track)[/ht_message]
The above command shows that you have a file named “README” that is present in the folder, but is not added to Git repository. So now, you need to add the file to the Git repository index. Do this by using the following command:[ht_message mstyle=”info” title=”” show_icon=”” id=”” class=”” style=”” ]user@user [~/GIT]# git add README[/ht_message]
Now you can compare again the list of files in the actual Git repository and the list of current files you have created:[ht_message mstyle=”info” title=”” show_icon=”” id=”” class=”” style=”” ]
user@user [~/GIT]# git status
On branch master
Initial commit
Changes to be committed:
(use “git rm –cached <file>…” to unstage)
new file: README[/ht_message]
As you can see, the file is now added to the repository index and now you need to commit it.
By committing a file, you add it to the actual repository. Committing is used when you create new files or modify existing ones and want to “push” your changes to the repository.
You can commit the README file by using the following command:[ht_message mstyle=”info” title=”” show_icon=”” id=”” class=”” style=”” ]user@user [~/GIT]# git commit -m ‘first commit’
[master (root-commit) e2a16e0] first commit
1 file changed, 0 insertions(+), 0 deletions(-)
create mode 100644 README[/ht_message]
where “-m ‘first commit'” is a comment that is left in the repository history. Using commits you can describe the changes that are made to the repository files. This will help you better understand and follow the development of your project over time.
Now, if you check the status of the Git repository, you will see there are no new changes to commit. Do that like this:[ht_message mstyle=”info” title=”” show_icon=”” id=”” class=”” style=”” ]user@user [~/GIT]# git status
On branch master
nothing to commit, working directory clean[/ht_message]
Remember, all of these changes were done to a local repository on your machine. If you want to push them to the remote Git repository that you have on GitHub, then you first need to add the repository on your machine with the following command:[ht_message mstyle=”info” title=”” show_icon=”” id=”” class=”” style=”” ]user@user [~/GIT]# git remote add origin [email protected]:your_username/name_of_your_repo.git[/ht_message]
Please remember to replace your_username and name_of_your_repo with your actual GitHub username and the name of your repository.
The command will “link” the two repositories, so any changes made to the local one can be pushed to the remote one at GitHub.
Finally, to push the changes to the GitHub repository you use this command:[ht_message mstyle=”info” title=”” show_icon=”” id=”” class=”” style=”” ]user@user [~/GIT]# git push origin master
Counting objects: 3, done.
Writing objects: 100% (3/3), 207 bytes, done. Total 3 (delta 0),
reused 0 (delta 0) To [email protected]:user/test.git * [new branch] master -> master[/ht_message]
Now, if completed properly you can access the GitHub repository and see the README file there.
