In no uncertain terms, the featured image in WordPress is one of the most important aspects of any post, which makes selecting the proper size essential for success. It is often the first thing a visitor will see when searching for a topic.
If the image looks bad, it will have a direct impact on the amount of traffic you receive. It is essentially a billboard for your content with the goal of grabbing a reader’s attention. That’s why so much effort goes into them.
In most cases, the biggest mistake beginners make is not selecting the right size for their post thumbnail in WordPress. Even if you have a great image, it will look bad if the sizing is off.
In fact, you might be cutting out key parts of the image, or making any text hard to read.
Thus, if you really want to succeed on WordPress, you are going to need to learn how to change the featured image size.
What Is A Featured Image?
A featured image is an image that represents your post or page content.
The featured image will be the first thing visible after the title and is also visible when selecting a post or page from a directory or search engine. Thus, it has a direct effect on the traffic to your site.
It is often called the header image and is used by WordPress to create thumbnails, so the naming can change.
The featured image will appear in multiple locations outside of its original post or page. For instance, it can appear on your homepage if you showcase the newest or most popular posts or your website’s search results.
It will also appear front and center when you share that post or page on social media platforms. As you can imagine, due to how often the image is seen, it is critical to make a good one.
One thing to keep in mind is that many featured image sizing options are dependent on the theme you choose. Each supports different image sizing options and you will need to consult the theme documentation to find the best options.
Thus, the header image size in WordPress is variable and not set in stone for every single website.
How to Set A Featured Image
Now, before you can go about changing a featured image’s size, you need to actually have a featured image. Let’s quickly cover how you will set a featured image in WordPress.
Step 1: Open A Post or Page
Simply open any post or page in WordPress. Alternatively, you can create a new one.
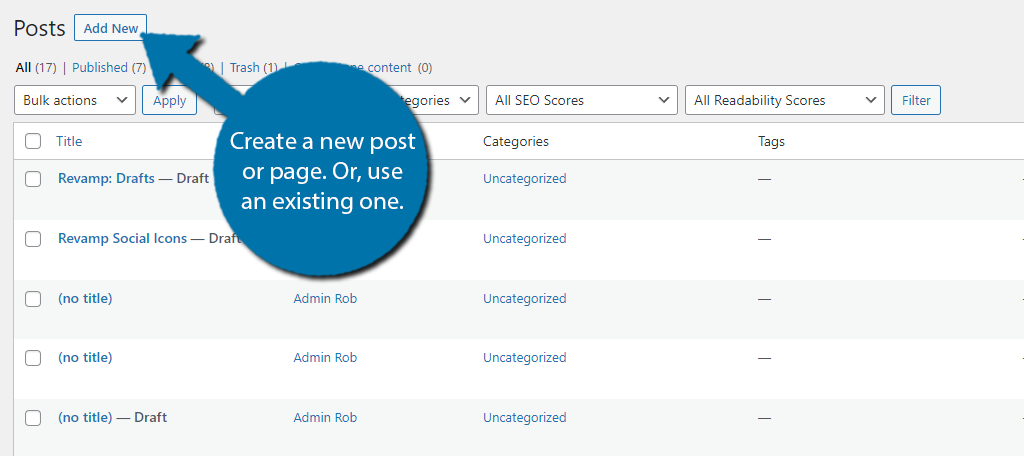
Note: The process is identical for both pages and posts.
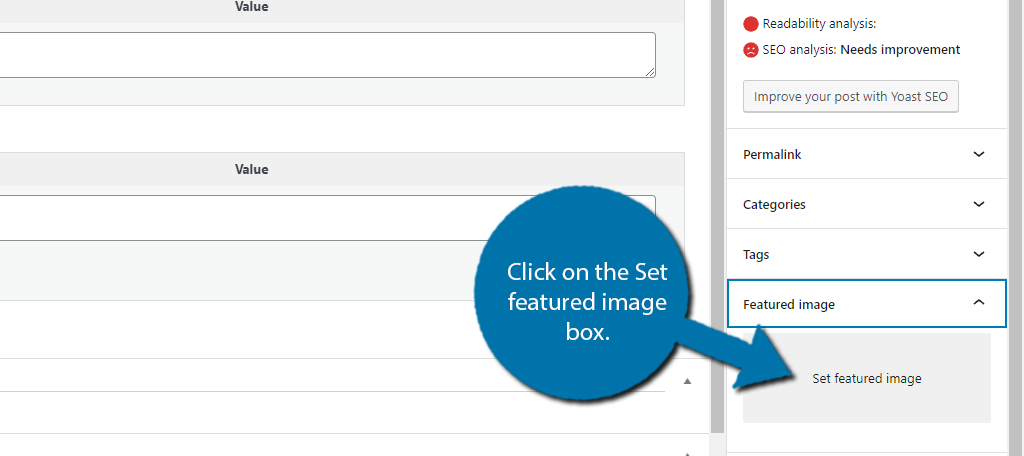
Step 2: Locate the Featured Image Section
By default, when you create a new post or page, the settings wheel should be open and visible on the right-hand side. If it is not, click on the settings wheel to open it.
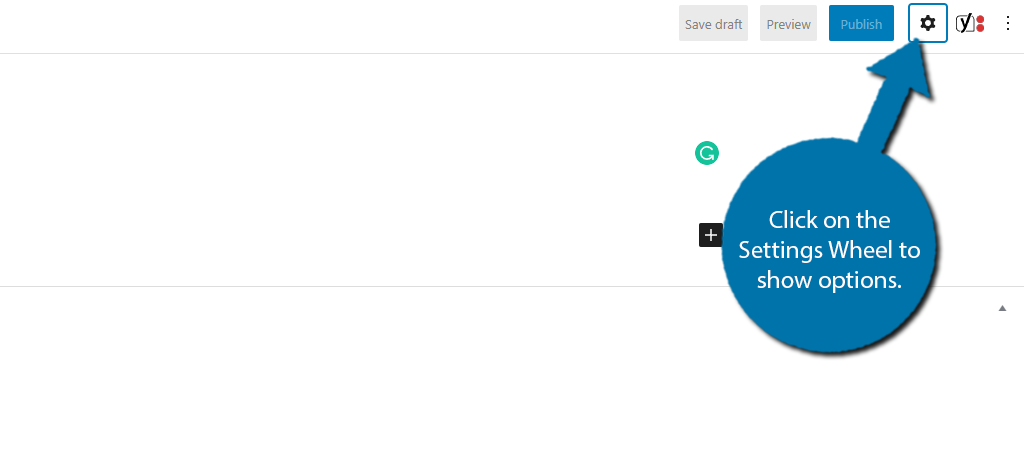
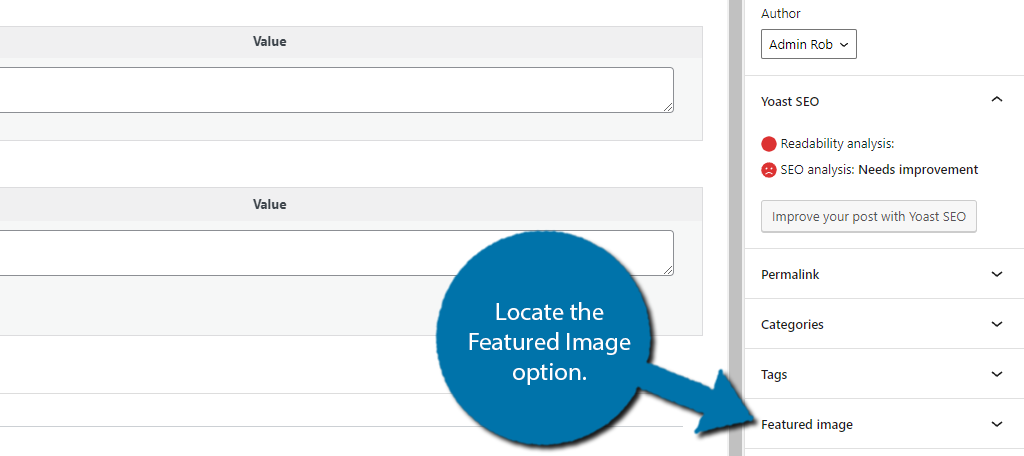
Locate the Featured Image option and click it to expand.
Step 3: Set the Featured Image
Click on the Set featured image box.
This will open up the media library. Select the image you want to use. You will see options to configure the image. You can add Alt Text, Title, Caption, and Description in them.
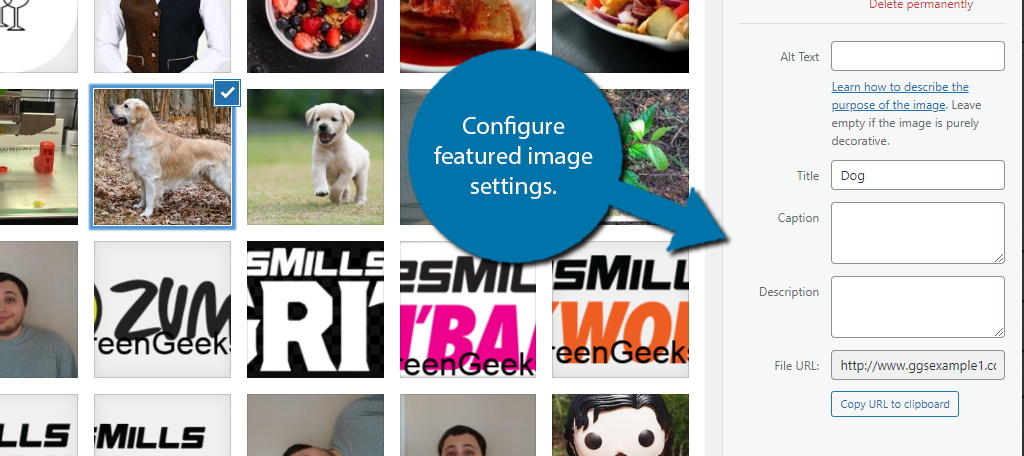
Just click on the “Set Featured Image” button and your image will be in place.
Did you notice what option was not available? There are no options to configure the size of your featured image. Let’s fix that.
How to Change the Featured Image Size in WordPress
Before going into this, I need to stress that the best size for a featured image depends on your theme. Every theme is unique; thus, you need to select the sizes based on what your theme recommends.
Not following what your theme advises could result in low-quality images that could appear blurry or cut off.
Method 1: Editing the Image in WordPress
So, there is actually an option to edit any image in your media library. You can find this when selecting the image.
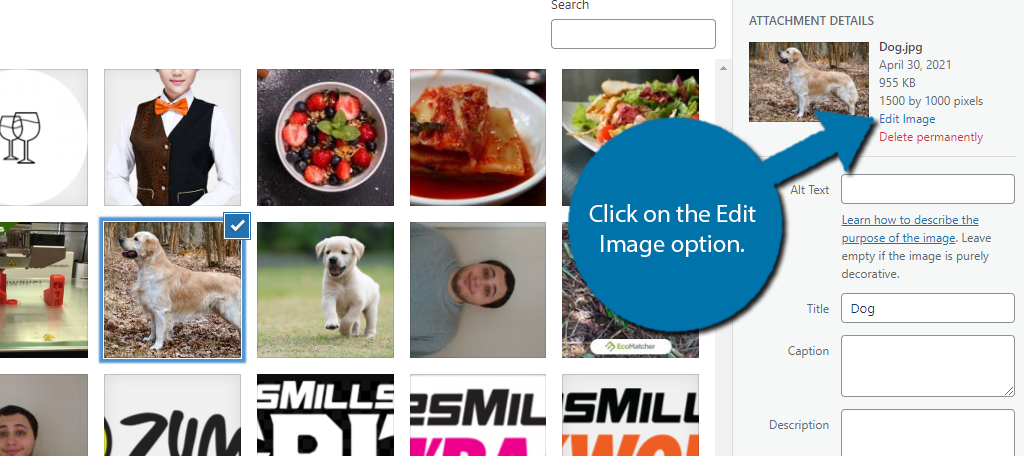
You have some pretty basic photo editing options that include cropping, rotating the image right or left, and flipping the image horizontally or vertically. More important, you can actually scale the image.
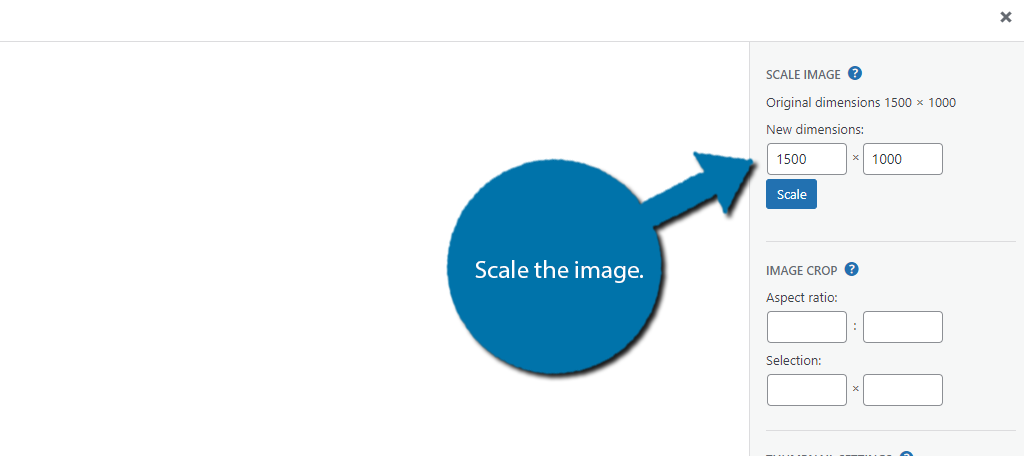
All you need to do is change the dimensions (in pixels) and click on the “Scale” button.
Now, in reality, this will only be effective in some situations. You see, this can drastically lower the quality and result in blurry images. It really depends on the original dimensions of the image and what you scale it to.
For this reason, most developers will ignore these options in WordPress and focus on using actual photo editing software like Photoshop, which is the next method.
Method 2: Properly Size the Image Before Uploading It
The Featured Image will appear at whatever size the original image was (theme permitting). Thus, one of the simplest ways to control its size is to use software like Photoshop and manually adjust it.
This even includes stock images, as you can put them into Photoshop and crop them to get the correct size without losing quality.
In general, most blogs will utilize Photoshop as it is the widely available photo editing software. There is also a wealth of tutorials that exist to demonstrate how to use it, which can help beginners.
If you don’t have the money for Photoshop, you can use a free online alternative such as Photopea. It works similarly to Photoshop and has many of the same functions and tools.
This also has another simple advantage, you can store the original image on your computer.
Throughout a website’s lifespan, it’s very possible that you will make several changes in relation to your images. This could be changing the size, the border, a specific graphic element, font, or something else.
Having the original available, allows you to edit it, then reupload it. This can save you from having to search for the same stock image again or create a new one from scratch.
Essentially, properly size it before uploading it, that way you can just place it and be done.
Method 3: Set the Featured Image Size In WordPress with PHP
Another, more complicated method, is to code the featured image size using PHP. Or more specifically, by adding some code to your theme’s functions.php file.
Now, I say more complicated loosely, because it really just boils down to copying and pasting a line of code and adding your own values to it. Thus, it’s not very hard.
Yet, it poses a bigger risk because if you make a typo, it can mess up your website.
Before proceeding, I strongly recommend making a backup. In fact, no matter what you do, you should create one.
A backup is an invaluable tool for developers as no matter what mistake occurs, you essentially have a get-out-of-jail-free card. And sometimes, it’s not even a mistake on your end that requires a backup.
In any event, all you need to do is locate your theme’s functions.php file, and paste the following line of code in it:
<?php
    set_post_thumbnail_size( $width, $height, $crop );
?>
This code is not ready for use as you must make a small change to it. The $width must be replaced with the width of your image in pixels. The $height must be replaced with the height of your image in pixels.
Lastly, the $crop option will crop the image to the specified width and height. If you want to enable this, enter True. Alternatively, you can either leave it blank or enter False.
Thus the code will look like this for a 100 x 100 image without cropping:
<?php
    set_post_thumbnail_size(100, 100, False );
?>
And that’s it. Save the changes and images you upload to your website after making this change will follow these rules.
Note: Since this code is in your theme’s functions.php file, if you change themes, you will have to add it again. Some themes may not support this function, thus, consult your theme documentation.
How to Change WordPress Image Sizes
Of course, featured images are not the only ones that exist in WordPress. There are actually four default image sizing types:
- Thumbnail size: 150×150 pixels
- Medium size: 300×300 pixels
- Large size: 1024×1024 pixels
- Full size: Original Image Size (No limit)
In fact, every time you upload an image to your media library, WordPress makes a copy of it using each of these sizes. Many developers actually take the time to disable this feature because it will eat up server space.
While these are the default image sizes in WordPress, they can be changed. This is important because sometimes these sizes don’t work well for a theme or for specific types of content.
For instance, the Thumbnail size may be too small for some websites, which could result in a blurry or hard-to-see image.
Let’s cover how to change the WordPress image size.
Step 1: Go to Media Settings
Click on Settings and select the Media option.
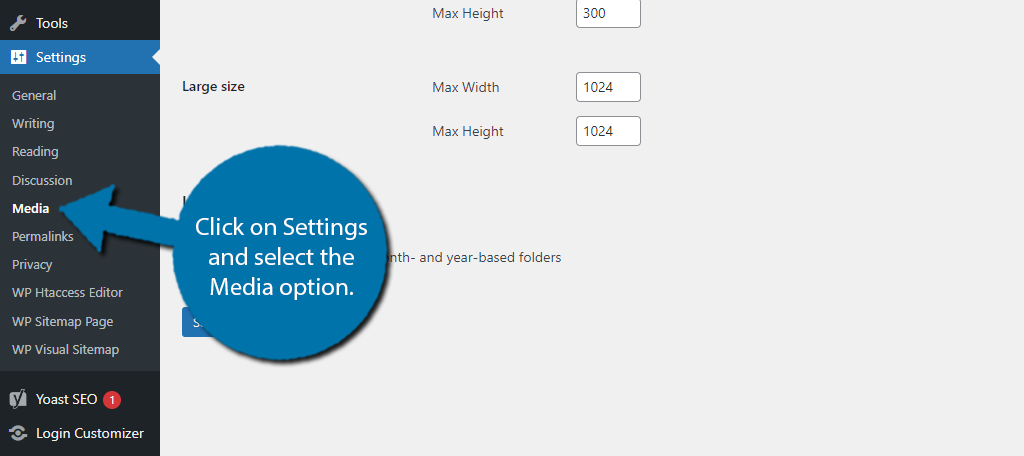
Step 2: Change the Default Image Sizes
This area contains the settings that allow you to customize the size of the three default image types. All this entails is changing the image dimensions, so it’s pretty straightforward.

Step 3: Save the Changes
After you have made the changes, all that you need to do is click on the “Save Changes” button at the bottom. Going forward, these will be the sizes your website will utilize.
Important Note: This will not change any of your existing image sizes. You will have to re-upload the image for it to have these sizing options, as WordPress only creates them upon an upload.
For this reason, determining what image sizes you will use should be one of the first things you do.
Optimize Your Featured Image for SEO
Going through all the effort to resize your featured image is completely pointless if no one ever sees it. Thus, you need to optimize the image for SEO.
So, how do you do this?
Well, the most important aspect is Alt Text. This is the text you can add to the image which describes what is happening.
For example, imagine an article about video games that include a featured image of two people playing games on a couch. Well, you would want the image to contain an alt text saying,” Two gamers playing video games on a couch.”
This accurately describes the image, while also including the keyword video games.
These clear descriptions do not just help search engines, they can also help visitors. If the internet connection is weak, especially important for mobile users, the images won’t load. Instead, the Alt Text will appear.
This can be beneficial as the visitor will have an idea of what the image was supposed to be.
Of course, while the focus here is on featured images, all images should get this treatment. It can dramatically improve your search engine rankings.
TL;DR: Describe your image and include the keyword in your featured images.
Featured Image Size in WordPress FAQ
You might have a few lingering questions, so let’s go through a few:
Do I Need to Set the Featured Image in WordPress?
No.
Truthfully, it is not required. In reality, WordPress will detect the first image in a post or page and set that as the featured image. While this is effective, it is less optimal than manually setting one.
In many cases, the image may not be flashy enough to capture a visitor’s attention. Or, it could just not reflect the topic.
Obviously, setting it yourself is a better option that I recommend, however, it is not required.
Are Featured Images Naturally Responsive?
In most cases, yes.
This completely depends on your theme, but virtually all modern WordPress themes are built to be responsive nowadays. It would actually be harder to find a theme that doesn’t do this by default than to find one that does.
That said, it is always recommended to test your website on various devices to confirm. It’s better to find a problem yourself than to let a visitor find it. In some cases, you may be unaware the problem exists.
Visitors do not always let you know.
What Is the Ideal Featured Image Size in WordPress?
It is completely theme-dependent. That said, generally speaking, 1200×628 pixels is a good size to satisfy most WordPress themes.
To really figure out what the best fit for your website would be, read through the theme documentation. If you purchased a premium theme, you can contact support to ask them for a recommendation.
You can also utilize plugin forums or Reddit to ask what others are using. Many developers are willing to help others.
Change Your WordPress Featured Image Size Today
WordPress is one of the most beginner-friendly CMS out there, and as you can see, changing the size of a featured image is pretty straightforward. Not only is it easy, but it’s also important.
The featured image you choose will be the first thing a visitor sees when loading a page. It needs to capture their attention, reflect the topic, and be optimized for SEO. If not, there’s a good chance that the post won’t do very well.
With this in mind, a good amount of time should be spent on every featured image you make for WordPress.
How long do you spend creating featured images in WordPress? Are you happy with the image size that appears in a search?