From time to time, it may become necessary to clone your WordPress website for a variety of reasons. Thankfully, there are several tools that can help you quickly clone and even store your website for you.
This will give you peace of mind and allow you to easily access and move this data to other storage mediums like an external HDD, or a cloud storage service for safekeeping. And luckily, these tools are easy to use.
As such, regardless of your skill level, anyone can clone their website with just a few clicks of the mouse by using the right tool.
Today, I will demonstrate three methods you can use to create a clone of your WordPress site today.
What Is A Clone and Why Should You Make One?
Cloning a website simply means duplicating its content. The cloned website will be identical to the original which gives you a lot of creative uses for it. The website and clone are independent of one another, thus changes to one do not affect the other.
Many people confuse a clone with a backup, but they are different. A backup can refer to copying a small amount of data from a site, while a clone copies everything. Thus, backups are more flexible, while clones are always everything.
Let’s take a look at a couple of examples of when you should create a clone of your website.
Creating a Staging Area
Perhaps you want to develop plugins, themes, or make modifications to the site in a testing environment. Instead of subjecting your primary site to the dangers of experimenting, the clone can be used as a WordPress staging environment.
Working as a WordPress Developer
Some WordPress developers create clones for clients. Once the website development is completed, it’s easy to clone the site to the client’s hosting service.
That provides a safe environment to make adjustments without fear of breaking a plugin or theme.
Creating a Backup
Creating a backup of your site can be useful.
For one thing, it makes it easy to recover in the event of a disaster such as a hacking or malware attack. The only downside to this is that you need to make regular clones to keep your backup files current.
Moving the Website to a New Host
Making a WordPress site move from one host to another can be a complicated process. Cloning the site gives you the opportunity to make the transition without impacting visitors. Ideally, from the visitor’s perspective, no one will even know a move took place.
Now you can understand why you may want to clone a WordPress site. Let’s take a look at how you can get it done in a few simple steps.
Method 1: Clone WordPress Using Softaculous
If you have cPanel and you used Softaculous to install WordPress, cloning a WordPress site couldn’t be easier. If not, refer to the next method.
It’s worth pointing out that if you have access to Softaculous but didn’t use it to install WordPress, you can still import your existing WordPress installation into Softaculous with just a few clicks.
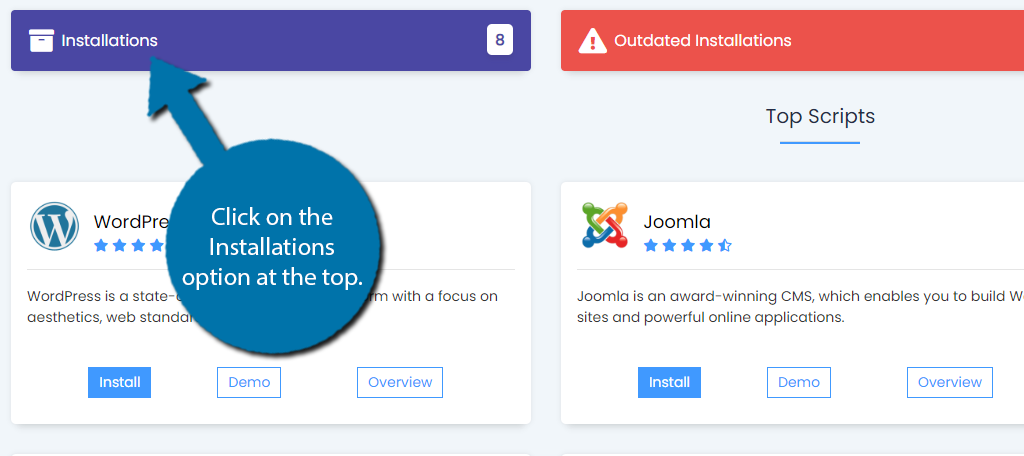
Step 1: Go to Softaculous Installations
Start off by logging into your web hosting account, going to the cPanel, and accessing the Softaculous app.
Click on the Installations option at the top.
Step 2: Use the Clone Option
This will pull up a list of all of your current installations from Softaculous. Locate the WordPress installation you would like to make a clone of and click on the Clone icon.
Note: There is also a Staging icon that works identically. The difference is that the staging icon allows you to push the clone to your live page. In this case, we are only using the Clone option.
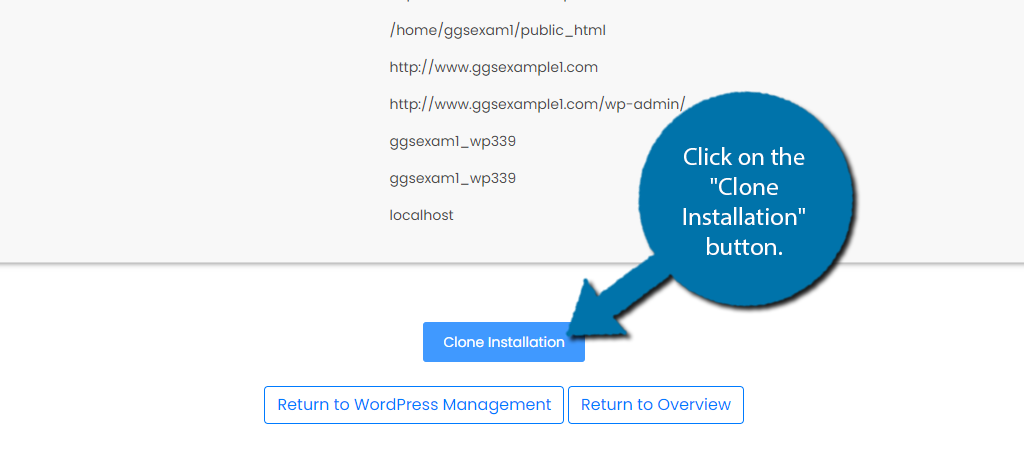
Step 3: Create the Clone
This will open the Cloning WordPress window. You can confirm that the correct installation is being used or select another if it is incorrect. Once everything looks good, click on the “Clone Installation” button at the bottom.
This will begin the cloning process, which should take 3-4 minutes depending on your site size. Once it is complete, you will see the following screen:

Method 2: Clone a WordPress Site Using a Plugin
For this method, we will use a popular clone and migration plugin called Duplicator, a WordPress migration plugin. There are several plugins that can clone WordPress sites, and I’ll list a few more options in a minute.
Duplicator creates two files from your WordPress site: an archive file and an installer file. The archive contains copies of your site data and MySQL database. The installer is a PHP file that will extract and install the archive in the new location.
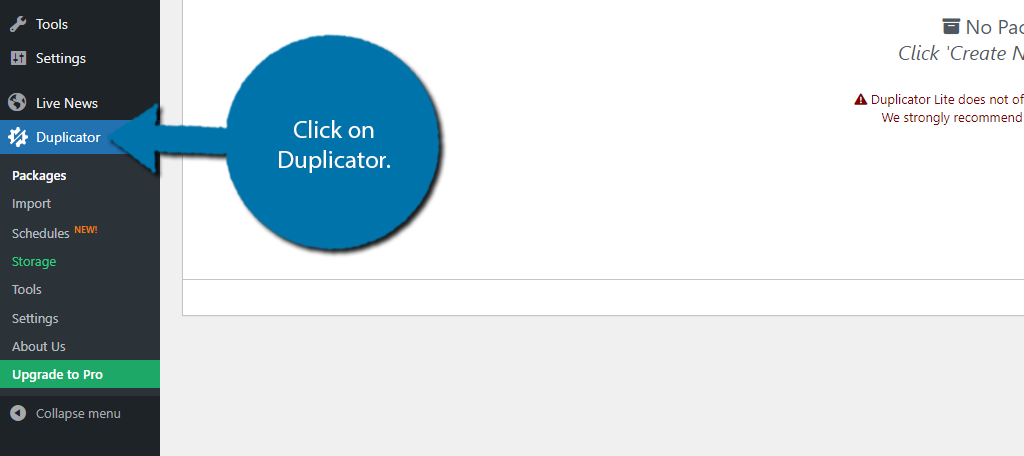
Here’s how you clone a WordPress site using the Duplicator plugin.
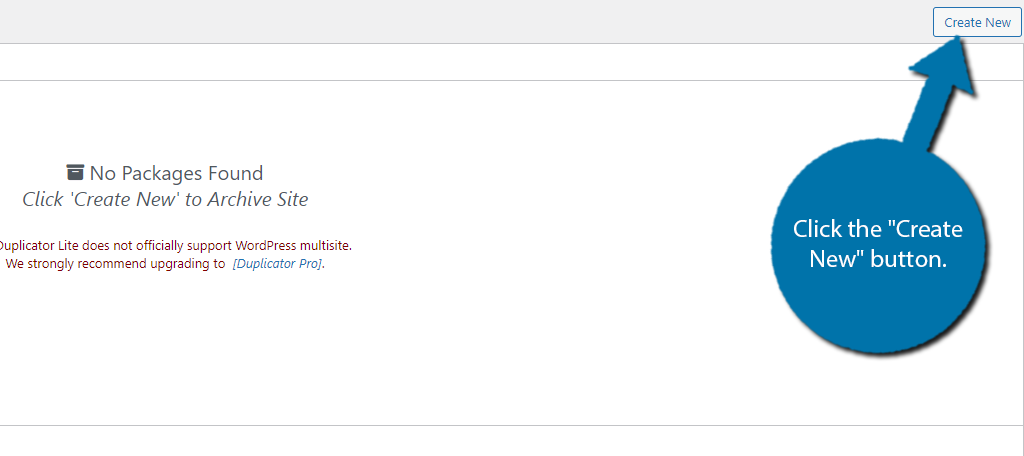
The first thing you want to do is install and activate the Duplicator plugin on your site. Once the plugin has been installed and activated on your site click on Duplicator.
Click the “Create New” button to get started.
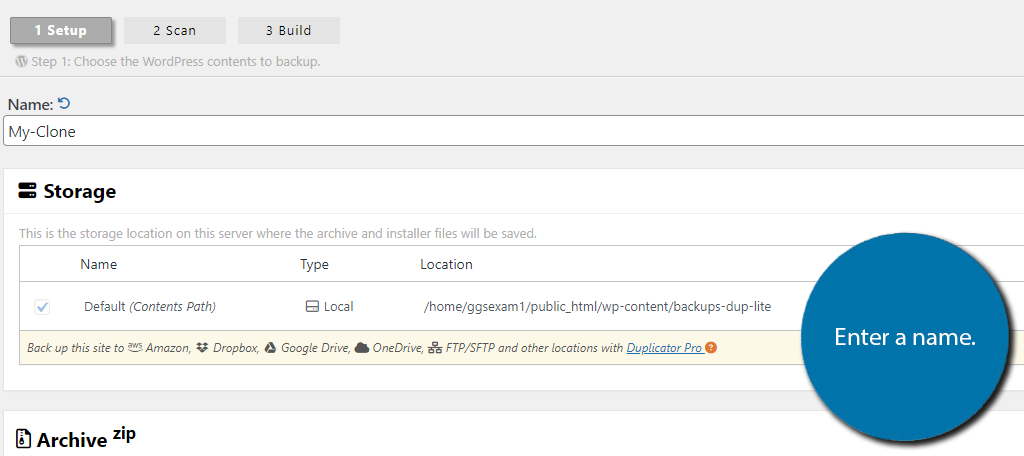
Enter a name for the file to help you identify it and click the “Next” button.
The Duplicator WordPress clone plugin will scan the site and let you know if there are any issues with your settings. It’s normal to get warnings, especially since everyone is using different versions of WordPress, PHP, etc.
There may also be some web host warnings based on the size of your site. Click the “Build” button to keep going.
This process may take several minutes depending on the size of your website. When your website package has been completed, you will see the page below and receive links to download two files: the Installer and the Archive.
Simply download each one and you are good to go.
Other WordPress Clone Plugin Options
If you are interested in other WordPress clone plugin options, here are a few more to look into and consider. They all get the job done, it’s just a matter of preference.
UpdraftPlus
UpdraftPlus makes WordPress backups and restoration very simple and easy. It is actually the highest-ranking and most popular backup plugin in the WordPress repository. You can create a full backup, which is the same as a clone of your website.
It’s worth pointing out that this tool allows you to upload them directly to cloud storage services. Restoring the backup is also a very easy process, so this is a great tool for many websites, which is why it has over 3 million active installs.
All-in-One WP Migration
All-in-One WP Migration easily exports your WordPress website and database without needing a lot of technical knowledge. You can upload your WordPress site to a different location using a drag-and-drop technique.
This plugin also has a “find and replace” option that will automatically fix any problems that occur while using the plugin.
WP-Migrate Lite
WP Migrate Lite is just a solid as anything else mentioned above. You can export your database as a MySQL data dump (much like phpMyAdmin), do a find and replace on URLs and file paths, handle serialized data, and then save it to your computer as an SQL file.
Method 3: Using Your Hosting Account
Many web hosts provide a variety of additional tools that customers can take advantage of. At GreenGeeks, we offer simpler solutions than many others and add a staging area directly from your account desktop.
You may have the option to create a clone directly through these options, but it is entirely dependent on your web host.
If your web host does not offer these features, it might be time to switch to a better one.
Note: Even if your web host does support this feature, how you access it may be different.
Step 1: Locate the Staging Option
The first thing you need to do is actually find the option. Begin by logging into your web hosting account. Once there, click on the Hosting option.
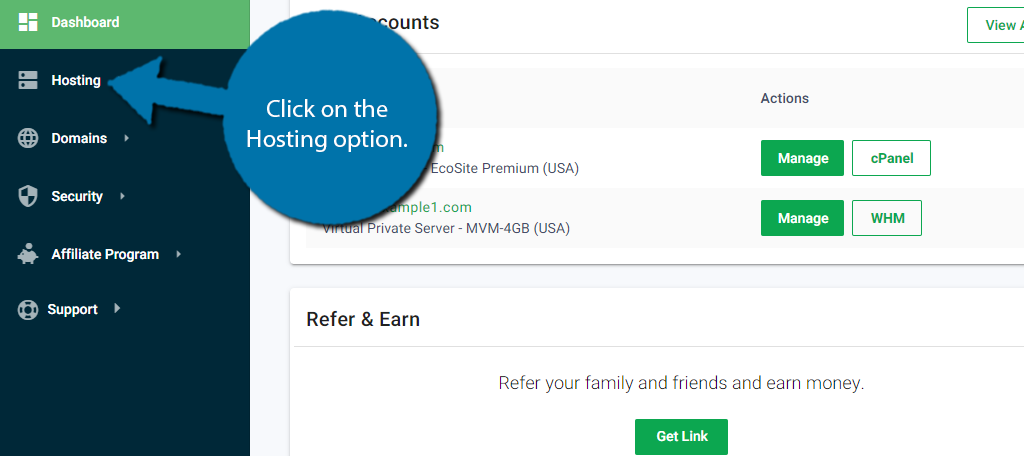
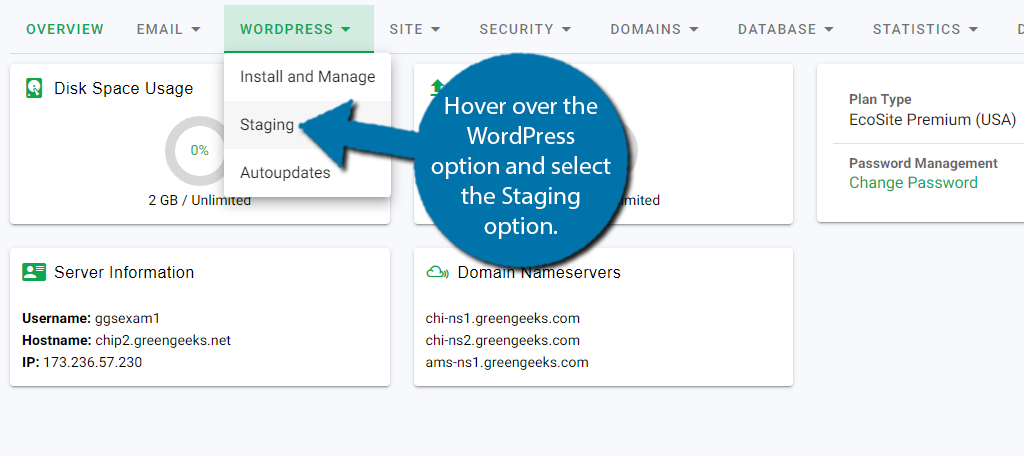
Click on the domain you want to clone. After that, hover over the WordPress option and select the Staging option.
Step 2: Create A Staging Environment (Clone)
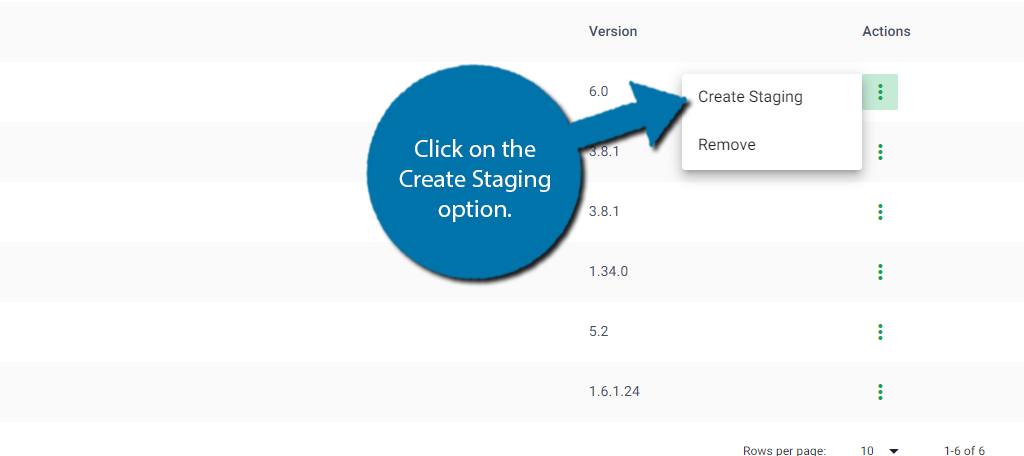
You’ll now see a full list of the domain and all of the subdomains. This even includes the ones that do not have WordPress installed on them. Locate the one you want to clone and click on the three verticle dots on the right of it.
Click on the Create Staging option.
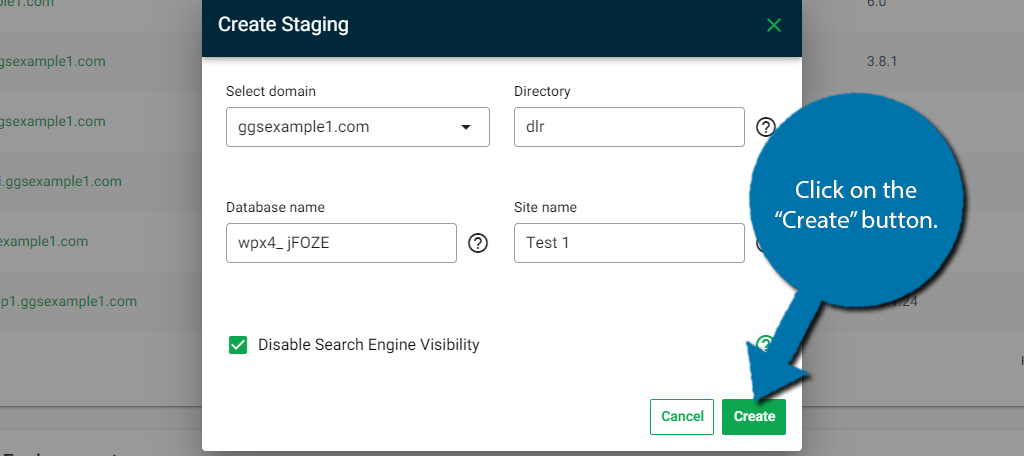
A small pop-up box will appear. It has four pieces of information that you need to fill in, but half of it should already be good to go. In the Directory text box, type “dlr” to satisfy it.
Simply name the site and click on the “Create” button.
Afterward, you should see a message stating that the staging was successful. Reload the page to see it at the bottom.
Then, click on the link and you can begin interacting with your site’s clone. It will have identical admin information, so the login will be the same as your main site.
It’s Easy to Clone A WordPress Website
As you can see, there are several options that any site can use to create a clone of their WordPress website. Personally, I would recommend using Softaculous to handle your cloning needs as it is the easiest method and applies to most sites today.
That is unless you’re a GreenGeeks customer. In that case, creating a clone from your account manager is very quick and easy.
That said, the other methods are also great alternatives, so it really comes down to your preference. If you do plan on creating a staging environment, be sure to use the Staging options instead of cloning, as they make the process much smoother.
I hope you found this tutorial helpful in learning how to clone your WordPress website.
Why did you want to clone your website? Which method did you use?
The problem is, with the memory and I/O allowance (384MB, 4MB) provided by EcoSite Standard and Reseller Standard accounts, WP Clone maxes out the resources and then fails.
Thanks for your feedback… If you ever experience issues with your Dedicated Physical Memory or Disk I/O becoming exhausted reach out to our customer support team. All of our platforms offer the ability to scale your computing resources for as little as $2.50 per month (for as long as you require it). In addition upgrades to our EcoSite Pro (Reseller Pro – for resellers) or EcoSite Premium is always available providing more base computing resources but also extra features such as our PowerCacher and/or PCI Compliance functionality.
I personally use the free cloning plugin WP Staging. This does not require any settings. Just execute it and a cloning website is done in a few seconds. Would be nice to read a review about it here.