Potentially, the scariest error someone can run into on the WordPress platform is the “Fatal error: max_execution_time exceeded” because of its name. The good news is, despite how “fatal” it seems, the error is quite easy to fix.
In fact, it’s really one of the most common WordPress errors you will run into. That said, there can be a variety of causes that you should look into as your website may not be optimized.
Today, I will demonstrate how to fix the max_execution_time error and how to prevent it.
What Causes the max_execution_time error in WordPress?
Every WordPress website has a predefined value for how long it will process server requests. The purpose of this limit is to protect the server from scripts that use up too many resources.
The default value is determined by your web hosting plans, but it can be changed manually. Thus, the error is common when switching hosts.
The fatal error maximum execution time exceeded occurs in WordPress when a script goes past this limit. And since every website is unique, how long a script needs to run cannot be generalized.
Some scripts will naturally have to run longer than others, it really depends on their purpose. Thus, as a web developer, you need to find that sweet spot for your website. The good news is that changing this value is trivial.
Of course, there is also the possibility that something has gone wrong and that changing the value won’t actually fix anything.
For instance, sometimes you may have installed a plugin that was coded poorly and will end up exceeding the limit no matter what it is set at. These are issues you need to track down and resolve.
So let’s get started!
How to Fix the max_execution_time Error in WordPress
There are two main ways to increase the memory limit in WordPress. The first is to manually increase it with code, while the second is to use a plugin. Both methods are viable, so it comes down to preference.
Note: You can also contact your web host to increase the limit for you, but it’s quicker to do it yourself.
Method 1: Increase Maximum Execution Time in WordPress
The first, and probably most obvious solution is to just increase the max execution time in WordPress. This simply involves going to the backend of your website and making a small edit to a file.
While this is an easy process, it’s worth noting that you can actually do this in three different files. They include .htaccess, wp-config, and the php.ini files. And each one has a different line of code.
The good news is that you just need to pick one of these, thus, I will demonstrate the .htaccess method.
However, before you begin, I would recommend making a backup of your website. Or at the very least, ensure you have one that is up to date. That way, if you make a mistake you can restore the website.
This might sound odd since you already have an error happening, but again, this isn’t a big deal.
Step 1: Locate the .htaccess File
First, you need to log into your cPanel. The login information is provided to you by your web host when you create an account.
Once inside, click on the File Manager option. The File Manager will allow you to access all of the files related to your WordPress install.
You need to locate your .htaccess file. Click on the public_html directory. You should see the wp-content and wp-admin folders.
Locate the .htaccess file. Right-click on the .htaccess file and select the Edit option.
If you can not find the .htaccess file, then there are two possibilities. The first is that your website has not generated the .htaccess file. The second is that the permissions are not set up correctly.
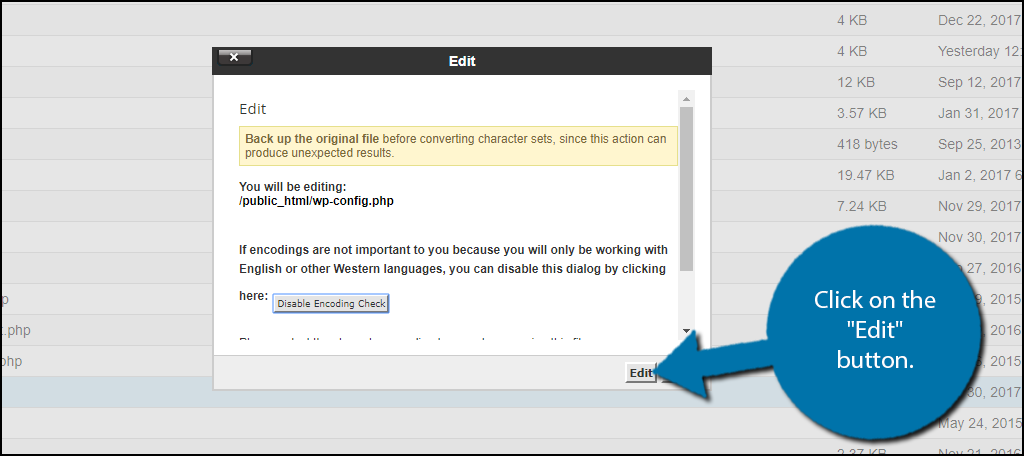
A pop-up window will show. This box will warn you to create a backup of your files before editing anything. This will ensure that you can revert your website back to when it was working if something goes wrong.
Click on the “Edit” button. A new tab will open containing all of the code from the file.
Step 2: Increase the Memory Limit
Insert the following line of code into your .htaccess file:
php_value max_execution_time 300
This line will increase the memory limit to 300 seconds, which is the largest I can recommend. And to be honest, it is way too much for most sites, but there’s a good reason I chose this number.
If the error persists, then you know that something has gone wrong and you need to identify what script is bad.
Once you have inserted the code into the file, click on the “Save Changes” button to finish.
Go back to your website and check if the error has been fixed. If so, congratulations. If not, move on to the troubleshooting steps.
Method 2: Using A Plugin
The bread and butter of WordPress is the huge selection of plugins you have at your disposal. There is really a plugin for everything and extending the maximum execution time is no exception.
In this method, I will demonstrate how to do it with the Increase Maximum Upload File Size | Increase Execution Time plugin. As you can tell by the name, it is also possible to increase the maximum upload file size.
Thus, the plugin can help kill two birds with one stone, as these problems are sometimes linked.
Step 1: Install the Plugin
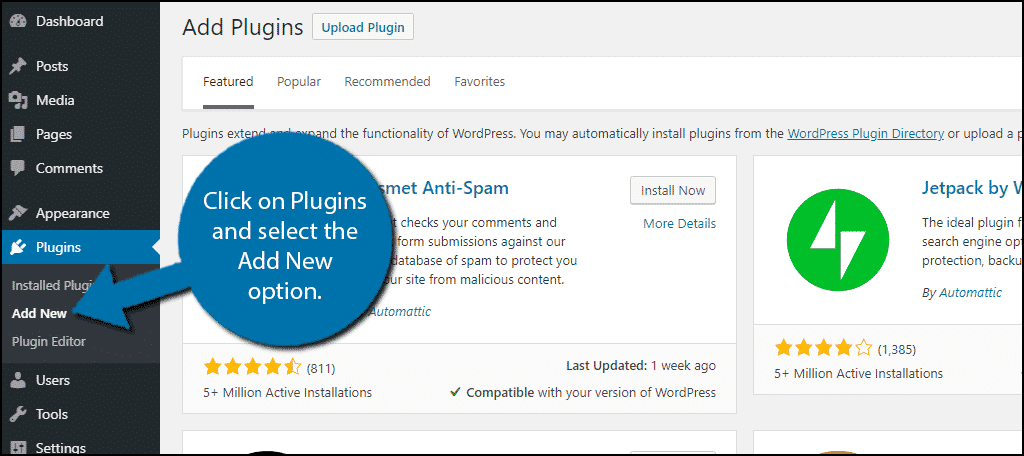
Let’s start by clicking on Plugins and selecting the Add New option on the left-hand admin panel.
Search for Increase Maximum Upload File Size | Increase Execution Time in the available search box. This will pull up additional plugins that you may find helpful.
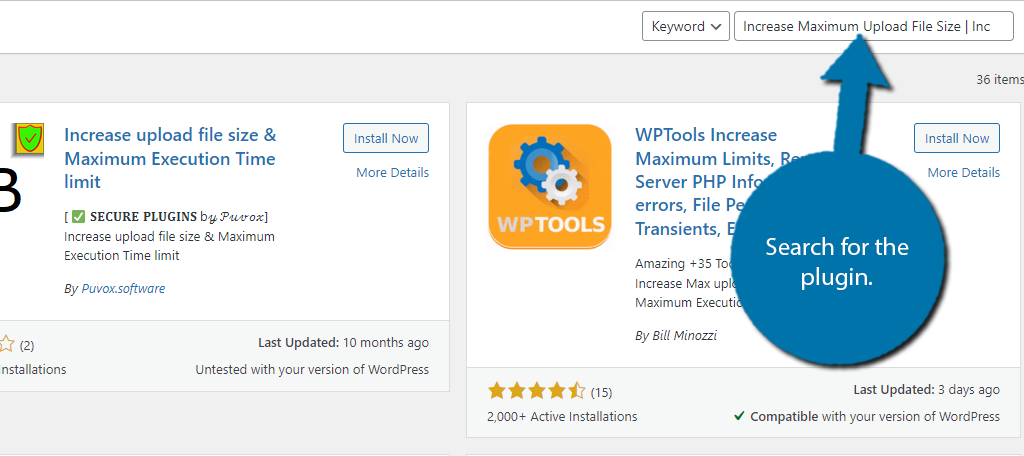
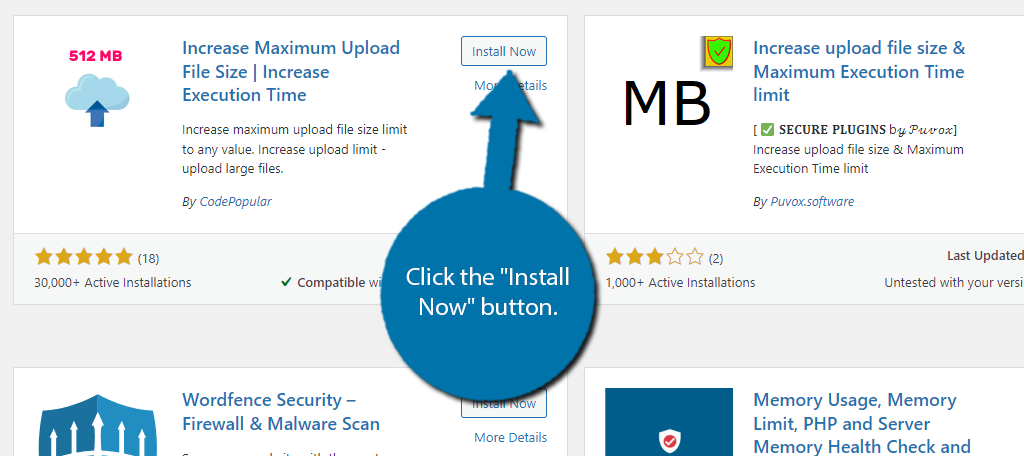
Scroll down until you find the Increase Maximum Upload File Size | Increase Execution Time plugin. In this tutorial, we’re using the tool created by CodePopular.
Click the “Install Now” button and activate the plugin for use.
Step 2: Increase the Execution Time
As the name implies, this plugin allows you to increase both the upload limit and maximum execution time. It’s simple to use and will take less than a minute.
On the left-hand admin panel, click on Media and select the Increase Upload Limit option.
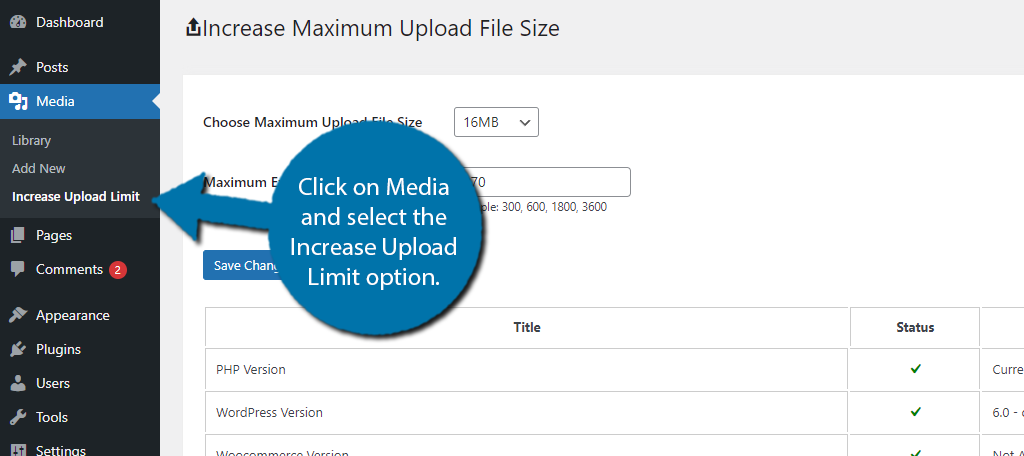
First, you can see a lot of information about your WordPress install including the PHP version, WordPress version, upload limit, and more. At the top, you can set the upload limit for files (images and videos) and set the execution limit.
Simply enter a value of 300 into the Maximum Execution Time box. You can make it larger, but it is not recommended.
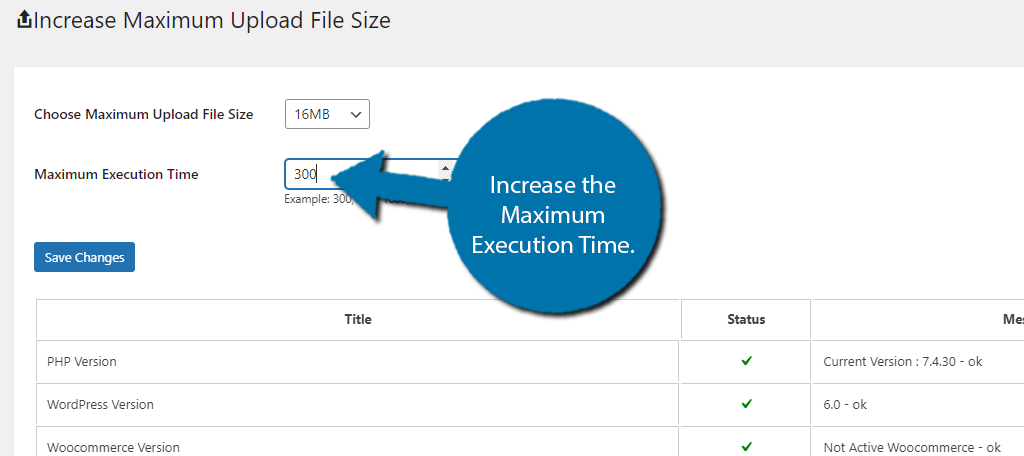
Finally, click on the “Save Changes” button and you are done. Check your website to see if the error has been fixed.
Method 3: General Troubleshooting the max_execution_time Error
If simply increasing the maximum execution time did not resolve the error, then that means something on your website has a script that is running far too long. You now need to locate and correct it to resolve the issue.
Obviously, this can be a very involved process. Since you may be making changes to your plugins and theme, it is recommended to create a backup before taking serious troubleshooting steps.
Check Any Scripts You’ve Added
The first place you should look is any scripts you have manually added or modified recently.
Obviously, if you don’t add any code to your website, then skip this step. But there might be a logical error that is causing the script to run longer than intended.
Logic errors typically cause runtime errors, so it’s the most likely cause.
It’s also possible that your script is calling on a plugin that may not be optimized for what you need.
Unfortunately, without looking at the code directly, I can’t provide programming tips. Issues like this are really specific to the code you wrote or pasted into the website.
Update Your Core Files, Plugins, & Theme
Before you begin the more drastic steps below, you should try updating everything.
Most websites will have updates automated, but there are situations where automatic updates are bad, especially as your website becomes more complex and grows in size.
Out-of-date plugins, themes, and most importantly, core files can cause things to break. However, more importantly, everything needs to be updated at the same time.
Because if you update one thing and not another, it can create some serious issues.
Disable Your Plugins
Plugins are the biggest asset available in WordPress, but they can be the cause of a lot of errors. So, it’s important to check them out.
All you need to do is go to the plugins area of WordPress, select all of the plugins on your website, and use the bulk actions to deactivate them all at once. Check to see if the error is gone.
If not, your plugins are innocent. But if it is gone, then you need to now identify which one is causing the issue.
To do this, reactivate them one at a time. Every time you activate one, you should check your website to see if the error is back. Once it comes back after activating a plugin, you know which on is to blame.
At that point, you should refer to the plugin documentation to see if there is any support available. If you cannot identify the issue in the plugin, your best recourse is to replace it with another.
Generally speaking, there are usually at least two or three plugins that do the exact same thing. This means it shouldn’t be hard to find a replacement or even a better one to suit your needs.
Swap Your Theme
Similar to plugins, a theme can just be coded badly, or very out of date.
The best way to see if the problem is theme related is to swap to the default theme of WordPress. This changes annually, thus at the time of writing this, Twenty Twenty-Two is the default theme.
Install and activate it to see if the error goes away. If it does, that means the issue is theme-related.
You have a few options now.
First, you can try and determine what the issue is. Again, start by checking any code modifications. If that isn’t the cause, there may be a rare compatibility issue with a plugin or other feature you’ve added.
After all, it’s not uncommon for some themes to be bundled with plugins of their own. This can cause issues, so, be alert.
And probably the most obvious answer is to permanently swap themes. If your theme is older or out of date, not only are errors like this more common, but they will also impact your website’s performance.
This can result in lower overall rankings on search engines. It’s essential to avoid these kinds of problems if you plan on succeeding on Google.
FAQ max_execution_time Errors
What is the standard max_execution_time?
The value itself is set by your web hosting company, and in general, will be 30 to 60 seconds.
This is because it will work for the majority of websites. That said, it is entirely possible that you may need to utilize a script that will easily exceed that limit. Thus, you may need to increase it.
You can raise this higher in most situations. However, your web host may limit your ability to do this depending on the plan you have. This normally applies to shared hosting environments and not dedicated servers.
For specific information, do not hesitate to contact your web host for more info.
Are There Any Downsides to Increasing the max_execution_time?
Yes; the max_execution_time is kept on the lower end because it helps prevent websites from using too many server resources.
If the max_execution_time is very long, like 300+ seconds, then a badly coded script may work just fine. However, it may also end up using several times the number of resources.
Not only does this waste precious resources you are paying for, but it can also lead to slower website performance. After all, the script is taking a long time to complete, which will have an impact somewhere on your website.
Just keep in mind not all scripts that are coded to be longer are necessarily bad.
Is max_input_time the same as max_execution_time?
No; these may have similar names, but they are quite different.
The max_input_time sets how long the script is allowed to parse data. Whereas the max_execution_time is how long a script can run before it is terminated. And yes, max_input_time can be a factor in this error.
For example, if you had a script that was designed to parse a lot of data that took longer than the execution time allowed, then the script would timeout. It’s very common when you are uploading a huge file if the connection is not strong.
Should I Increase the max_execution_time with Code or a Plugin?
Many beginners always ask if it is better to code yourself or use a plugin.
Truthfully, you can create an amazing website that runs great by using plugins. This is the core philosophy of WordPress, which is why the platform is so popular today. It makes it possible for anyone to build a website.
However, make no mistake that a website will run better if it is coded well. Being able to write your own scrips and handle routine maintenance without a plugin is beneficial.
After all, the more plugins you install, the slower your website gets.
Thus, for something this simple, adding the code yourself is recommended. Nonetheless, the plugin approach is just as viable, especially if the plugin is coded well. The better you get at coding, the more options you have as a developer.
Can the Upload Limit Be An Issue?
Unlike the max_input_time, max upload limits do not cause the max_execution_error.
You would actually get an entirely different error if you ran into an upload limit. And as a reminder, the plugin I mentioned above can increase the upload limit.
Why Is It A Fatal Error?
The term “Fatal Error” is not actually WordPress specific. Instead, it comes from general coding when a program is aborted and sends the user back to their operating system.
In the case of WordPress, it occurs when a script is terminated, thus it is pretty similar.
However, as far as naming conventions, it sounds a lot worse than it actually is. Not to mention you will get an email telling you a fatal error occurred on your website.
It’s a great way to scare a beginner into action.
Don’t Panic About the max_execution_time Error
Like most things, panicking about an error is the worst possible thing a website owner can do. Errors happen all the time, and most of the time, they take a few minutes to fix.
Generally speaking, this error mostly stems from recent changes to your website like adding custom code, installing a new plugin or theme, updating a plugin or theme, or something else.
All you need to do is keep calm and begin tracking down what is causing the error.
If done correctly, your website will be up and running in no time. And more importantly, it will probably be in a better situation than before the error occurred.
Which method have you used to solve the maximum execution time exceeded error? Were 300 seconds enough to fix the issue?