
WordPress keeps track of every change made to post content, and this is known as the post revision system. Post Revisions are essentially a changelog of your content in WordPress. Every change you make creates a new revision that WordPress stores.
You can access them at any time in case you need to revert a change someone made or view what changed after an author updates it. While it is a handy feature, it’s worth pointing out that these revisions take up site resources.
As such, many developers choose to either limit how many revisions can be stored or disable the feature entirely.
Today, I will demonstrate how to use post revisions in WordPress and how to manage them.
What Are Post Revisions in WordPress?
Post revisions are previous versions of your posts in WordPress. For example, let’s say you have a post that you spotted a typo in after publishing. Naturally, you go into the editor and correct the mistake.
The previous version of that post is now saved as a revision that you can access. Not only can you access it, but you can also use it to restore that version of the post if necessary. As such, it can be a very powerful tool if changes are made haphazardly.
You may be wondering how far back the revisions system will work. By default, there are no limits, thus every single version of a post is saved as a revision. As you can imagine, this can be a serious problem for sites with a lot of content.
How to Use Post Revisions in WordPress
First, let’s cover how to actually access post revisions in WordPress. These are very easy to access and really only take a minute or two to manage. This makes it easy to hit the proverbial undo button in WordPress.
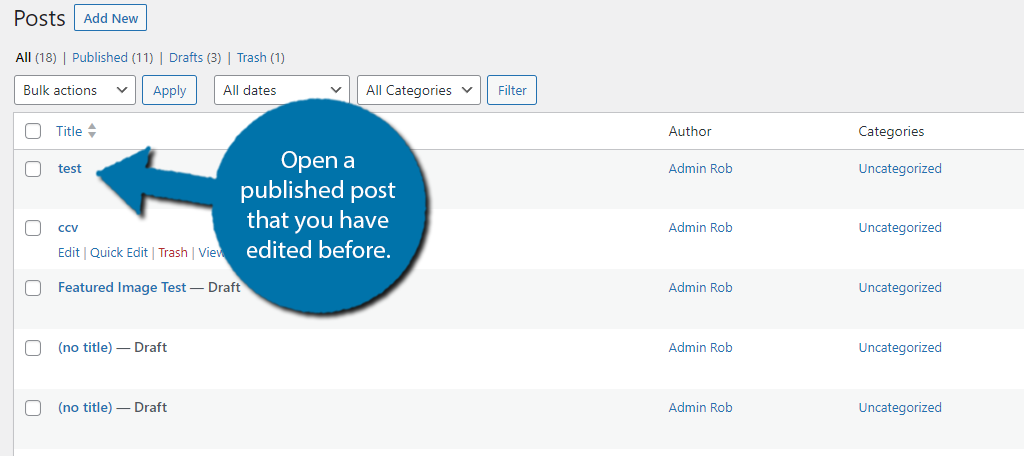
Step 1: Open The Post You Wish to View the Revision In
This probably doesn’t need to be said, but a revision only exists for posts that are published. Thus, if a post is currently in a draft, it will not have the revisions option visible. It is also worth noting that you actually need to make a change to the published post at least once.
Again, if no changes were made to the published post, WordPress has never stored a revision of it.
The first step is to open a published post that you have changed in the past.
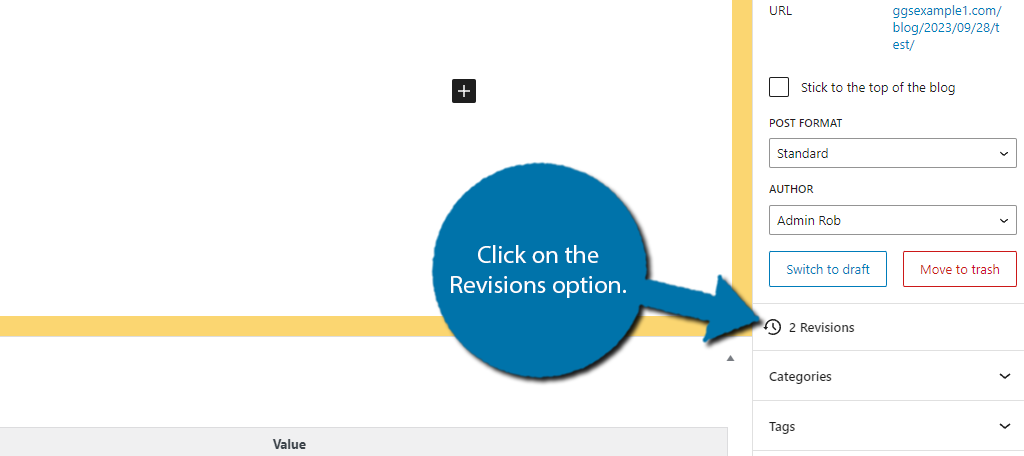
Step 2: Access Revisions
Once you are inside a post, all you have to do is click on the revisions option. This is located in the post settings on the right-hand side just below the Summary.
Note: The number in front is the number of revisions stored for that post.
Step 3: Using Post Revisions in WordPress
There is nothing complicated about using revisions, and the only options you have are to switch between revisions and to restore.
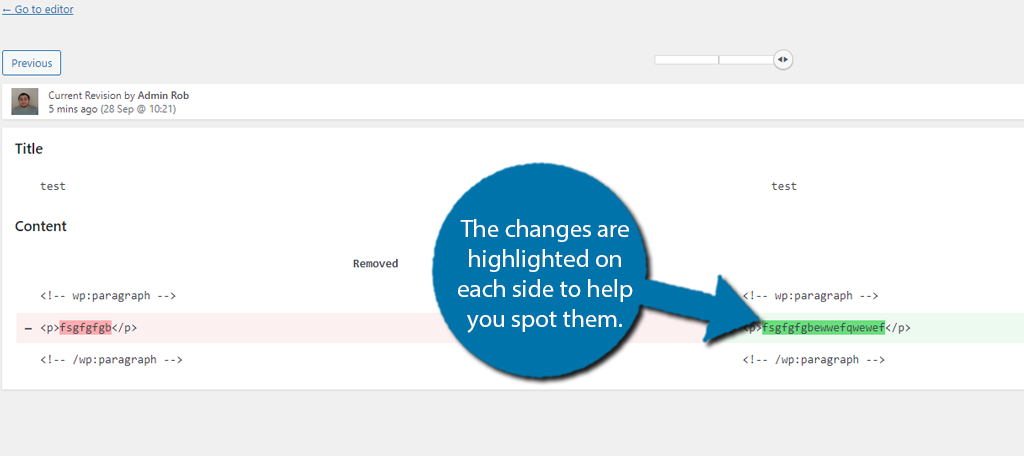
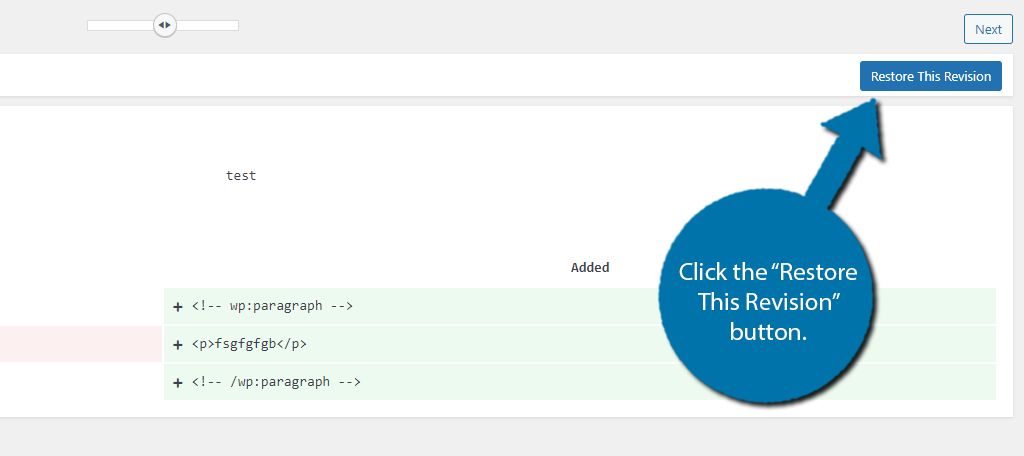
The revisions section itself is divided between two versions of the post, and you can see the changes made. The latest version is on the right side, while the previous version is on the left side.
The changes are highlighted on both sides to help you see the before and after like so:
To switch between the revisions, there is a slider at the top. Simply drag it to see older revisions. Alternatively, you can use the “Previous” and “Next” buttons to switch between revisions.
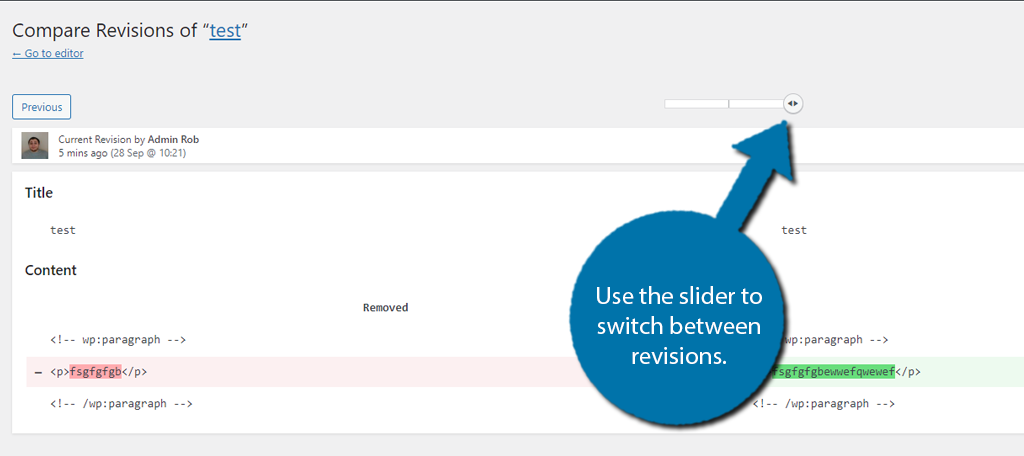
And finally, you can revert changes made by using the “Restore This Revision” button. This button is not available if you are on the current version of the post as it is already in use.
And that really covers what you can do with revisions in WordPress. At least with the default tools.
Now, let’s cover how to better manage them by limiting the number of revisions created.
Limiting Post Revisions with Code
As mentioned earlier, WordPress stores an unlimited number of revisions for your post content. On paper, this sounds extremely useful, but the reality is quite different. Every website requires a web host, and your plan often includes a set amount of server space.
Naturally, these revisions take up that server space within your database. As your website grows, and you continue to update your content, you are bound to have hundreds if not thousands of revisions stored on your server that eat up valuable resources.
Thus, you can either pay for more space or limit the number of revisions WordPress creates. Most opt for the latter, but there is a problem with this, WordPress currently has no settings to manage revisions by default.
Instead, you need to modify some code in the wp-config file. Don’t worry this is very easy.
Step 1: Locate wp-config File
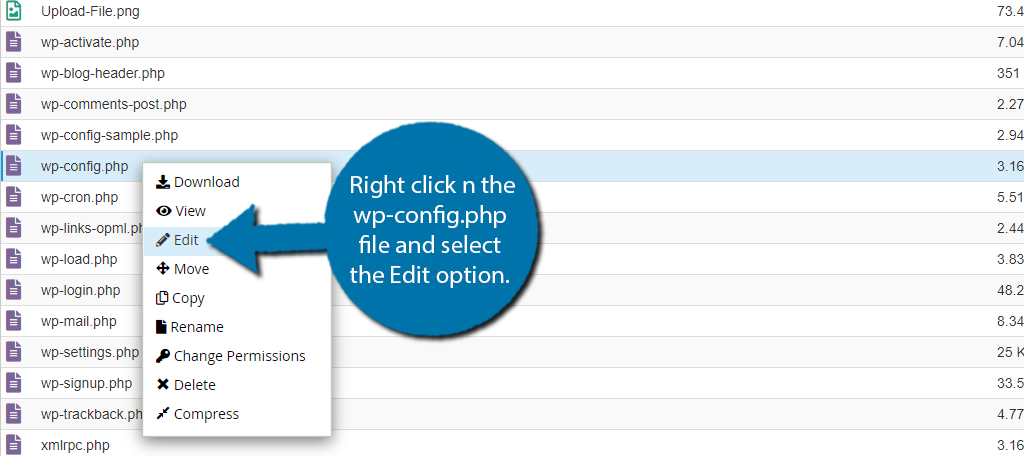
The first thing you need to do is actually find the wp-config file. First, log into your web hosting account and access the cPanel.
Once there, locate the Files section and click on the File Manager option.
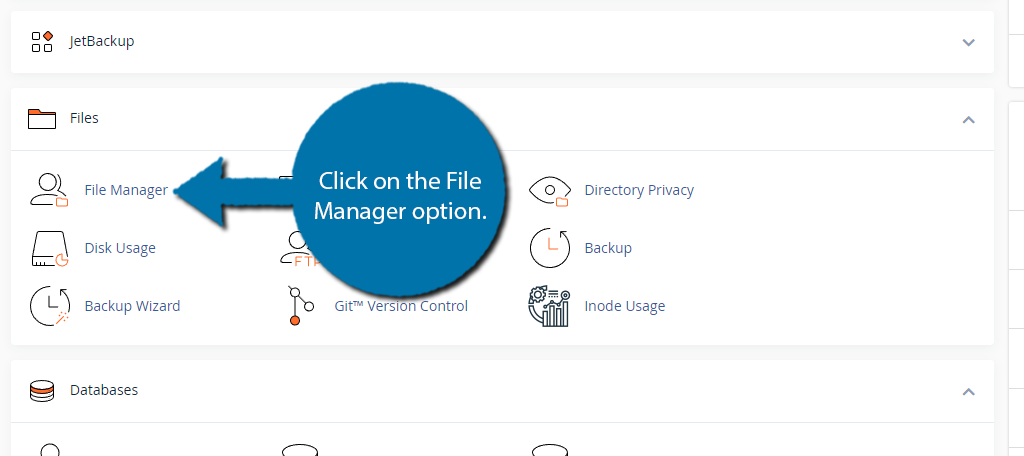
Enter the public_html directory and locate the wp-config.php file. Once you locate it, right-click it and select the Edit option.
A small pop-up will appear advising you to create a backup before making any changes. This is always recommended to do before editing code. This way, if you do make a mistake, you can quickly revert it.
Luckily, we are just adding a single line, so there is not much room for mistakes, but it’s better safe than sorry.
Step 2: Add Code
By default, WordPress allows for an unlimited number of revisions. The following code will limit that to a specific value that you can decide on. In most cases, you probably only need 2 or 3 revisions, but the choice is yours.
The code to limit post revisions in WordPress is as follows:
define('WP_POST_REVISIONS', X);
You simply need to change “X” to the number of revisions you want to store for each post. You can add this code at the bottom of the wp-config.php file like so:
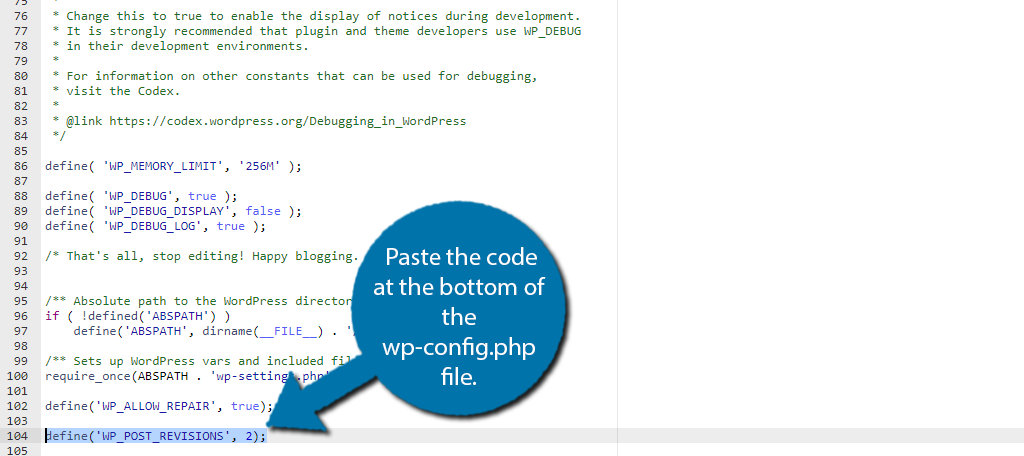
In this case, I changed “X” to “2” which means that each post will only store up to two revisions.
Disabling Post Revisions Completely
While limiting post revisions can be a great solution for many sites, some may just want to disable the post revision system altogether, and you can do this quite easily with a plugin like Disable Post Revision.
As the name suggests, it allows you to disable post revisions in WordPress.
Of course, you could also do it with a line of code that is quite similar to what we just covered, so I will go over both methods as they are quite short.
Method 1: Disable Post Revision Plugin
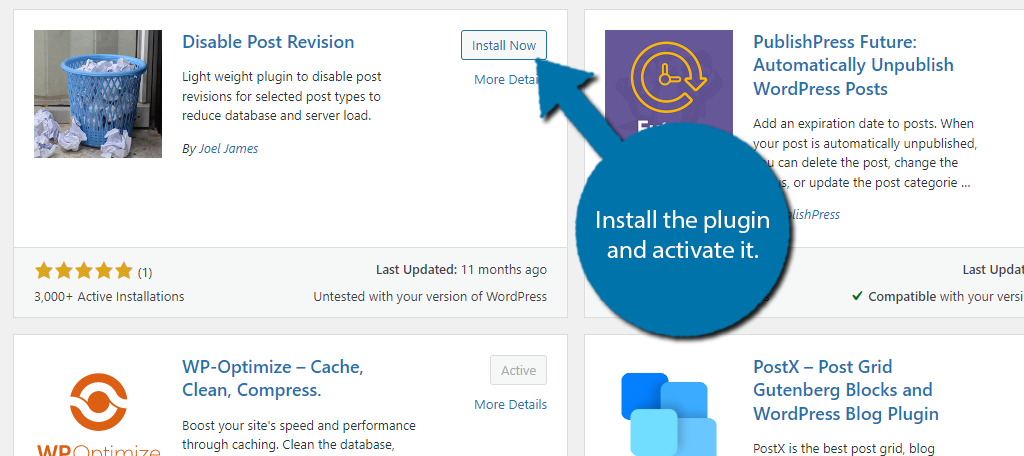
First, go ahead and install the Disable Post Revision plugin.
After this, you would just need to click on Settings and select the Writing option.
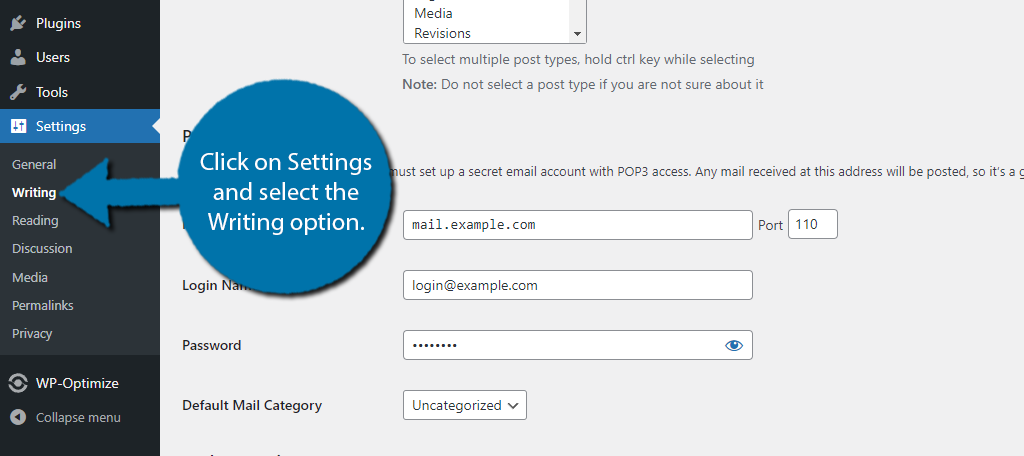
This plugin adds the Disable Post Revisions option to the settings here. All you need to do is select what post types you want to disable them on. You can select multiple, but you will need to hold down the Shift key to do so.
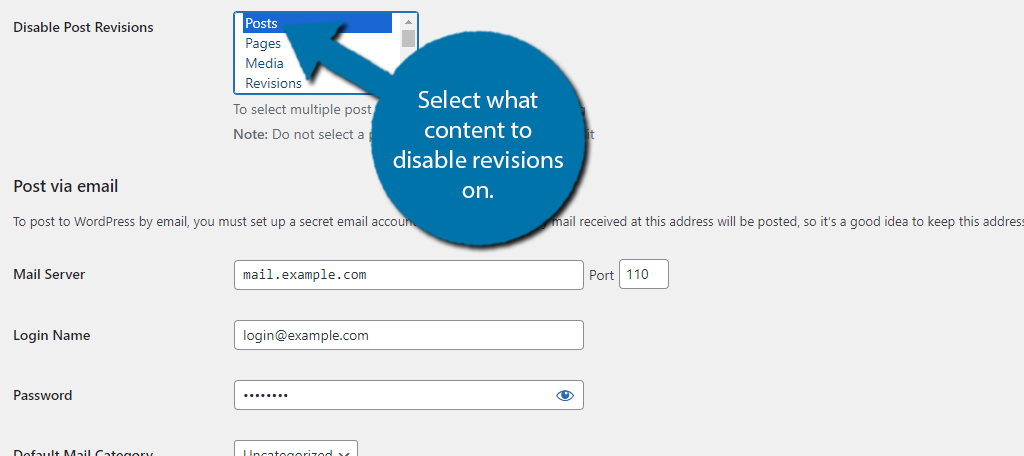
Once you make your choice, be sure to click the “Save Changes” button at the bottom and that’s it. This plugin does not delete the existing revisions in your database.
To do that, check out our next section using the WP-Optimize plugin.
Method 2: Code Approach
In the previous section, we covered how to limit the number of post revisions in WordPress with the following code:
define('WP_POST_REVISIONS', X);
In that one, we made X the number of post revisions we wanted to keep, but in this case, we just need to replace “X” with “false” and you are done, thus the code will look like this:
define('WP_POST_REVISIONS', false);
And that’s all it takes with code. Paste it into your wpconfig file and save the changes. WordPress will no longer store post revisions.
Just keep in mind that it only stops new revisions from being created and does not delete the old ones. To do that, you’ll need a plugin like WP-Optimize.
Using WP-Optimize to Clean Post Revisions
Another way to manage your revisions would be to clear them out with the help of a plugin. While there are plenty of plugins that can do this, WP-Optimize is my favorite. It is a database optimization plugin that will clear out unnecessary files from the database.
This ensures the database is as small as possible for the best performance. Naturally, the revisions that WordPress creates are stored here and this plugin can help you delete them along with other unnecessary files.
It’s quite easy to use so let’s get right into it.
Once you have the plugin installed, click on WP-Optimize and select the Database option.
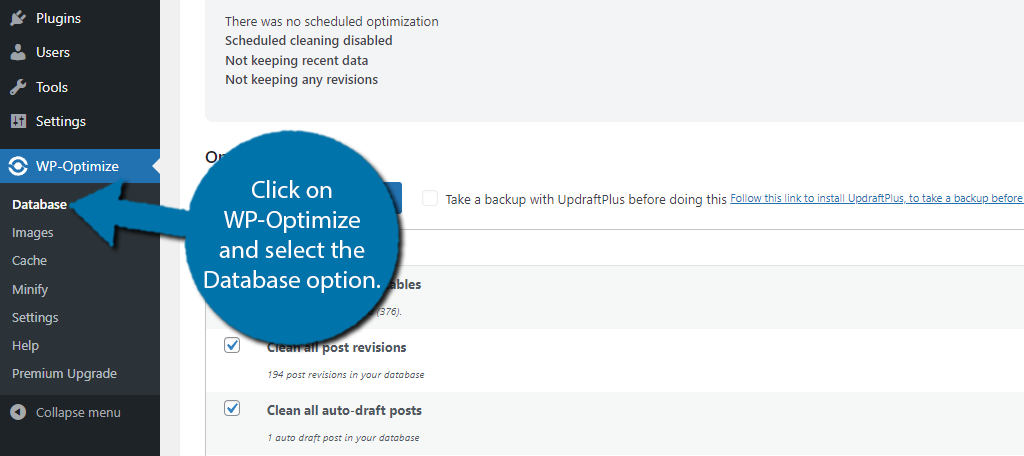
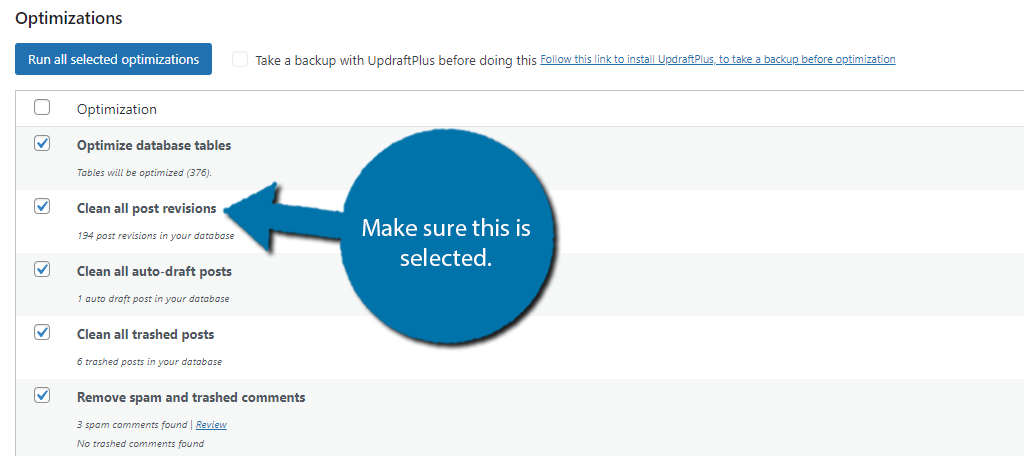
The plugin will auto-select some of the common files it will remove when you begin the optimization process. I’d recommend leaving these options set as the “Clean all Post Revisions” option is already selected.
That said, you are welcome to make any changes you would like but ensure this stays selected.
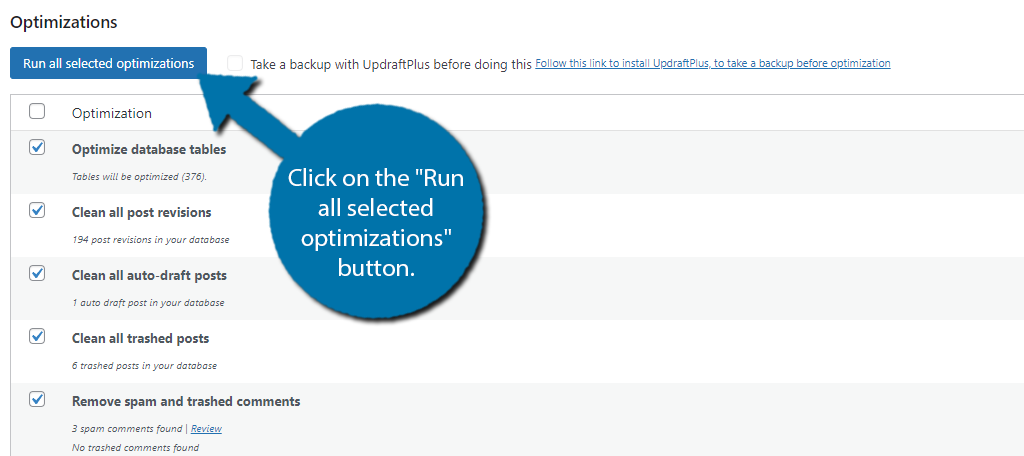
Click on the “Run all selected optimizations” button.
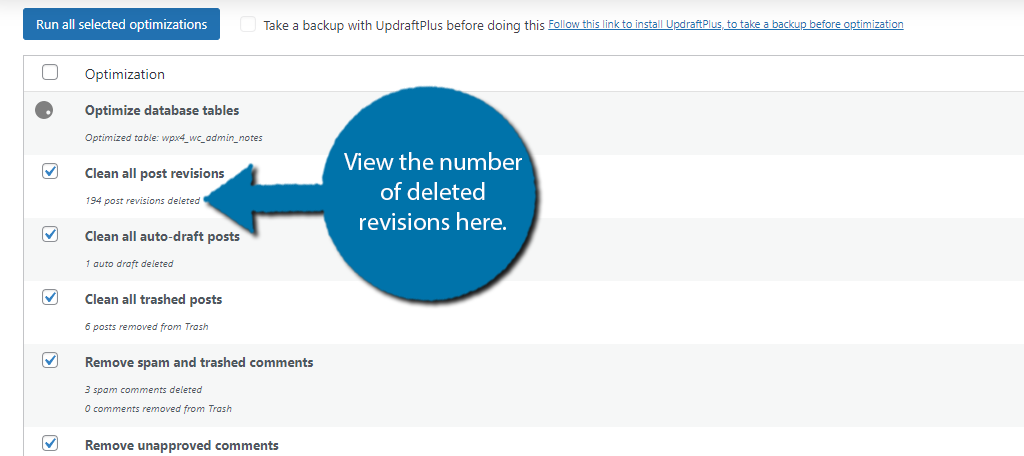
The process will begin and take a few moments but could take longer if your website is on the larger side. Once it is done, you can see exactly how many post revisions were deleted underneath that option.
That covers how to use WP-Optimize to remove post revisions in WordPress. Just keep in mind you will no longer be able to use them to revert changes in WordPress posts, and unlike other methods, this deletes all of them no matter how recent they are.
Setting Up Automatic Optimization
Now, if you have already limited or disabled post revisions in WordPress, you’re good to go. But if you decide to leave the system intact but just want to clear them out occasionally, you could use this tool.
It also has an automatic function where you can have it clean your website on a regular basis. This can be daily, weekly, or monthly. However, if you are clearing revisions on a daily or weekly basis, you are probably just better off disabling the feature altogether.
This is easy to set up and only takes a few extra clicks to implement.
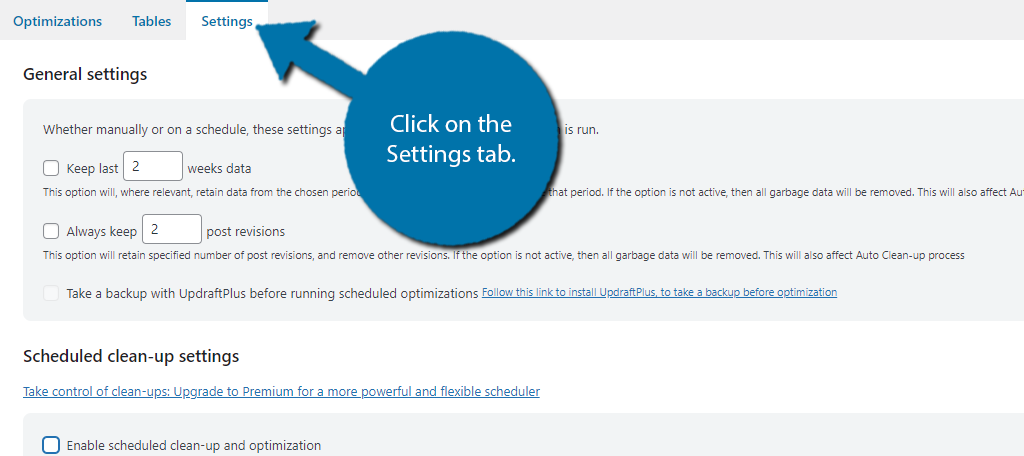
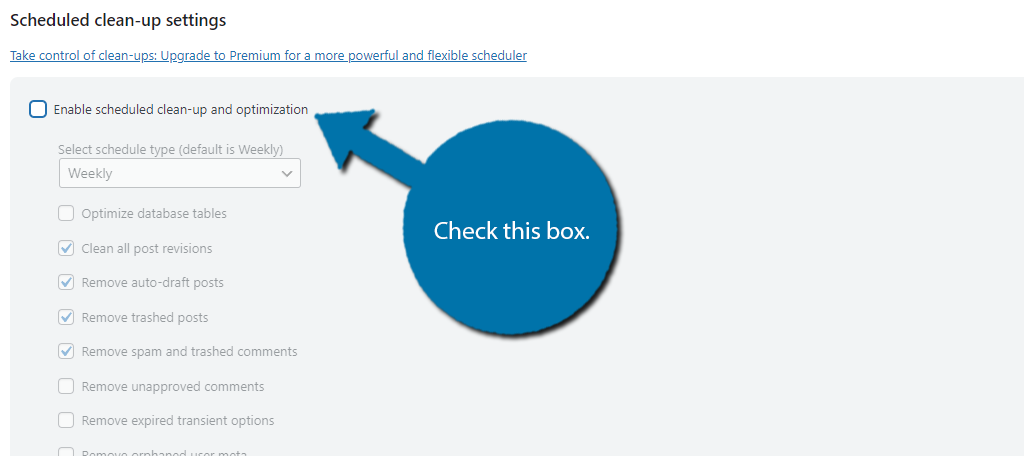
Click on the Settings tab.
Under the Scheduled clean-up settings section, check the box to enable clean-up and optimization.
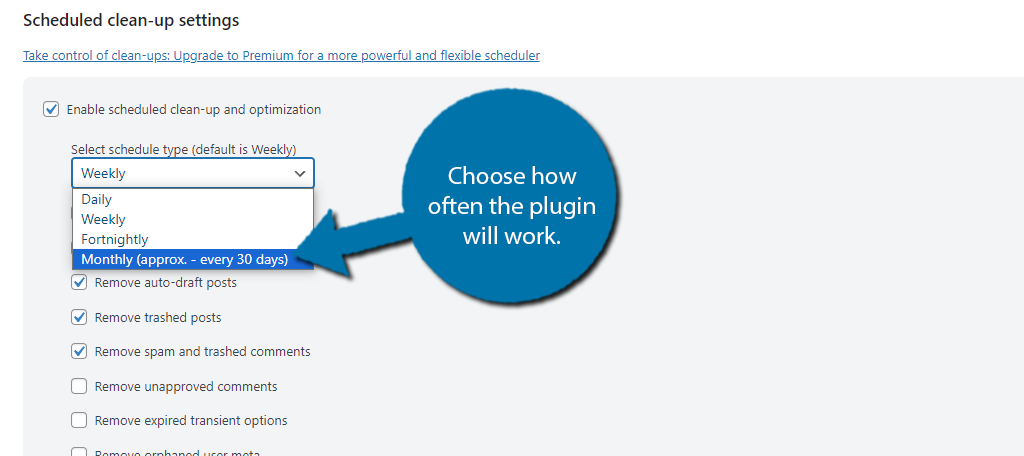
This will unlock all of the settings in this section. First, use the drop-down menu to select how often it will optimize your website. I recommend a monthly scan, but you can pick whatever option you feel is best.
Note: Monthly is not technically every month, but instead every 30 days. It’s not a big deal, but it is worth noting.
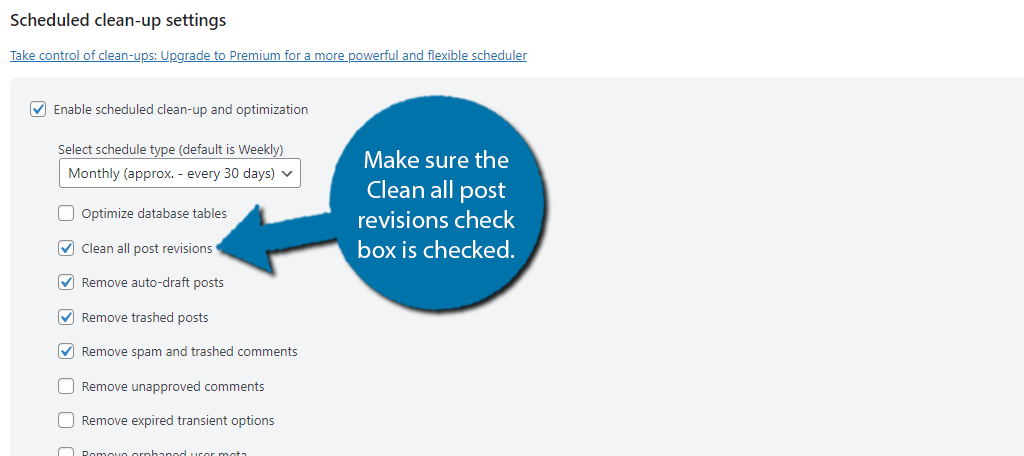
Underneath this, you can select what content will be optimized just like before, and similarly, you want to make sure the Clean all post revisions check box is checked. You can select any other options you see fit as well.
After that, all you need to do is click on the “Save Settings” button and the plugin will handle the rest. You can disable this at any time or change what types of content are optimized by the plugin.
Allow Any Author to Make Post Revisions
Alright, this section is a little different, but it is related. By default, all users can utilize the post revision system in WordPress, but for some sites, the feature is a bit lacking because the content must be published for it to store a revision.
What if you wanted authors to submit a revision before the work goes live? Well, you can do that with the Revision Manager TMC plugin.
This plugin allows authors to create revisions of existing pieces of content that they can submit for review by editors. This is superior to the post revision system in WordPress because you can create revisions without making changes to a live page to store them.
Unlike the original system, the revisions are created manually and can be deleted from the revision section. Thus, extra space is not consumed when you correct a typo or make a small change on a live post.
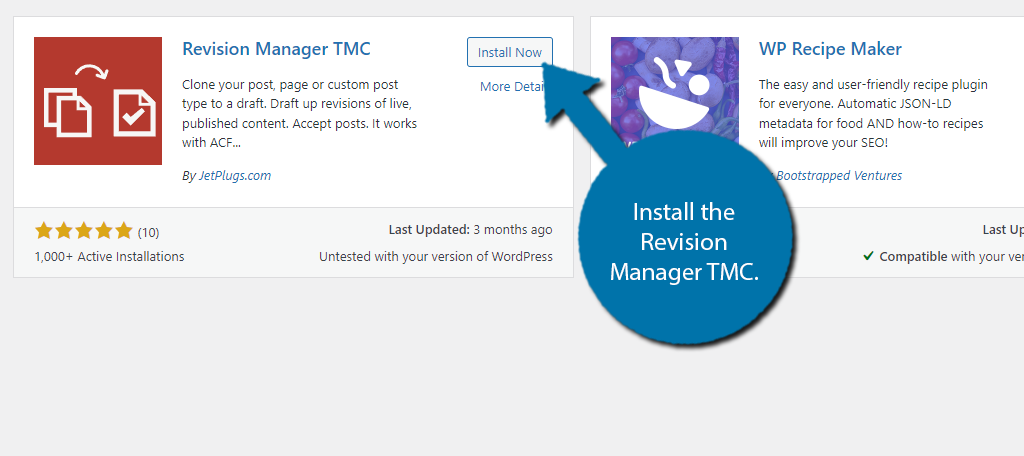
Step 1: Install and Activate the Plugin
The first thing you need to do to accomplish this is to install and activate the Revision Manager TMC plugin. You can do this fairly easily by jumping over to the Plugins page in the WordPress admin dashboard.
Simply use the search field that is available to search the plugin by name. When it pops up, go ahead and install and activate it directly from there.
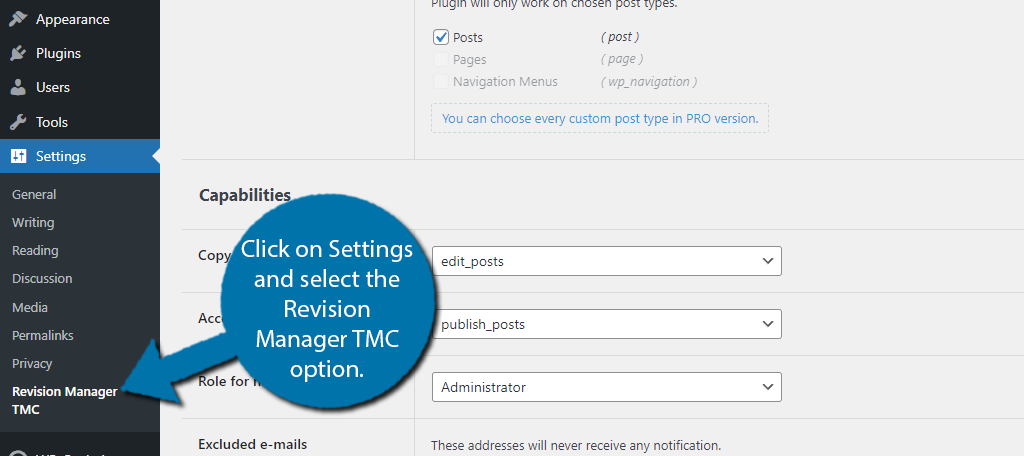
Step 2: Access the Revision Manager TMC Settings Page
Once the plugin has been installed and activated click on Settings > Revision Manager TMC, and you will be taken to the plugin page in your WordPress admin area.
You will notice that the setting dropdown boxes have quite a few choices. Don’t worry, below I am going to show you the exact setup you want to allow any author to make WordPress post revisions.
Step 3: Use Proper Revision Manager Settings
At the top of this section is the Post Types section. The free version of this plugin only allows posts to be selected, thus if you want the other options you will need to upgrade. You can ignore this section since there is nothing you can change.
Below this is the Capabilities section. Here you need to select edit_posts in the “Copy creation capability” dropdown menu.
Then select published_posts in the “Acceptation capability” dropdown menu.
What this does is allow users with the contributor user role to create a duplicate copy of a published post.
The “Role for notification” dropdown menu should be assigned to an Administrator or Editor who will review the changes and publish the post. In most cases, this is you or the person in charge of site content.

Step 4: Select a Template
Scroll down and you will pass various settings for how the post revisions will appear. Make changes to these settings as you see fit.
Even further down you will encounter the template section.
You can select a template and customize it to your liking and standards.
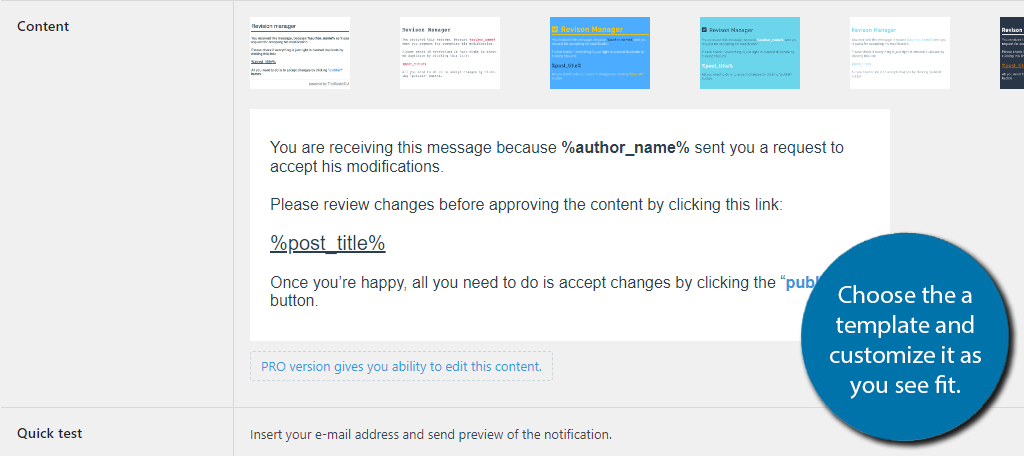
When you have everything set to your liking, click on the “Update Changes” button to save all your changes and settings.
Step 5: Log In as a Contributor
Now that you have completed the setup and plugged in the correct settings, let’s take a look at how Revision Manager works.
However, since you are on an admin account, you can’t actually experience the plugin as intended, so you need to log out and in on a contributor account.
Step 6: Create & Accept Revision
Once you are logged in again, click on Posts > All Posts and drag your mouse to any published post. You will now see an option to “Create a revision draft” below each post.
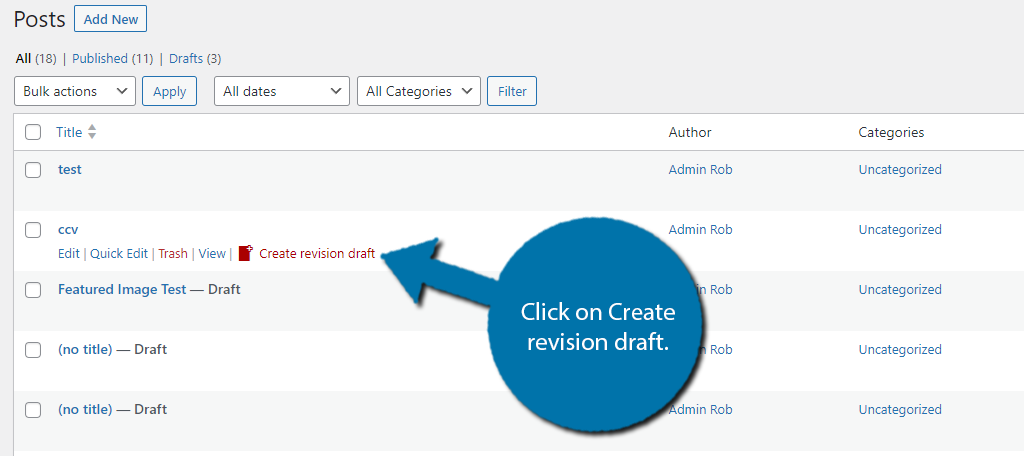
Once a contributor clicks on the “Create revision draft” link, the plugin will create a duplicate version of the published post and open it for editing. Begin revising the post as you see fit.
Now depending on how your user roles are set, you may be able to publish the revision and replace the live version of the post. However, assuming you only let admins or editors do this, the most you can do is save the changes.
Now, go back to your admin account and check the post section. You should now see a revision appear in the post list.
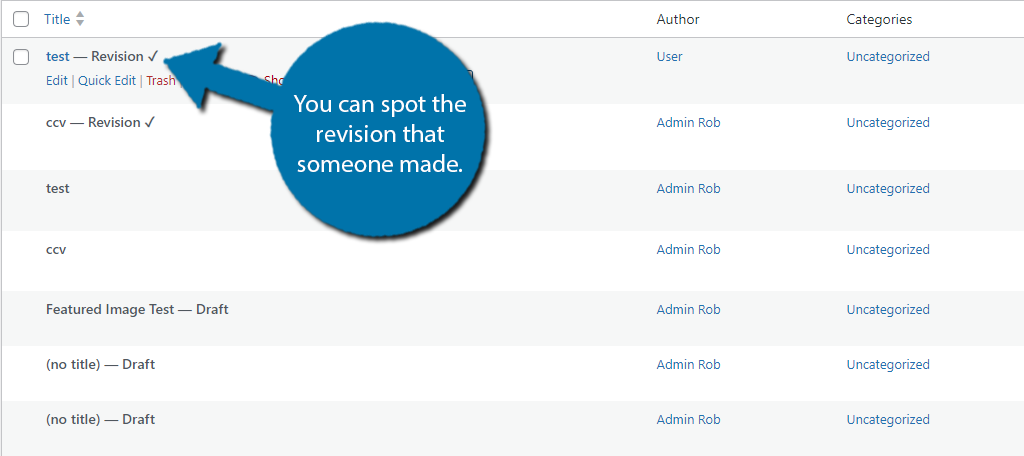
If you click on it, you will be brought to the editor, where you can review the post and make any changes as needed. From there, you can publish the post like normal and it will replace your original.
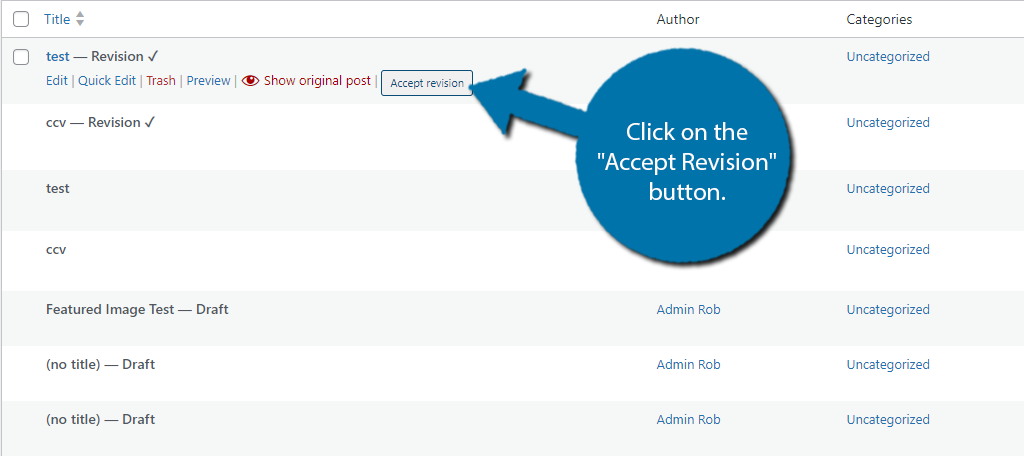
Alternatively, you can click on the “Accept Revision” button on the post list to do the same.
And that’s it. This can help streamline your editing process for older content. After all, it is only natural that you’ll need to update posts over time to account for changes in your website design, or that the content itself is just outdated.
In any case, the Revision Manager TMC plugin is a great choice.
Manage Post Revisions in WordPress Today
The post revision system in WordPress allows you to monitor and even undo changes that are made to your content by any author. While it can be quite a useful feature to take advantage of, there is no denying that it is also problematic.
The revisions of your content have to be stored somewhere, and that location is your database. As such, when you add hundreds or possibly thousands of revisions to your database, it can take up a lot of space and ultimately slow down your site.
As such, many web developers take the time to limit the feature or disable it completely. Regardless of how you go about it, I hope this guide has shown you everything you’ll need to manage post revisions in WordPress.
Did you disable or limit the post revision system in WordPress? Have you ever used a revision to undo changes?