Perhaps one of the most powerful tools at any developer’s fingertips is a backup. A backup provides an extra layer of security when it comes to protecting your content, and in WordPress, there are several ways to create one.
And even better, the majority of backup options are free to use. It’s also worth mentioning that backups are extremely easy to create and can even be fully automated depending on the tool you choose to use.
Today, I am going to demonstrate how to create a backup in WordPress using several methods.
Why Keep a Backup of WordPress?
Backups are useful for several reasons, which is why you should always keep one. Let’s take a look at a few of the reasons.
First and foremost, backups give websites an extra fail-safe layer of security. If a massive mistake is made when changing some code that you can’t seem to resolve, a backup can allow you to revert the website to before the code was added.
Or, perhaps your website was hacked and you have lost access to your website. A backup can restore your website to before the hack.
Backups also allow you to test features more easily. For example, let’s say you want to test a new feature for your website. However, doing it on a live site can be risky. As such, you can create a testing environment and use the backup to clone your site.
This allows you to test all of the changes before they go live on and not impact your visitors.
It’s also worth pointing out that you can back up individual parts of your website like your plugins or themes. Thus, if you decide to swap plugins, you could back up the old one’s settings in case you decide to go back to it in the future.
Overall, backups are one of the most powerful tools in a developer’s toolkit.
Method 1: Backup WordPress with a Plugin
One of the strongest aspects of WordPress would be its huge library of plugins, and backup plugins have no shortage of options to choose from. In this case, let’s take a look at the Duplicator plugin.
At its core, Duplicator is a migration tool that helps you move your site from one location to another. But it also works great as a general backup tool. It’s easy to use and is free, which makes it the ideal choice for most sites.
Step 1: Install Duplicator
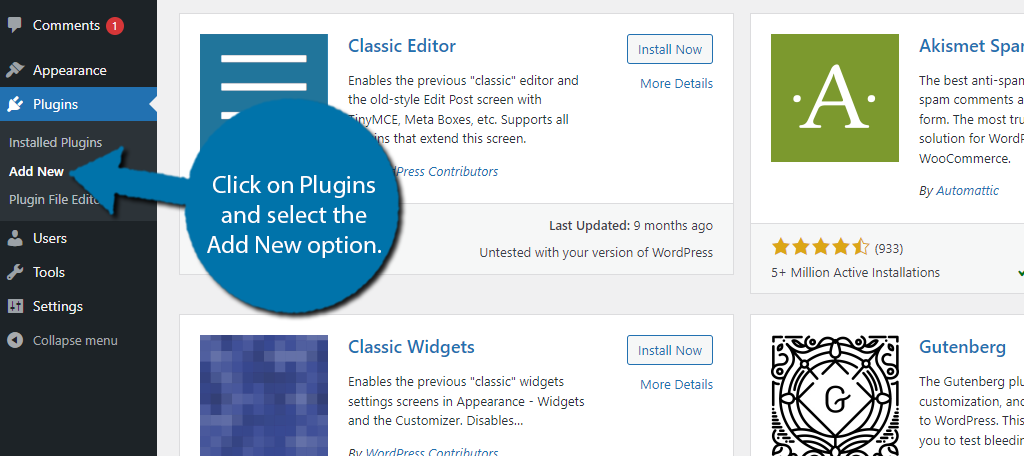
Let’s start by clicking on Plugins and selecting the Add New option on the left-hand admin panel.
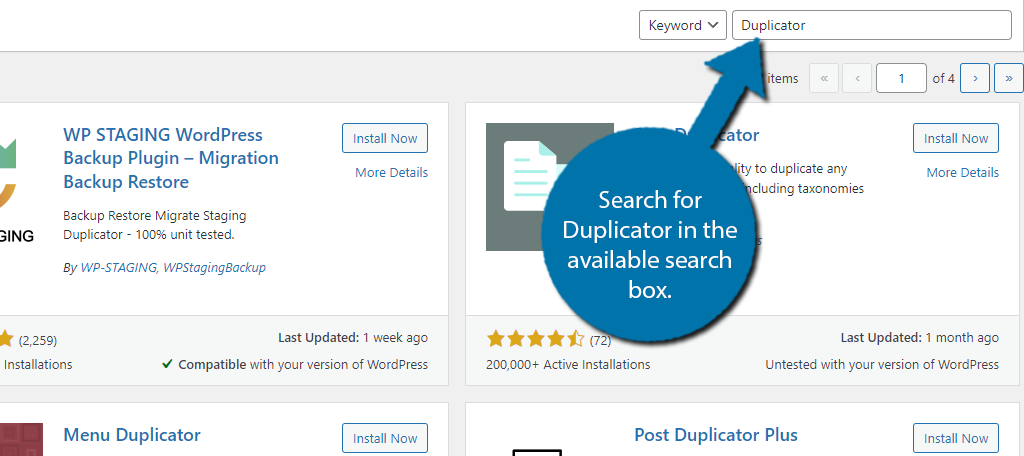
Search for Duplicator in the available search box. This will pull up additional plugins that you may find helpful.
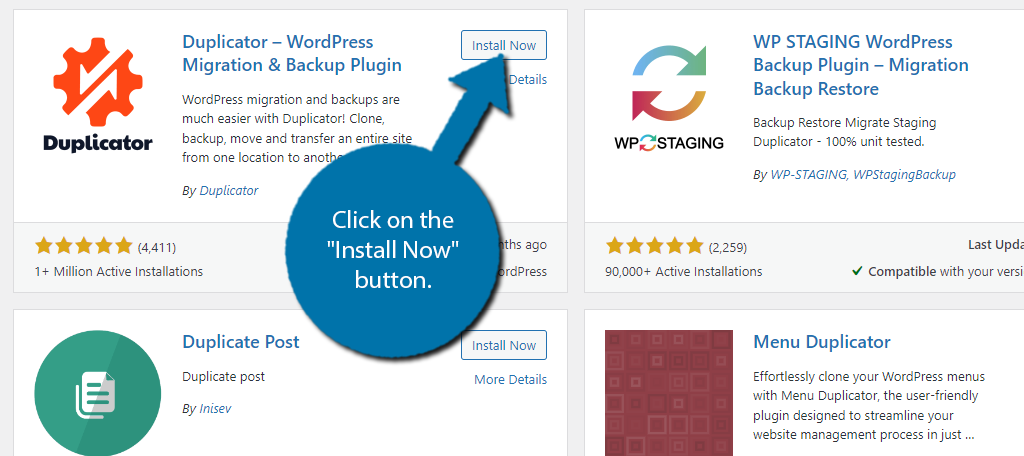
Find the Duplicator plugin and click on the “Install Now” button and activate the plugin for use.
Step 2: Create A Backup
You can immediately use Duplicator to back up your website upon activation. The plugin calls a backup a “package”, but it is the same thing. To begin this process, click on Duplicator and select the Packages option.
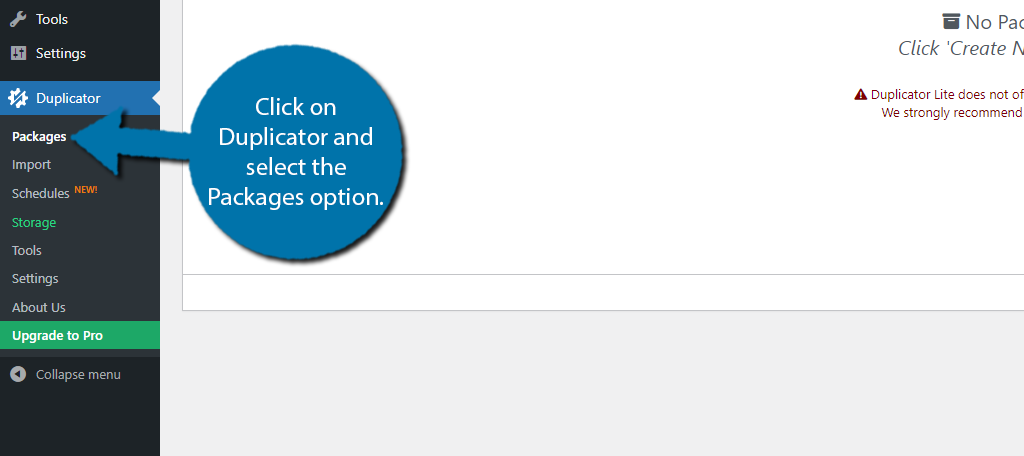
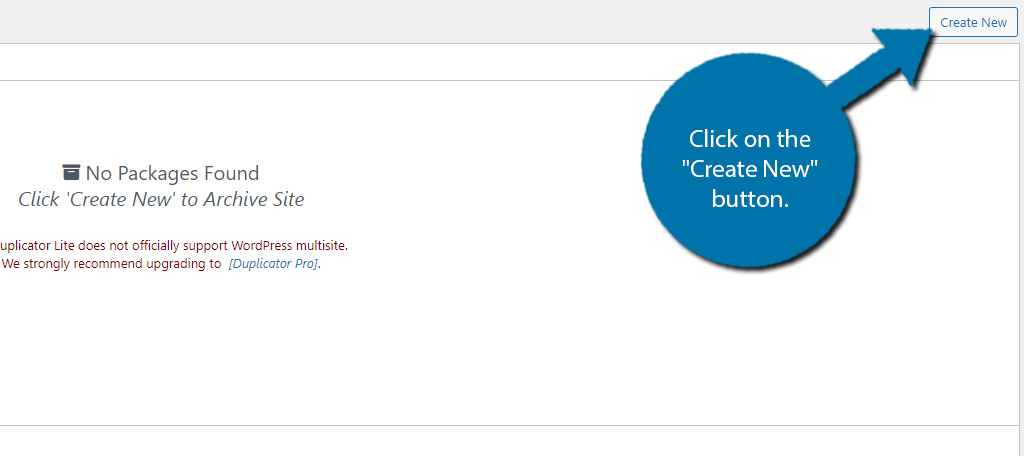
Packages are your backups, and this section would contain every single one you made if you had any. If you just installed the plugin, this section should be blank. Click on the “Create New” button on the top right.
Duplicator backups have three steps. There are settings to configure if you want, but the default options will create a full backup of your site, thus, you don’t really need to touch anything.
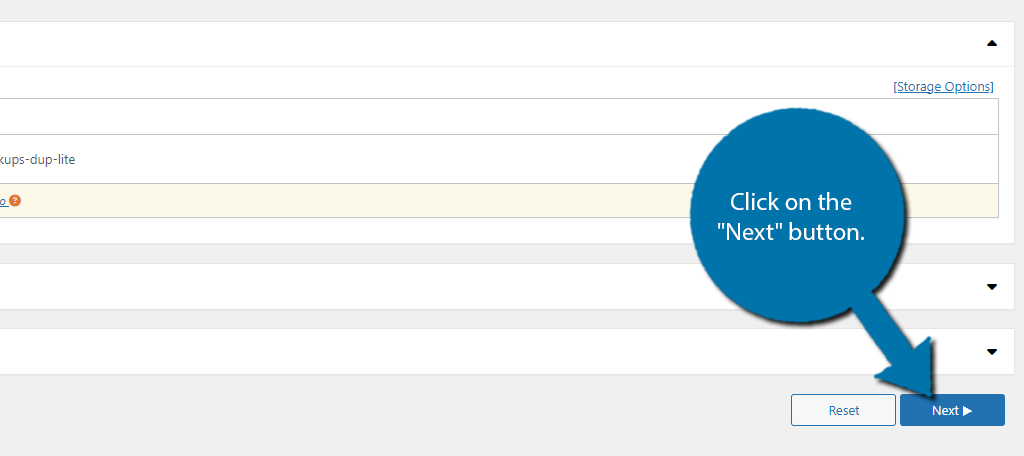
The first part of the process would be creating a title for the backup and choosing where to store it. In the free version, you can only store it locally, but if you upgrade to the Pro version, you can upload it to external places like Dropbox.
Note: It is recommended to keep your backup stored externally. That way, if your site is compromised, you still have access to the backup.
When using the free version of Duplicator, it’s probably not a bad idea to download your backup using something like cPanel to locate and save the file.
Click on the “Next” button to continue.
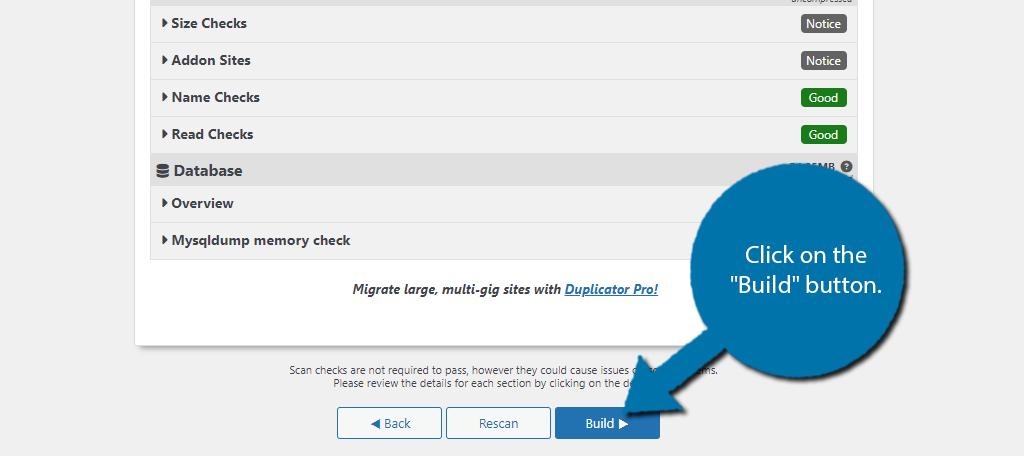
The plugin will now scan your site. You will see a full summary of your site, which is what the plugin will include in the backup. Click on the “Build” button to turn it into a backup.
A process will begin to create your backup. The time it takes depends on the size of your site and where you choose to store the file. After a few moments, you should now have a full backup of your WordPress site.
You can use the files it provides to restore your site at any time. Just be mindful that backups can take up a lot of space, so be sure you have the resources.
Method 2: Using FTP to Backup WordPress
Let’s take a look at how to create a backup of the site manually using an FTP client. Any FTP client will work, but this tutorial will demonstrate it with FileZilla. If you need help setting it up, be sure to check out our FileZilla setup guide.
This process entails copying your website’s files and storing them locally on your computer. It isn’t as straightforward as using a plugin, but it gets the job done and doesn’t take that long.
If you are not comfortable digging through files on your back end, I recommend using a different method. That said, it’s not that hard.
Step 1: Make A Backup Folder on Your Computer
The first thing you need to do is actually create a destination on your computer to store the backup. In this case, we are just going to make a folder called “Backup”, but feel free to call it anything you want.
To do this, find a location on your computer where you want to store it, right-click it, and select the Create Directory option.
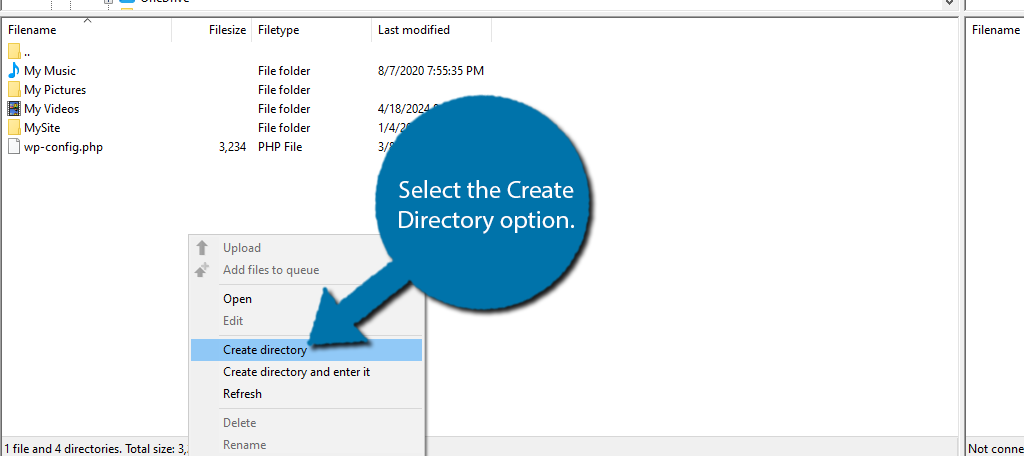
Name it “Backup” or whatever you want. We will use this folder to store everything from the next step, so be sure that it is still selected.
Step 2: Copy Your Site
All you need to do is copy the files that create your site. While you can do this individually, the fastest and easiest way is to just copy the public_html directory that houses all of your site files.
Note: Make sure you are in the Backup directory we just created otherwise, the files won’t end up there.
In my case, my starting directory is public_html, as such, I just need to select all of the files and Download them.
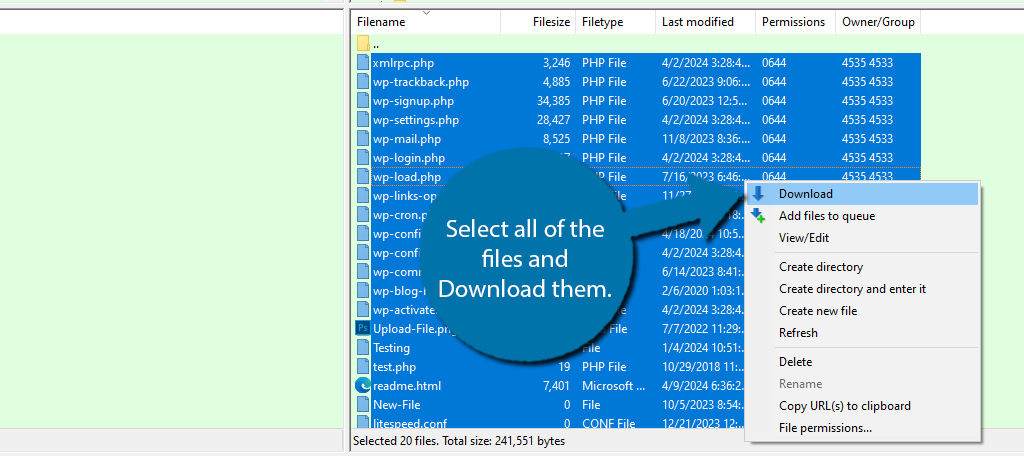
And that’s it. All of the files that were in your public_html directory should now be in your backup folder on your computer. To restore a backup with this method you would simply replace the files in the public_html directory with what is on your computer.
Note: You may want to consider zipping the Backup folder to save space on your computer, or wherever you store the file.
Method 3: Using cPanel for Backups
The cPanel actually has several ways to back up WordPress, but this method will look at the dedicated backup tool that may already have been set up by your web host when you started an account, but that depends on the host.
This tool is very easy to use and just requires clicking a button, thus it takes no time at all.
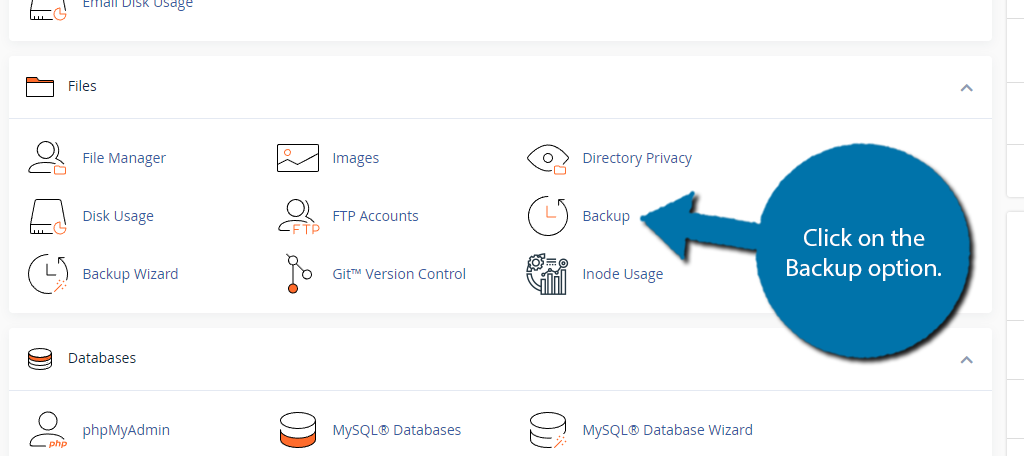
Step 1: Locate the Backup Area
Once you have signed into your cPanel, look for the Files section. Click on the Backup option.
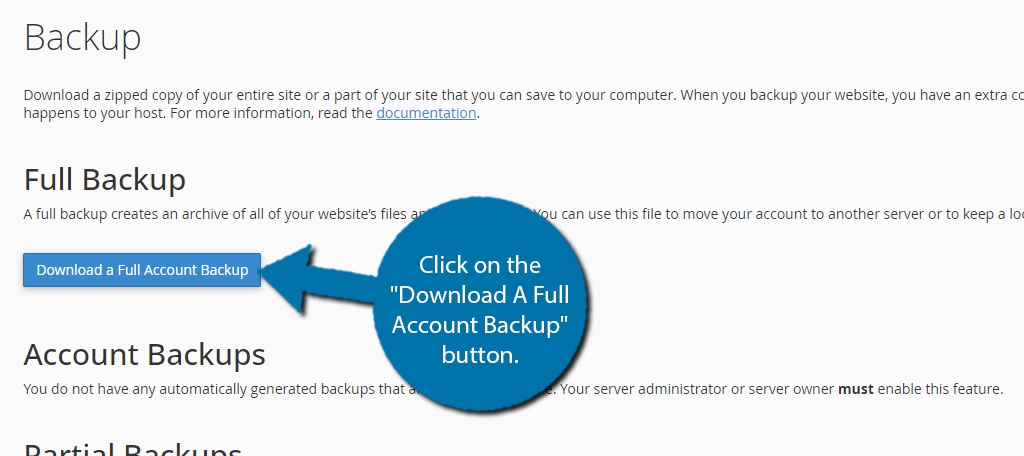
Step 2: Create A Backup
The cPanel gives you two options to create a backup. The first is a full backup, while the second is a partial backup. In most cases, you will just want a full backup, but more advanced users may want to create a partial backup to help them with testing.
To create a full backup, click on the “Download A Full Account Backup” button.
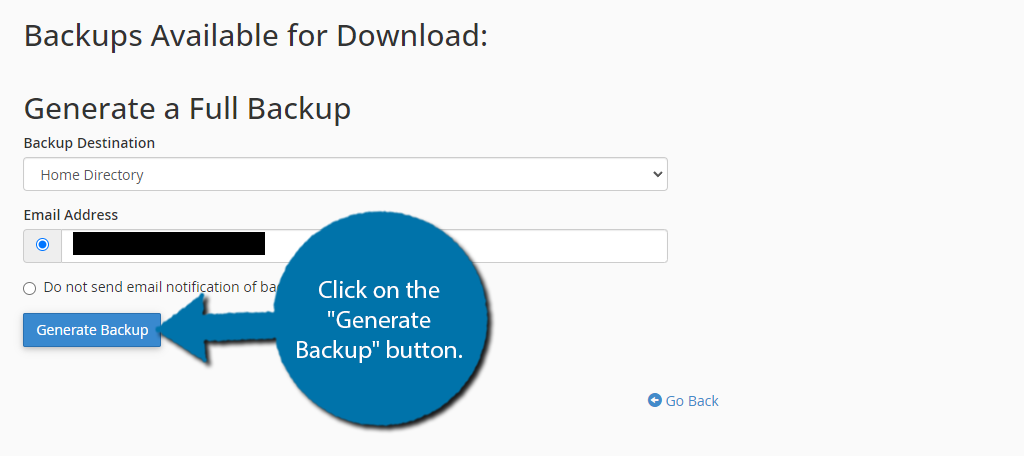
In the next area, you will be able to choose the destination for your backup. This allows you to place it in your home directory, or in an FTP client you have linked. You can also choose if you want to receive an email notification when it is complete. It is on by default.
Click on the “Generate Backup” button.
Depending on the size of your website, this process may take several minutes. Once it is complete, you will receive an email notification. The backup will be located in the destination you chose. The default option will place it in the Home directory.
The file name should begin with “backup-month.date.year…”.
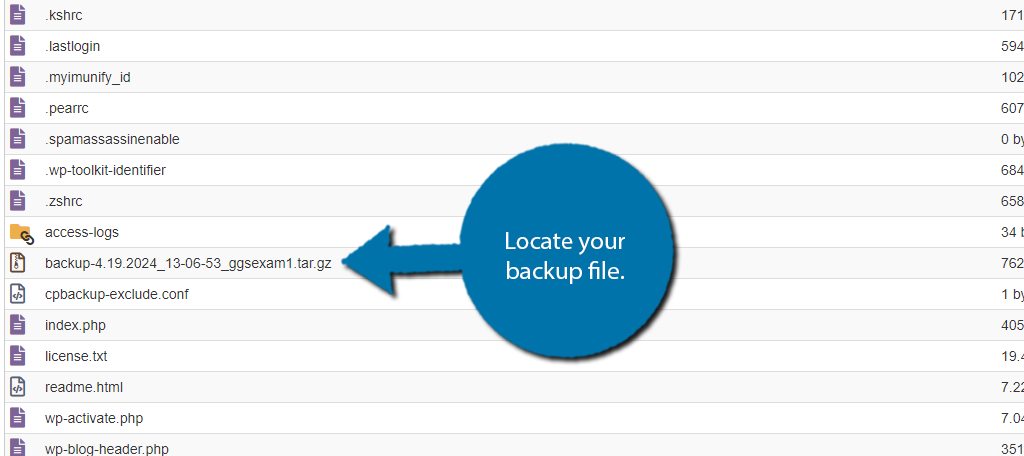
And that’s it. You can use this at any time to restore your website. Again, I do not recommend leaving this file in the home directory. Use the Download option to put it on your computer or upload it to the cloud for safety.
Method 4: Backing Up the WordPress Database
A more advanced way of backing up your site is to back up the WordPress database itself. This method is a bit more advanced than some of the others on this list, so it may not be the best option.
For those unaware, the WordPress database stores all of your content for your site. This includes posts, pages, users, and just about anything else you can think of. That said, accessing or manipulating databases is often avoided by beginners.
Deleting or editing the wrong database can break your site. Which, ironically, is a reason why you should make a backup before doing it.
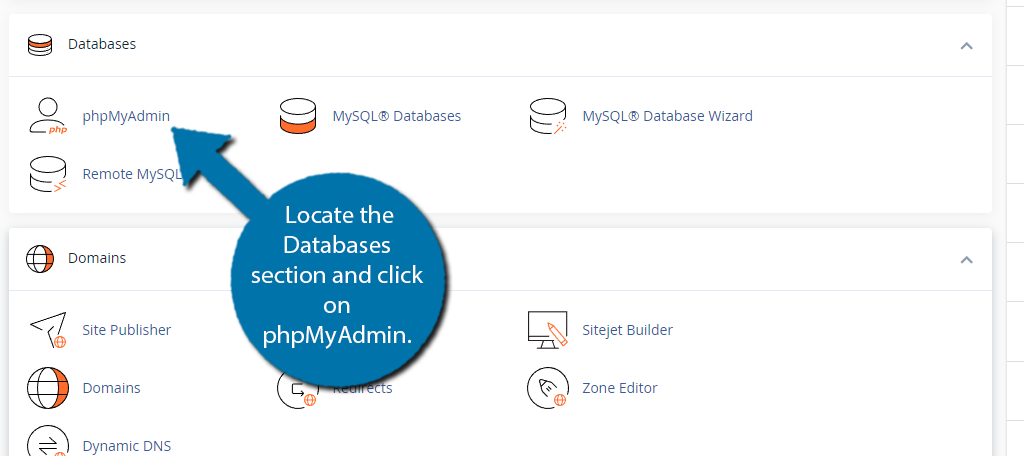
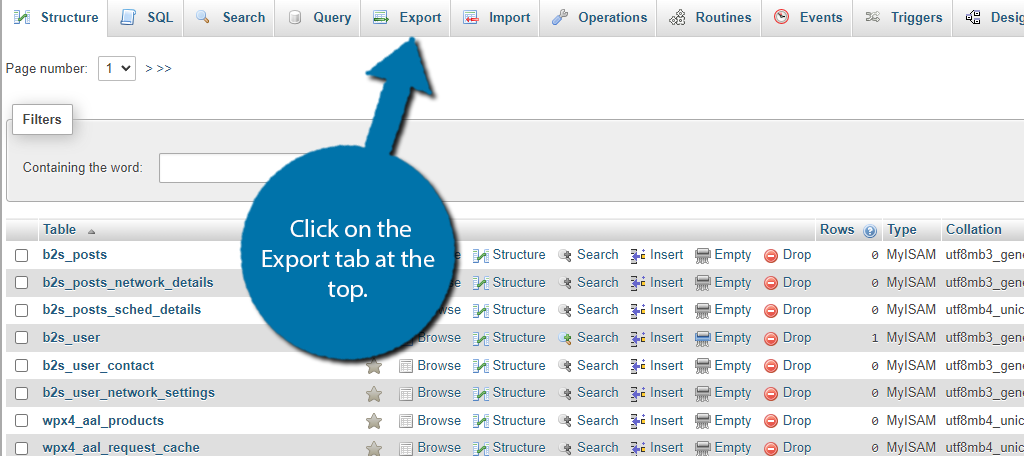
Step 1: Access phpMyAdmin
Start off by logging into your web hosting account and accessing the cPanel. Locate the Databases section and click on phpMyAdmin.
Step 2: Backup Your Database
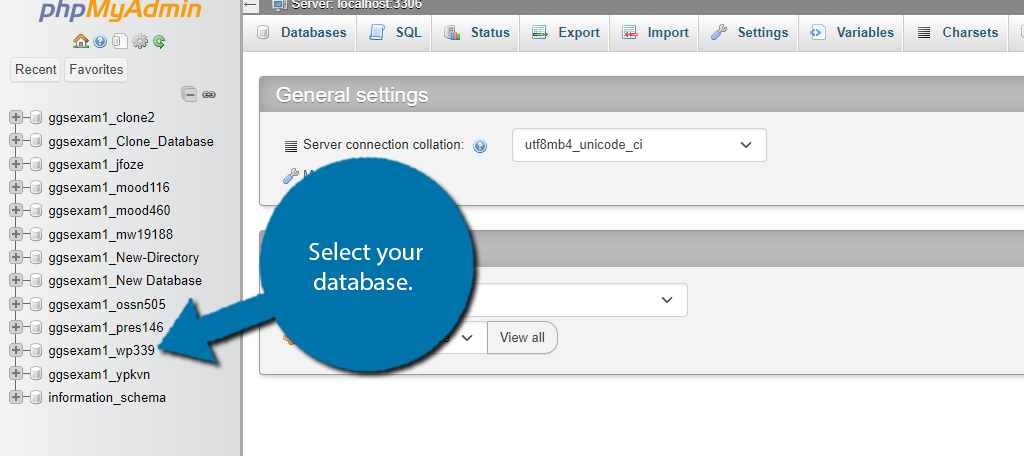
The first thing you need to do is locate your database. depending on your web hosting environment, you may have multiple. Unfortunately, the database name is not the same for everyone, so you will need to be able to identify this.
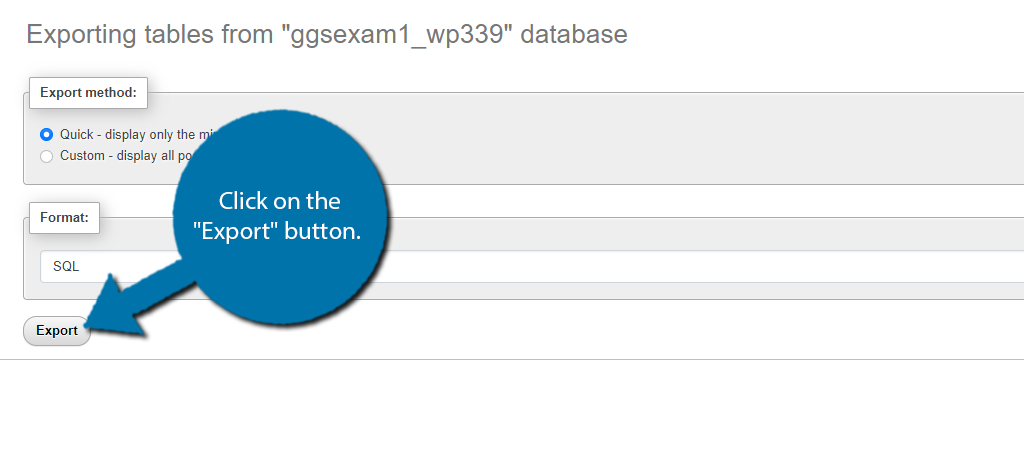
In most cases, the WordPress database will have “wpXXX” at the end of it. In my case, the database was called ggsexam1_wp339. Alternatively, you can browse the contents of each database, until you find the correct one.
You can also look the database up in your wp-config file for your website.
Click on the Export tab at the top.
The Quick default option is perfect for exporting your entire WordPress database. You can also choose the custom option if you want to control exactly what tables get exported. Once you have made your choice, click on the “Export” button.
The backup file will be added to your web browser’s downloads folder where you can move it to the desired location.
FAQs for WordPress Backups
You may still have a few questions after going through some of these methods, so let’s take a look at the most frequently asked questions about WordPress backups.
The best advice I can give is anytime you make a change to it. That could be daily, weekly, or monthly, thus it depends on your site. In most cases, websites opt for regular backup every month.
Absolutely! Automatic backups make it effortless to keep an up-to-date backup of your site. Most dedicated backup tools include this feature, although sometimes it is locked behind a paywall.
Yes. While there are other options, cloud storage is one of the best choices for storing backups because you can access them from any location and restore your site immediately. And in the event your site is compromised, your backup is safely stored elsewhere.
It depends on how often you make changes, but typically, having the latest three versions of your website is a great rule of thumb. Keeping too many can make it hard to find what you are looking for and take up a lot of space.
Yes. A website will typically take up a lot of space, and a backup will be a copy of it. To save space, especially if you are paying for cloud storage, zipping the file can save you a lot of money.
Yes, as long as you also used it to install WordPress. The process itself is quite simple, so it is a great option for beginners, and if you are interested, check out our full guide to create a backup using Softaculous.
We offer our customers a staging tool that you can access from the GreenGeeks dashboard. This will create a copy of your site, but the intended use is for moving your site to a new domain, or for creating a subdomain testing environment.
Create A WordPress Backup Today
As you can see, it is very easy to create a backup in WordPress and there are several ways to go about it. If I had to recommend a single option from this list, I would choose to use the cPanel backup method, as it is the easiest.
Just remember, make sure your backup is not stored on your web server. If your website is compromised, then your backup would be as well. Instead, keep it on an external device like an old HDD, computer, or in the cloud.
I hope you found this tutorial for backing up WordPress helpful.
How often do you back up your WordPress website? Which method do you prefer?
Article needs updating since back-up rotation option is gone. Option reduced to one (1).
For protecting WordPress:
I use Wordfence Pro version to check for spam, possible insertions and ability to blacklist countries or I.P. addresses as well as other stuff.
I was using Updraft Plus the paid version but was having trouble with it as were others. I moved to All-In-One Migration plugin which became a God send for migrating as well as backing up the ENTIRE WordPress site as oppose to being selective in what you backup as I’ve discovered it’s just as easy and less cumbersome to backup the entire WordPress folder for precautions. The backup for a 4GB site using A-N-1 takes about 15 minutes to create an image in your WP folder but depending on your Internet speed, it might take another 20 – 40 minutes to download it from your WordPress site to an off storage device whether in the cloud or on a network USB drive.
I feel TOTALLY secured with these two plugins as I can fully recover the money making WordPress site.
However, I will also use Softaculous to backup the Public_Html folder once a week to my Google Drive to grab the emails and other “Not as important” folders and files.
It is worth noting that I sometimes have trouble using FTP programs which is absolutely necessary to upload a backup back to the hosting server in which you will restore your WordPress site and that can take between 1 – 2 hours for a 4gb site; I don’t remember the exact time because I only had to do this once for a migration.
Thanks for your post.
It seems UpdraftPlus is having some issues with Green Geeks due huge memory usage that may be caused by some large processes like backup creation. Do you have any feedback ?
Thanks for your post.
It seems UpdraftPlus is having some issues with Green Geeks due huge memory usage that may be caused by some large processes like backup creation. Do you have any feedback ?
===
I heard someone said that .. I hope this had fixed
You can go into your GreenGeeks cPanel and update all those variables if needed.
I am searching on google how to backup wordpress website and I find your post. Hopefully, now we can backup WordPress website easily. Thank you!