Have you switched web hosts recently and need to fix those pesky 404 pages in WordPress? The 404-page error occurs when visitors try to access your website through your old URL. The good news, you can fix them by setting up a redirect for 404 pages in WordPress.
Tracking and redirecting these pages is one of the most important and first things that should be done when switching. Keep in mind that you should use other mediums to get the word out about a URL change.
Seeing a 404 error as a visitor is not a good thing and will generally make visitors look elsewhere for content. Another thing to consider is your website’s SEO, which determines how well you rank on search engines like Google.
In reality, 404 pages are a normal occurrence, but when it happens, the URL is removed from Google’s search index.
Today, I will demonstrate how to track and redirect 404 pages in WordPress using the Redirection plugin.
Why Are Tracking and Redirecting 404 Pages in WordPress Important?
Switching your website from one web host to another is not an easy task. There is a lot of work that goes into it, and redirects should be one of your first thoughts.
This will ensure that visitors who visit your old URLs will be redirected to the new ones. Unfortunately, no matter how well you prepare and let your visitors know about a change like this, many will not listen.
Redirects are the only surefire way to make sure they visit the correct page after a switch, but it doesn’t mean you shouldn’t try other ways. For example, utilize your social media accounts to spread the word about all major changes.
Facebook, Twitter, and Instagram are huge platforms that allow you to stay connected to your community. Informing your community of these changes is essential to building a sense of trust for your website.
Today, I will demonstrate how to track and redirect 404 pages in WordPress using the Redirection plugin. The Redirection plugin has over 900,000 active installs and gets the job done.
The best part is it’s completely free and makes it easy to manage your URLs at the same time.
Keep in mind that if you have hundreds or possibly thousands of 404 pages, you will be spending a lot of time. But, individual pages only take less than a minute.
Let’s take a look at the plugin in question and see all that it has to offer.
Redirection

The Redirection plugin is the most popular redirection plugin for WordPress. Once it has been installed and activated, you will be able to easily manage 301 redirections, keep track of 404 errors, and really just keep track of any loose ends you have on your website.
Keeping track of these sorts of things can help with SEO and generally help keep other errors down to a minimum. Whether you have a small site or a big site, Redirection can help you manage the 404 pages on it and get everything squared away.
It is a very lightweight plugin that won’t increase any load times for your site, so don’t worry about overusing it.
Redirection is powerful, yet straightforward. Once installed, you will have access to quite a few great features. These include:
- Redirect Manager
- Conditional Redirects
- Full Logging
- HTTP Headers
- Track 404 Errors
- Query Parameter Handling
- Migrate Permalinks
- Apache and Nginx Support
- Fine-Grained Permissions
- Import and Export
- Search Regex Compatible
- Totally Free to Use
All in all, you won’t find a better plugin out there today to help you with error pages and redirects. Let’s get it installed and set up together.
How to Track and Redirect 404 Pages in WordPress
Step 1: Install and Activate the Plugin
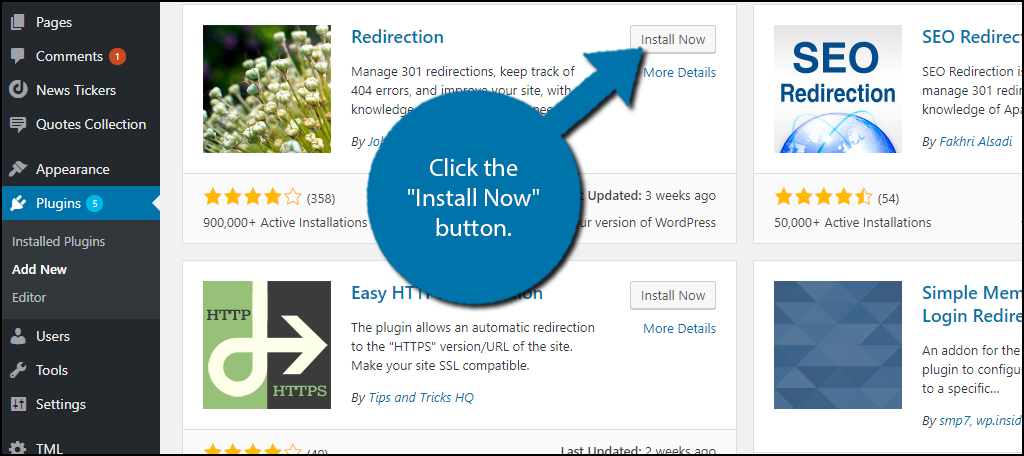
Let’s begin with clicking on Plugins and selecting the Add New option on the left-hand admin panel.

Search for Redirection in the available search box. This will pull up additional plugins that you may find helpful.

Scroll down until you find the Redirection plugin and click the “Install Now” button and activate the plugin for use.
Step 2: Go to the Plugin Settings Page
On the left-hand admin panel click on Tools and select the Redirection option. This will pull up the main settings page.
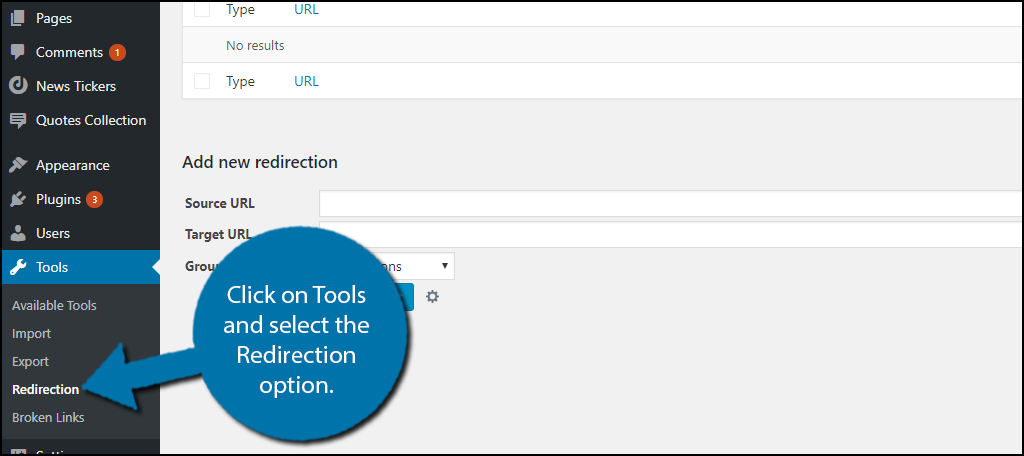
These options will only appear after activating the plugin.
Step 3: Start Tracking 404 Pages
404 pages are a common occurrence when switching web hosts, moving content, or deleting older content. You will most likely not have many 404 pages at once and they will appear at different times.
The Redirection plugin will track whenever a 404 page is encountered. You can find this information by clicking on the 404s tab.
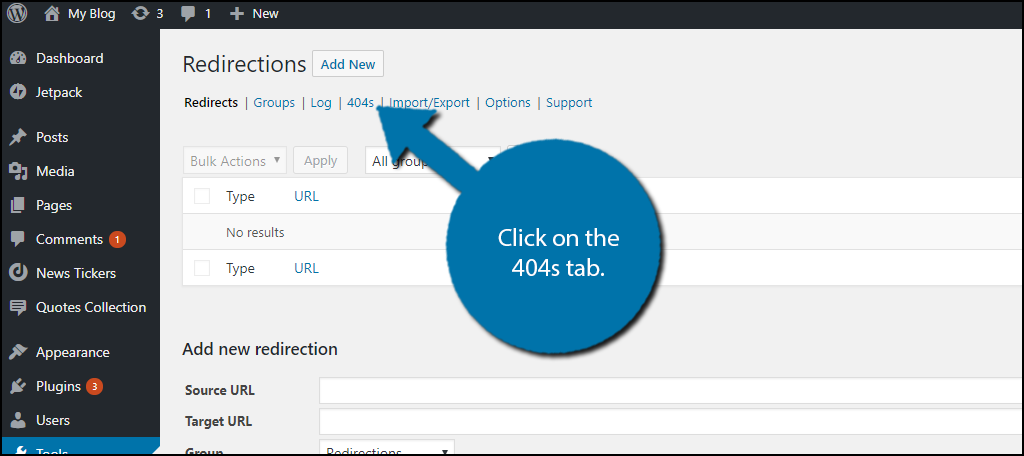
If you had any 404s, they would appear here. Unfortunately, not all of these will end up being true, which is why you should test the link in question before setting up a redirect.
Of course, you should also make sure you are listening to feedback from your community. They may discover the issue before you notice it.
Step 5: Set Up Redirection
Setting up Redirects is very easy, but it can be confusing the first time. All you need to set one up is the URL of the page that has the 404 message and the URL of where you want them redirected to.
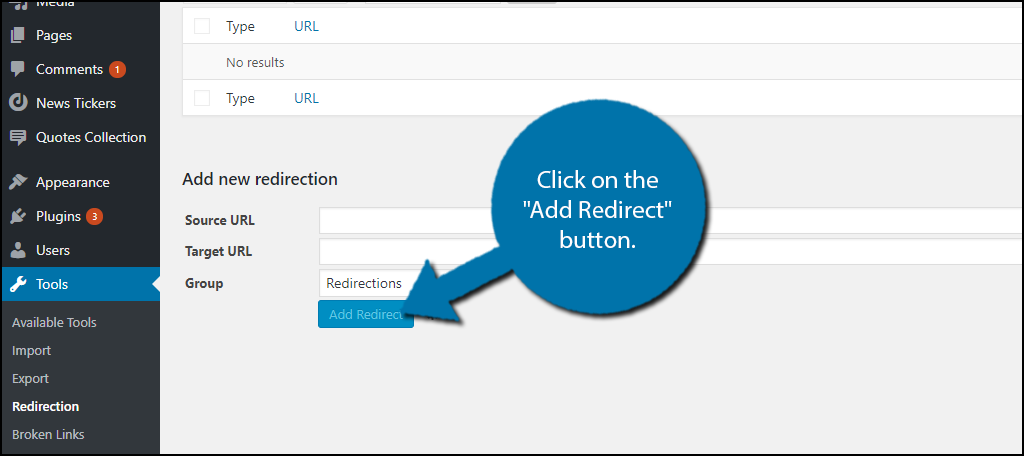
The Add new redirection section is where this information is entered. The Source URL is where you enter the 404 page.
The Target URL is where you want to send your visitors. Once the information is entered, click on the “Add Redirect” button.
Congratulations, you have successfully set up a redirect in WordPress. You can change it at any time by clicking on the Edit option next to the redirect.
You can set up as many redirects as necessary, but you will need to create each one individually.
Make Sure Your Visitors Find Your Website
Moving a piece of content, deleting a piece of content, or moving an entire website will definitely lead to a 404 page. This is normal for a web developer and whenever one of these occurs, you need to be ready to set up a redirect.
Most visitors are not loyal and if they experience a 404 page, they will look elsewhere.
Redirects are an essential part of running a website. There are plenty of pieces of content that are no longer necessary and you will need to delete them. The important part is how fast you react.
Every 404 page encountered is one less view for your website and that can be very frustrating for struggling websites.
Redirects Have A Lot Of Uses
While correcting error messages when pages move is the most common use of redirections, it’s not the only use.
For instance, have you ever typed in the wrong URL but ended up in the right location? That wasn’t luck, it’s a redirect. Larger websites actually buy up similar domain names or misspellings of their domain name to avoid third parties from taking advantage of it.
For example, if you go to www.Amazoon.com, you still end up at Amazon.com.
Another example would be before it was common to make your website responsive. Websites could achieve this by detecting and redirecting certain devices to specific pages. Or in other words, sending mobile users to the mobile pages.
The same concept works with different regions. You can send visitors from Mexico to a Spanish version of a page.
Redirect 404 Pages In WordPress Today
Having 404 error pages and bad directs can really affect your website on multiple levels. For one thing, it will hurt your SEO. Google follows links on your website and nothing more. Thus, if a link leads to the wrong location, Google will think it is correct, and index it.
Or, if you have a broken link, Google will penalize your content. This means your pages could start to drop in terms of search results.
That being said, the process of making the fixes on your site and updating everything properly does not have to be difficult if you have the right tool.
Using the Redirection plugin will allow you to accomplish this a lot easier than any other method out there right now.
I hope the tutorial was able to show you how easy it is to track and redirect 404 error pages in WordPress using a plugin. Simply install it, make your changes, and watch your website SEO come back and search functionality restore to how it should be.
How many redirects have you set up? How easy have you found the Redirection plugin?