If you want to present videos on your WordPress website, use a video popup to do it in style! A popup (also known as an overlay or modal) draws attention to the video content. Rather than playing on the page, the video is brought to the forefront, where it’s the center of attention.
Can’t You Just Embed YouTube Video?
Embedding a video from YouTube or Vimeo in a WordPress page is easy. Thanks to the WordPress “auto-embed” feature, all you have to do is paste a video URL into the WordPress editor. When you publish the page or post, the video will appear on the page.
There are a couple of drawbacks to that method, though. If a visitor wants to make the video larger, their only option is to click the “Watch on YouTube” link. That’s good for YouTube, but not so good for you. It takes the visitor away from your site.
Maybe worse, embedding video creates a connection to the video site and loads a preview. That will increase the time it takes to load the page. We should be doing all we can to decrease page load times, not to load things that may not be used.
A video popup solves that problem. Using the WP Video Popup plugin, the video opens over the top of the rest of the page content. It can’t be missed. And it doesn’t create a connection to the video site until the visitor opens the popup—no more loading of unnecessary page elements.
The plugin allows us to popup video when the visitor clicks a “trigger.” The trigger can be a link, a button, an image – any element to which you can add a CSS class.
The pro version of the plugin also has an option to play the video when a visitor loads a page. Auto-play is not always a great user experience though (and Google doesn’t like it). So we’ll focus on creating popups that your visitor chooses to open.
Let’s install the plugin and learn how to popup YouTube and Vimeo videos.
Installing the WP Video Popup Plugin
Log in to your WordPress admin panel.
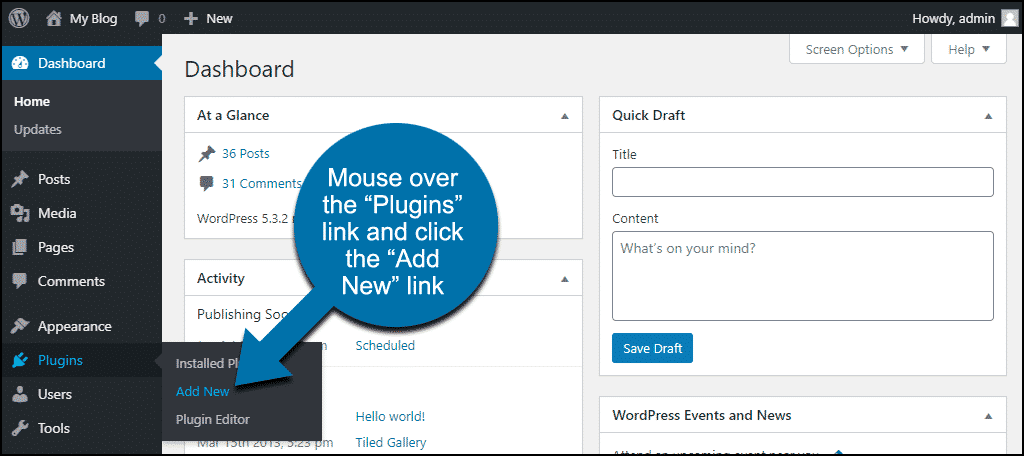
In the left column navigation, mouse over the “Plugins” link and click the “Add New” link.
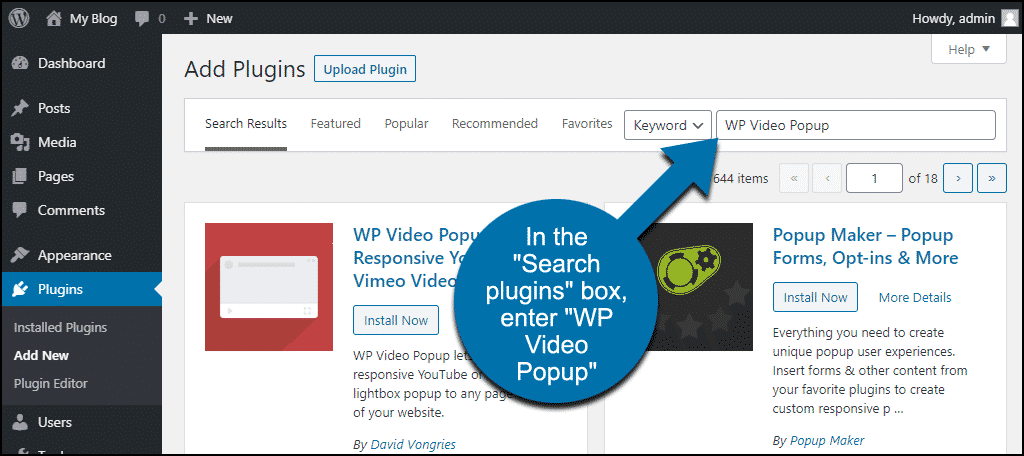
In the “Search plugins…” box, enter “WP Video Popup.”
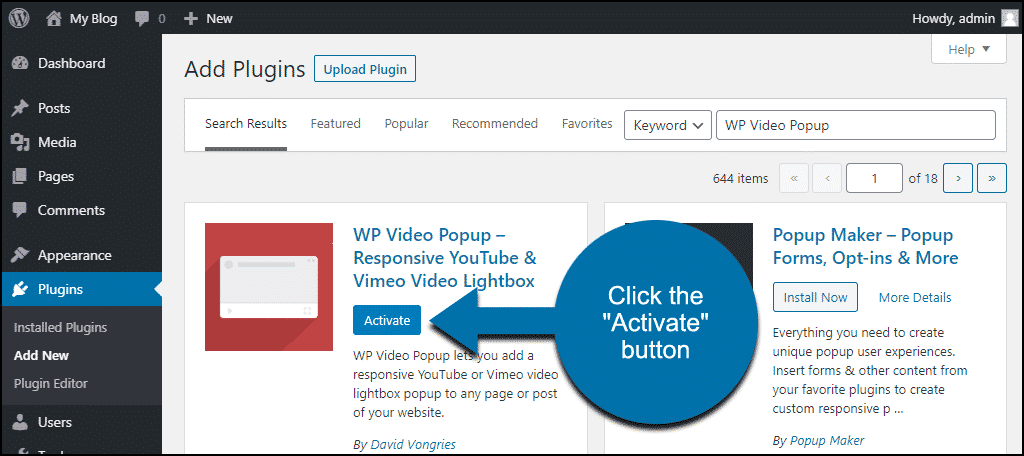
Once you have located the plugin, click the “Install Now” button.

Click the “Activate” button.
Using WP Video Popup
There’s no setup or configuration necessary to use the plugin. Just add the shortcode to a page or post.
This is the shortcode:
[ht_message mstyle=”info” title=”” show_icon=”” id=”” class=”” style=”” ][wp-video-popup video=”link to YouTube or Vimeo video“][/ht_message]
This is how it looks with a YouTube video URL:
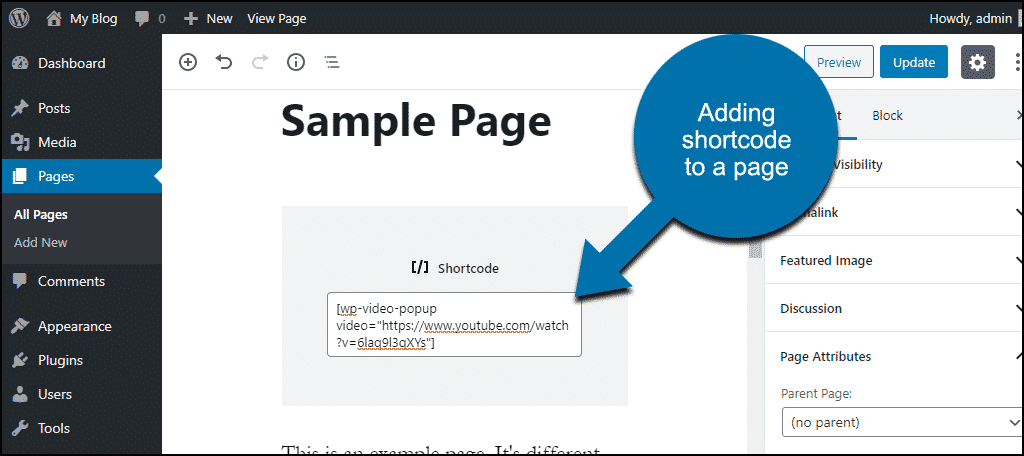
[ht_message mstyle=”info” title=”” show_icon=”” id=”” class=”” style=”” ][wp-video-popup video=”https://www.youtube.com/watch?v=6laq9l3qXYs”][/ht_message]
So let’s add that shortcode with the video URL to a page. I’ll open the sample page for editing, and paste the shortcode into a shortcode block.
If you don’t use the WordPress Gutenberg editor, paste the shortcode into the page using the classic editor.
The second step is to add a trigger that will popup the video. The trigger is a CSS class (wp-video-popup) added to a link, button, image, etc.
It may seem unusual, using a CSS class to trigger an action, but it’s not as complicated as it sounds.
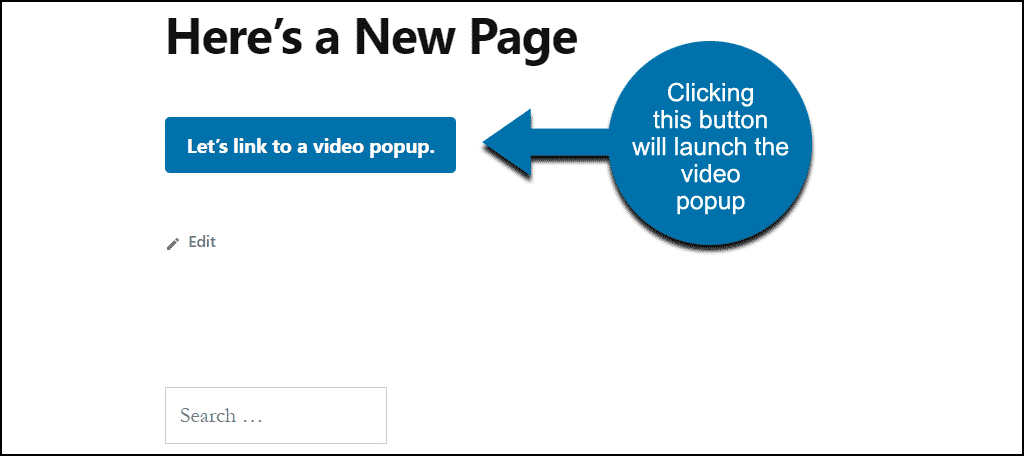
We’ll use a button to trigger the popup.
In the “Options for the Video Trigger” section below, I’ll show you other ways to trigger the popup. Also, how to add a trigger using the classic WordPress editor.
Add a button block and enter the button text.
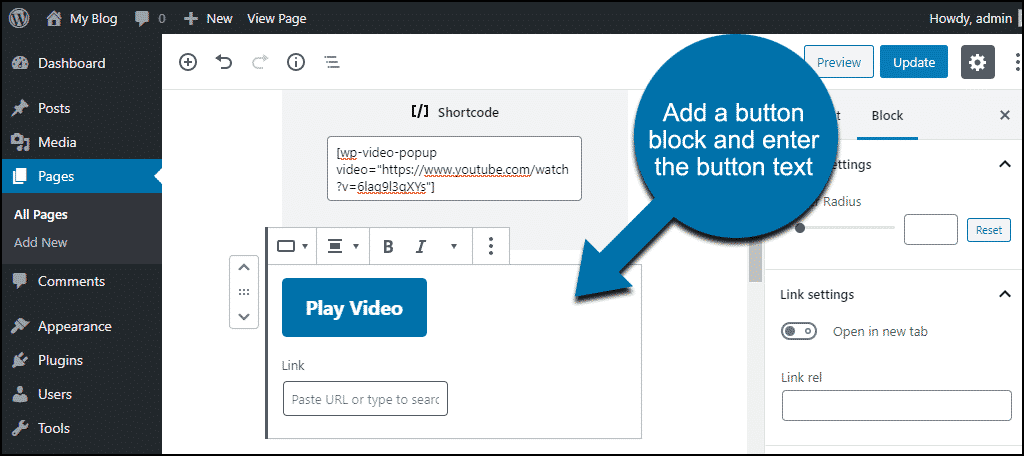
Now while the button block is open, scroll down to the “Advanced” section in the right column.
In the “Additional CSS Class(es)” field, paste the trigger class, wp-video-popup.
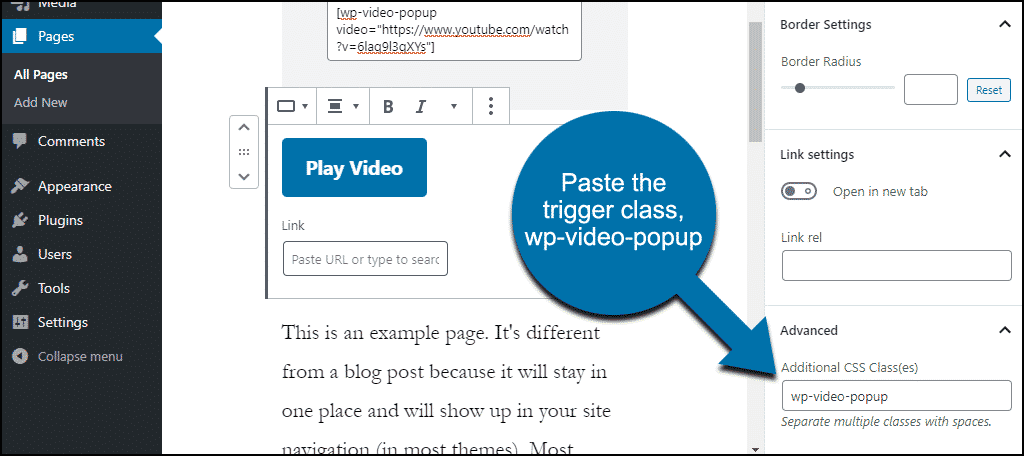
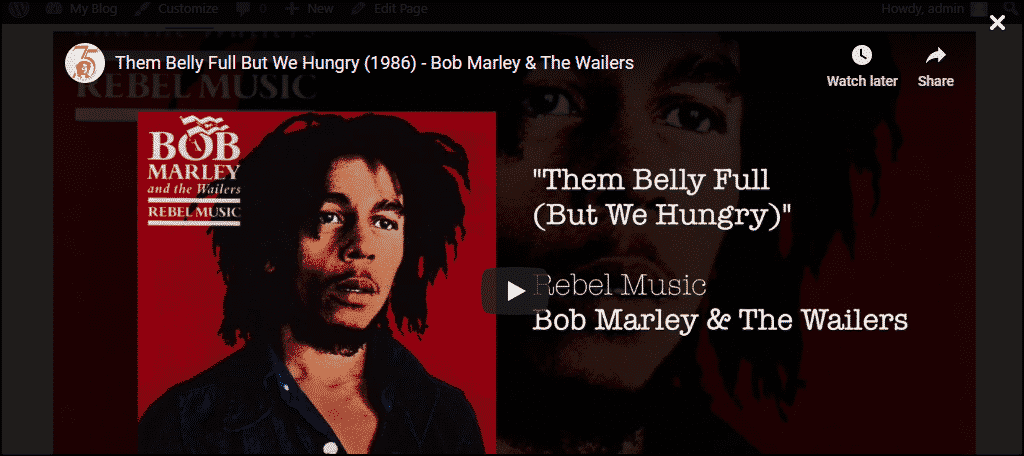
Save the page, and the button will be displayed.

Click it, and the video popup goes into action.
To popup a Vimeo video, the steps are the same. Just use a Vimeo URL where we used the YouTube URL above.
Options for the Video Popup Shortcode
There are a few useful things you can do with shortcode options.
Mute
You probably don’t want to mute your video when it starts, but in some cases, you may have to. Some browsers will only auto-play video if it is muted, so you have to decide between sound or auto-play.
If video isn’t auto-playing in your browser of choice, try adding the mute option to your shortcode:
[ht_message mstyle=”info” title=”” show_icon=”” id=”” class=”” style=”” ][wp-video-popup mute=”1″ video=”https://www.youtube.com/watch?v=6laq9l3qXYs”][/ht_message]
Only Show Videos From Your Channel in “Related Videos”
At the end of most YouTube videos, there will be a display of related videos. You can’t disable that feature, but you can make it show only videos from your channel.
[ht_message mstyle=”info” title=”” show_icon=”” id=”” class=”” style=”” ][wp-video-popup hide-related=”1″ video=”https://www.youtube.com/watch?v=6laq9l3qXYs”][/ht_message]
Skip the Beginning of a Video
There are occasions where you’ll want to start a video at a certain point in the video. To do that, add the start option. The value is in seconds, so to start a video a minute in, you’d enter 60.
[ht_message mstyle=”info” title=”” show_icon=”” id=”” class=”” style=”” ][wp-video-popup start=”24″ video=”https://www.youtube.com/watch?v=6laq9l3qXYs”][/ht_message]
Using Multiple Options
You can combine the popup options in one shortcode.
[ht_message mstyle=”info” title=”” show_icon=”” id=”” class=”” style=”” ][wp-video-popup mute=”1″ start=”24″ video=”https://www.youtube.com/watch?v=6laq9l3qXYs”][/ht_message]
Options for the Video Trigger
We placed the trigger for our video popup in a button in the example above. But it can also be placed in other elements.
Trigger With Text
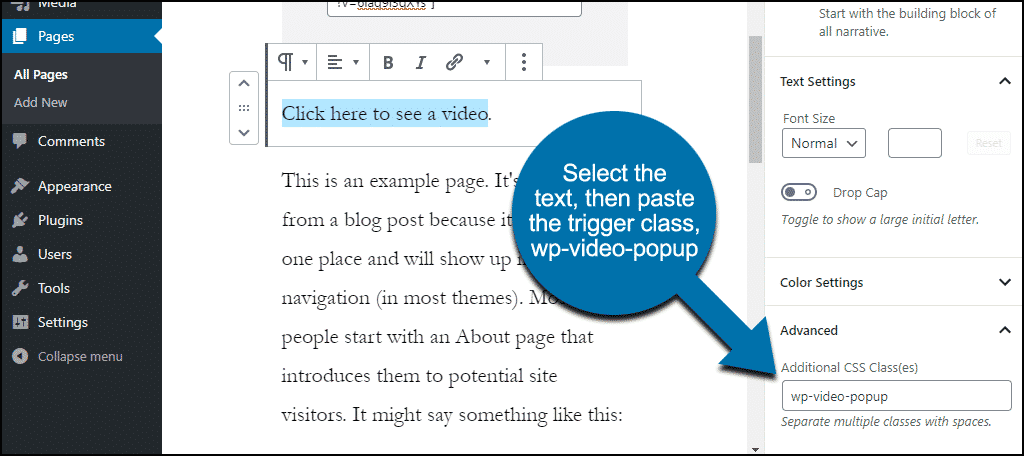
Any section of text can be selected to link to a video popup.
Select the text in the editor.
Then just like we did with the button, scroll down to the “Advanced” section.
In the “Additional CSS Class(es)” field, paste the trigger class, wp-video-popup.
Now save the page.

Note that you are not creating a link with this method. So there won’t be any visual indication that the text is a link. You may want to underline the text with HTML or CSS to remain consistent with other links on your site.
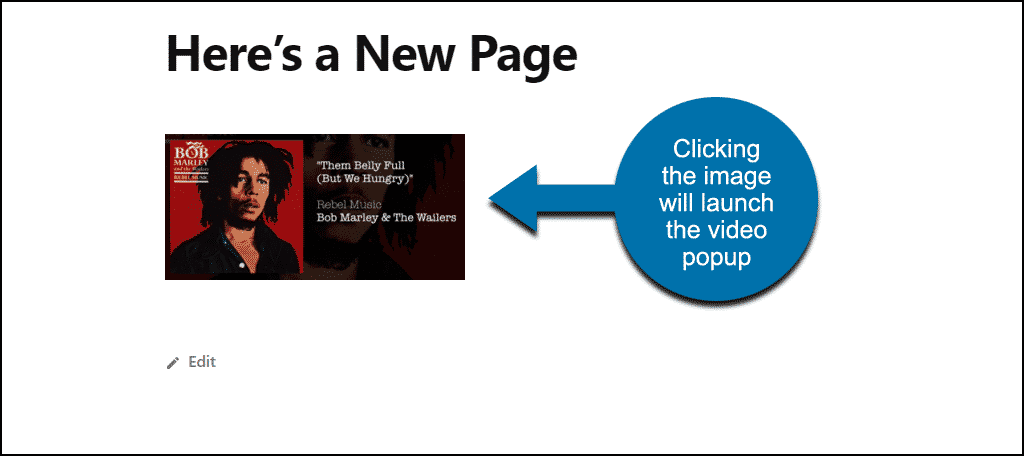
Trigger With an Image
Add an image to your page.
Then, as we did in the previous examples, scroll down to the “Advanced” section.
Paste the trigger class, wp-video-popup, into the “Additional CSS Class(es)” field.

Save the page.
Now there’s a clickable image on your page that will open a video popup.
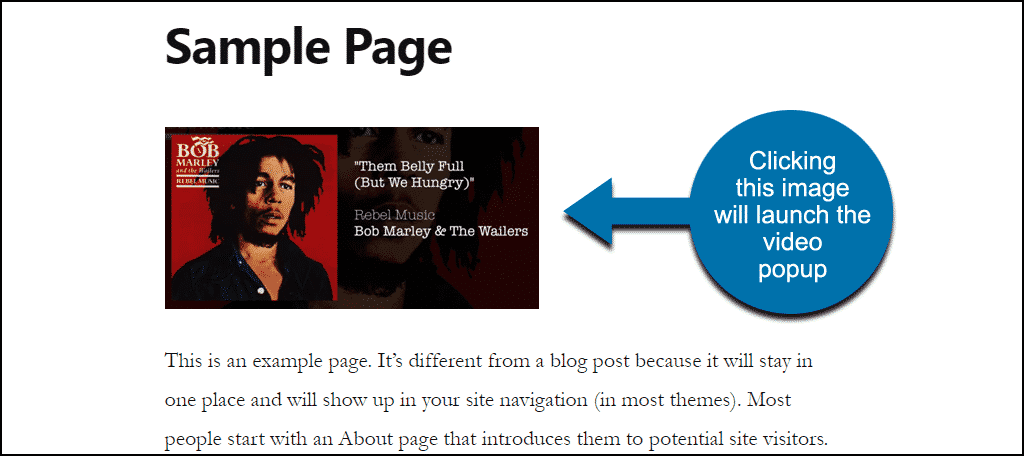
Again, there’s no visual indication that a visitor should click the image. You should add text, an image caption, or even some sort of “click here” text on the image itself.
As you’ve no doubt noticed, any element to which you can add a CSS class can be a trigger.
Setting Triggers in the Classic WordPress Editor
The concept is the same; we’re adding a CSS class to an element. But it’s done in different places in the classic WordPress editor.
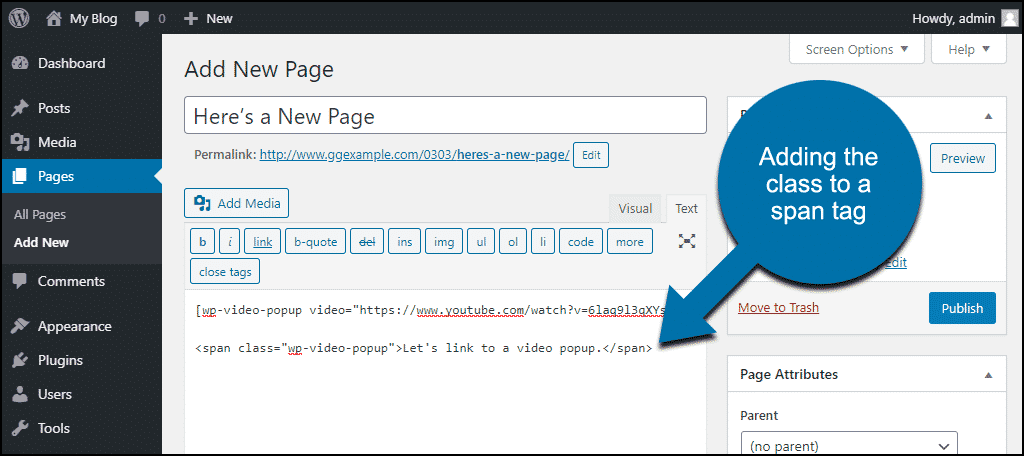
Adding the Trigger CSS Class to Text in Classic Editor
To add CSS to text, we have to switch out of the Visual editor and go to the Text editor

Now we’re going to wrap the text we want to trigger the video in a span tag. So:
Let’s link to a video popup.
This becomes:
[ht_message mstyle=”info” title=”” show_icon=”” id=”” class=”” style=”” ]<span>Let’s link to a video popup.</span>[/ht_message]
Then we add our trigger class:
[ht_message mstyle=”info” title=”” show_icon=”” id=”” class=”” style=”” ]<span class=”wp-video-popup”>Let’s link to a video popup.</span>[/ht_message]
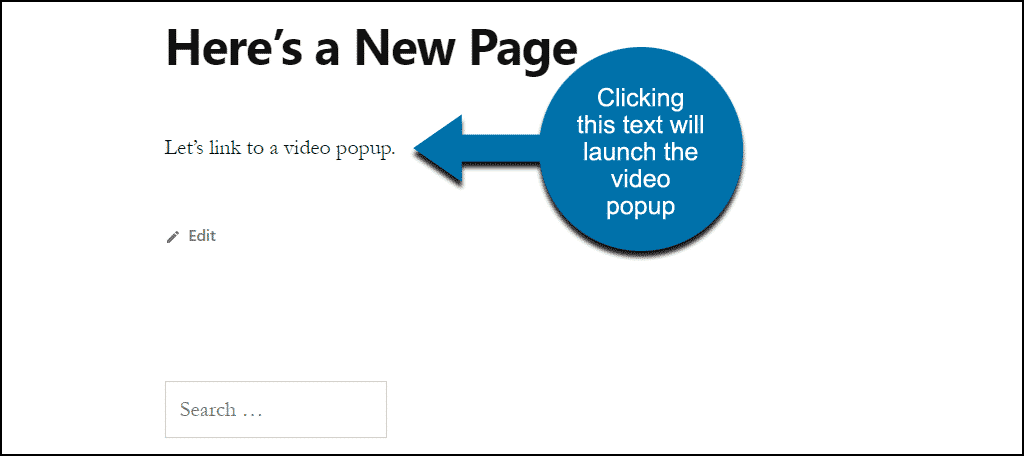
Publish the page and the text will trigger the video popup.
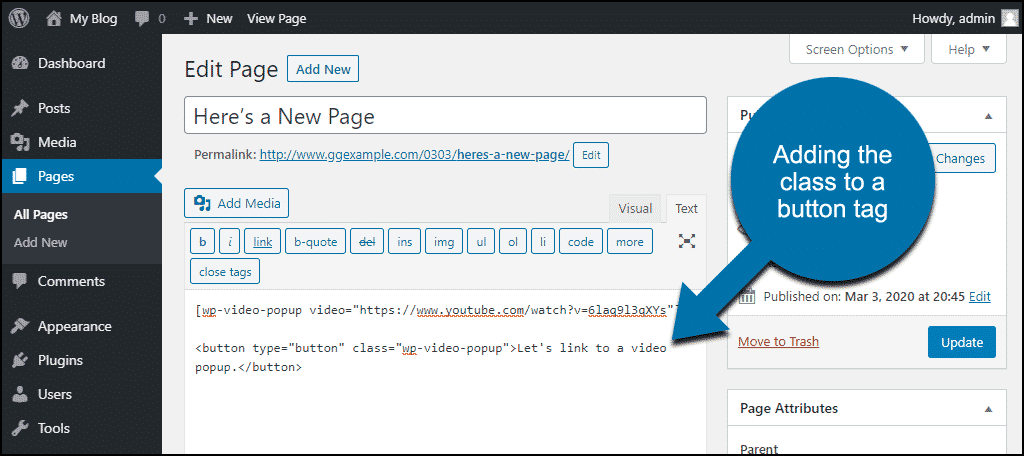
Adding the Trigger Class to a Button in Classic Editor
We can add the class to a button like so:
[ht_message mstyle=”info” title=”” show_icon=”” id=”” class=”” style=”” ]<button type=”button” class=”wp-video-popup”>Let’s link to a video popup.</button>[/ht_message]
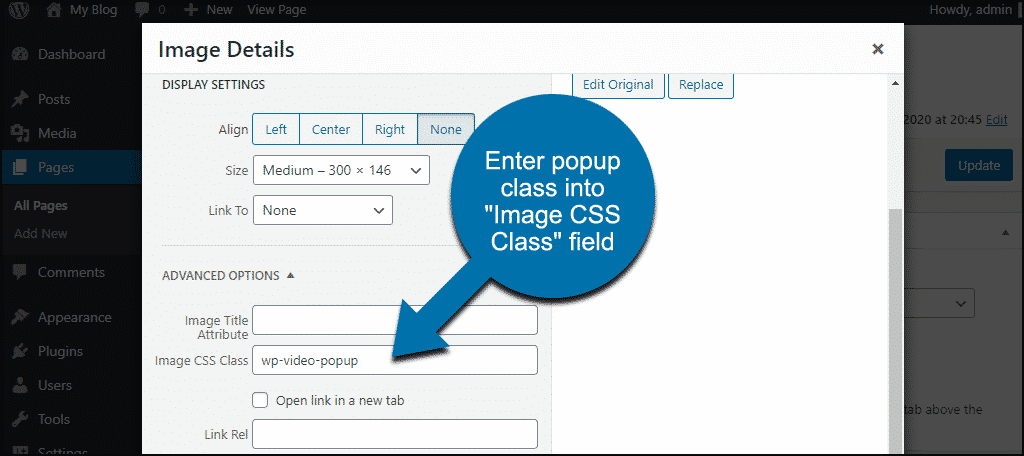
Adding the Trigger Class to Images in Classic Editor
You don’t have to switch to the Text editor for this one.
Insert an image into your page and click the image in the editor.
Click the “Edit” icon.
![]()
In the “Image Details” popup, find the “Advanced” section and enter the popup class into the “Image CSS Class” field.
When you save the page, the clickable image is there.
Don’t forget to add text or some other indication that the image is clickable.
What Happens if You Uninstall the WP Video Popup Plugin
If you uninstall the plugin, pages and posts that used the plugin will be affected. Issues include the following:
- Your pop out YouTube player will stop working.
- The plugin shortcodes will stop working, so the shortcodes themselves will be displayed anywhere they were used.
Video Rules, Show It Off
I’ve explained how presenting video in a popup can speed up your page loads and keep visitors on your site. Using the WP Video Popup plugin makes it easy to add a video to your website the right way. Hopefully, this tutorial will inspire you to add a video to your WordPress site.
Or to add more!
Have you ever used the native WordPress “auto-embed” feature? If you moved from embedding to popups, did you notice performance improvement? Let me know in the comments.
I think LeadPlayer is an easy way to put popup on YouTube and Vimeo videos.