Forbidden errors, or a “403 forbidden error,” arise when your site has permission settings that are incorrect. Every file and folder has a permission access number that can control whether the content is writable, executable, or readable.
It can cause a great deal of damage when trying to attract visitors if these get changed. Today I am going to show you some options that allow you to fix a 403 error on your website.
The error can also affect your reputation as a professional in your field as people will not be able to access your content. Even though 403 forbidden errors on a website can be problematic, they are actually quite easy to identify and fix.
In some instances, it could be as easy as re-configuring a security plugin or removing one that is corrupt.
How Do 403 Forbidden Errors Occur?
Simply put, when you see a 403 forbidden error, it means that you do not have the permissions needed to view the requested file or resource. The error can be intentional sometimes. However, oftentimes, it is due to certain permissions being misconfigured.
There can be several things that cause this type of error to show. More often than not, a 403 error is caused by security plugins or various scripts that have been added to a website and not configured properly.
When not configured properly, these security plugins can block IP addresses because they incorrectly think that they are malicious.
A 403 error can also be caused by a host detecting an infection during real-time scans. Again, it may be misread because of an outlying issue, but when detected, these infected domains are often disabled.
Let’s take a look at a few different ways to look for these problems and fix a 404 error.
Fixing a 403 Forbidden Error on Your Website
There are quite a few things you can do to address the 403 error. First, we’ll start with the most common fixes for your website.
Luckily, a lot of these fixes are relatively quick and easy to try.
Method 1: Checking the .htaccess File of Your Site
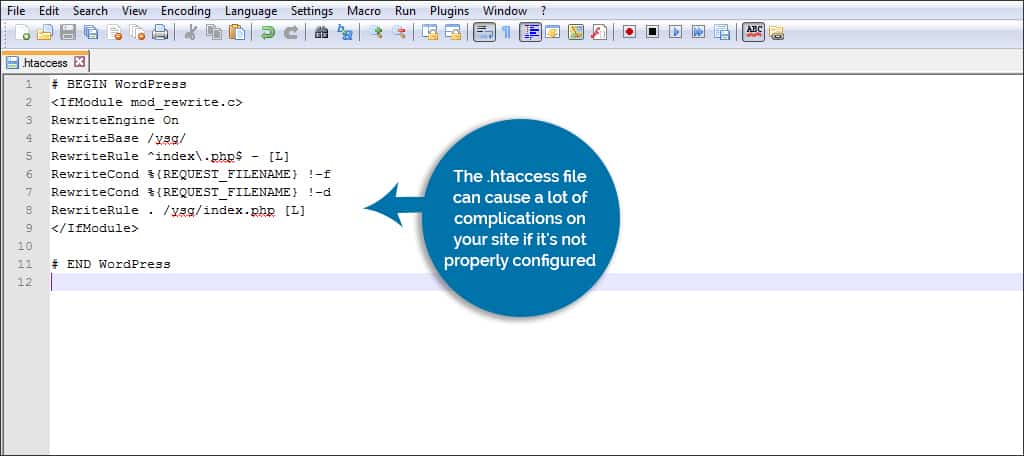
The .htaccess file can cause a lot of complications on your site if it’s not properly configured. A corrupt or modified file can prevent users from accessing certain pages or even the entire site itself.
Not sure where to find the .htaccess file? No worries, you can easily find it here. There are two ways you can check the .htaccess file of your site once you find it. You can check it through FTP access or through plugins if you use WordPress.
FTP Access
If your web hosting company uses applications like cPanel, the .htaccess file can be directly accessed and modified by using the “File Manager” tool for your domain.
Other FTP programs can be used to access those files as well, such as CuteFTP or FileZilla.
WordPress Plugins
Using a WordPress plugin that deals with .htaccess file issues is never a bad choice and can help stabilize the .htaccess file. These can be found by going to the “Plugins” section of your dashboard, clicking on “Add New” at the top, and searching for “htaccess.”
Find one that you like and use it to check your .htaccess file.
Method 2: Removing the .htaccess File
If you believe the .htaccess file is corrupt or having problems, you can simply remove it entirely. Using FTP access or otherwise viewing the root folder of your website, you can delete the file from the system.
After this is done, go to “Settings” in the WordPress dashboard and select “Permalinks” in the list. Once you hit the “Save Changes” button, a new .htaccess file will be created automatically.
Note: You don’t have to change any of your current settings in order to press this button.
Method 3: Addressing File Permissions of Your Website
Sometimes, incorrect file permissions can cause the 403 forbidden error. File permissions can be somewhat time-consuming to fix if you don’t have the right software.
Many FTP clients will give you access to those permissions and allow you to change them.
However, you must be confident in what you’re doing. If you don’t know exactly how to change the access numbers of web pages and content, you could disable a large number of features on the site.
The folder permissions of any WordPress site should be set to 744 or 755. Anything else could prevent new content from being added to the folder. This could prevent future updates, additions, or changes you may need to make later on.
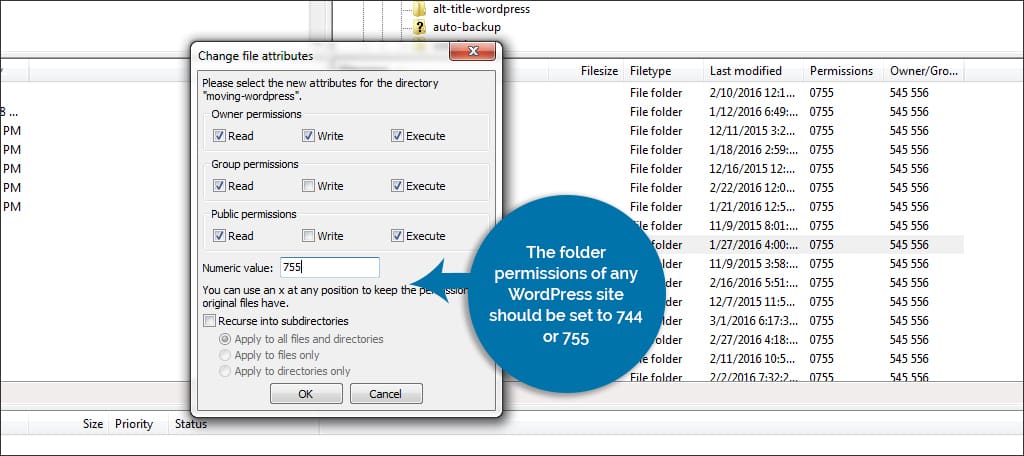
File permissions should be set to 644 or 640. If these numbers are set incorrectly, it could lead to hackers and bots having the ability to edit those files. This could lead to compromises and malicious code being delivered to your visitors.
Some FTP clients will allow you to change these permissions en mass. This could save you a great deal of time from accessing each file one by one. Just be absolutely sure you understand the risks before altering any of these permissions.
Method 4: Deactivate the CDN
At this point, you might want to try deactivating the Content Delivery Network (CDN). For those unaware, a CDN is a network of servers that store copies of your website so that users can connect to a server that is closer to their location.
The end result for a user is that the page loads faster because they are eliminating servers from the equation, which may be located on the other side of the world.
If you have a CDN enabled, to figure out what is the problem, all you need to do is disable it. To do this, just log into the hosting account for your website, Go to the CDN settings, and disable it. If you’re having trouble, contact the CDN for assistance.
If the error goes away, there is a problem with the CDN and you’ll have to contact the network and your web host for a solution. This isn’t a problem you can actually fix as there may be hardware or software issues out of your control.
Method 5: Check Your Index Page
Another culprit could be your index page. If you are not aware, your homepage should be called index.html or index.php, depending on the file structure. If yours isn’t, that could be the source of the error.
Luckily this is really easy to fix, but there are a few ways to go about it.
The first and most direct approach is to actually just find the file and rename it to either index.html or index.php. And that could fix the error. However, links will probably break if they are pointing to the current URL of the page instead of “index.”
Now, if you are set on your home page having the current name, there is an alternative.
You can upload a blank index.html or index.php file into your public_html directory. Then access the .htaccess file and redirect the blank index.html file to your existing homepage by adding this line of code:
Redirect /index.html /yourhomepage.html
You will need to change “yourhomepage” to your actual homepage name. Also, be aware of the .html at the end. You may need to change this to .php.
Method 6: Check the IP Address for DNS
Yet another cause of this error is when your domain name points to the wrong IP address. This results in a situation where you do not have access to view the content. This could occur if you just switched between web hosts or changed domain names.
Once again, this is actually pretty simple to fix.
Go to your cPanel and locate the Domains section. Click on the Zone Editor option.
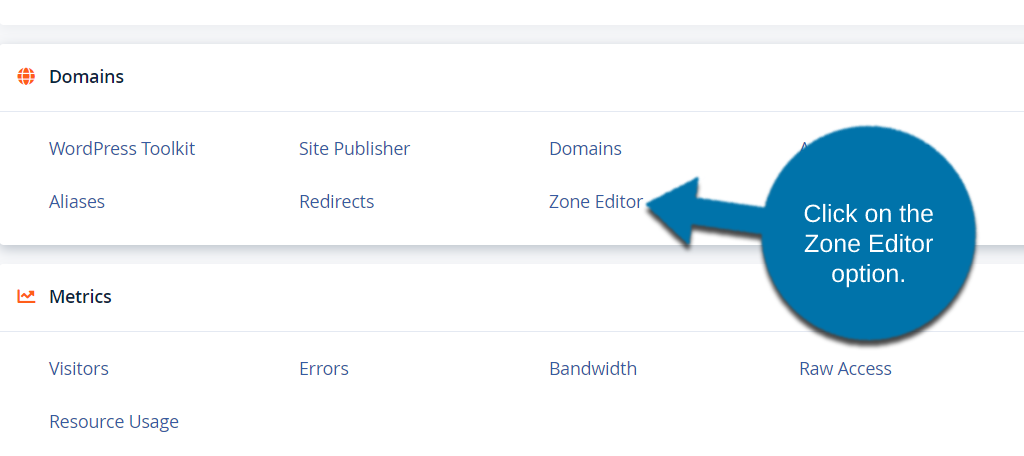
You will see your domain name. Click on the “A Record” button.
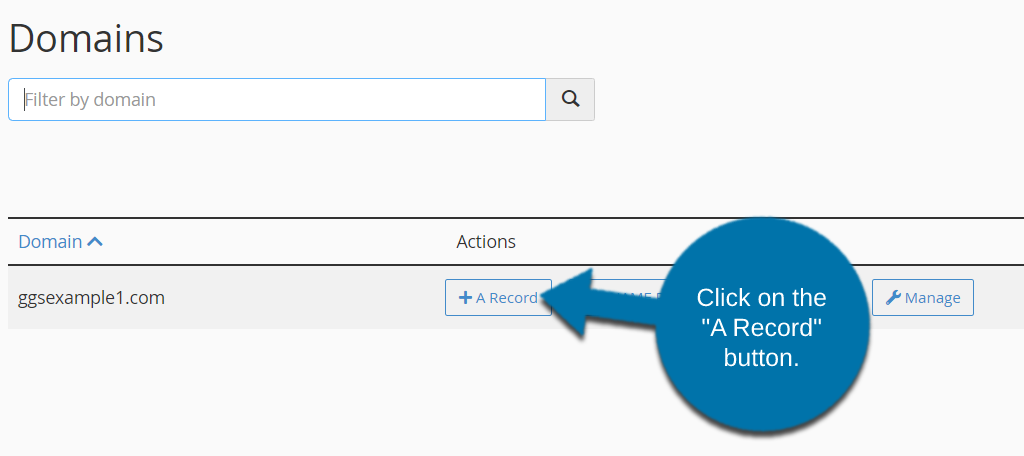
This will pull up a pop-up window. It will contain your domain name and the IP address it is pointing to. If it is not correct, enter the correct information into the text box, which should fix the 403 error.
Method 7: Clearing Your Browser’s Cache
The last possible cause of the error we will cover is your browser cache. Your browser may be storing an out-of-date file or image that can cause the error. You can quickly verify if this is the case by switching web browsers.
For instance, if you normally use Google Chrome, try switching to Firefox or another browser and test your site. If it works fine, then it’s most likely a browser issue.
The easiest way to test is to simply clear the cache of your web browser.
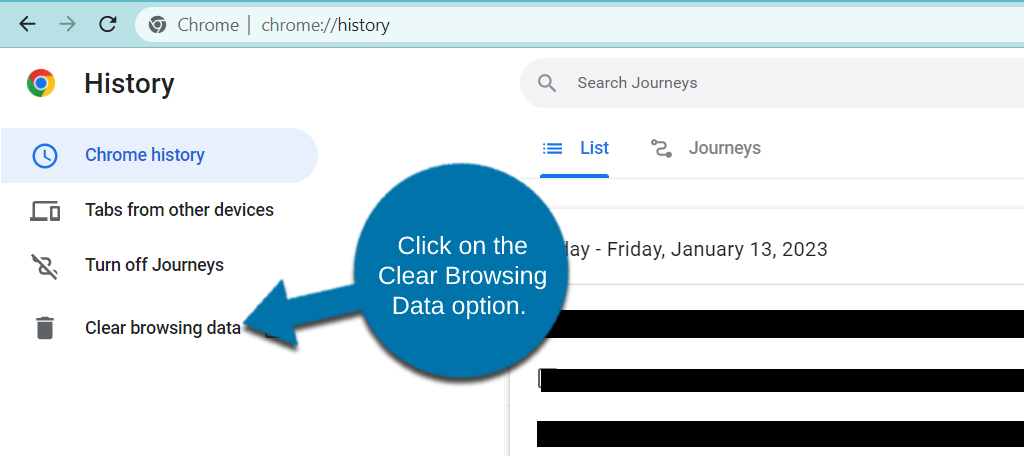
The process is different for every brand. But today, I will demonstrate the most popular option, Google Chrome.
First, click on the tools option (three vertical dots in the top right corner) and click on History.

You will see a full list of your browsing history. On the left-hand side, click on the Clear browsing data option.
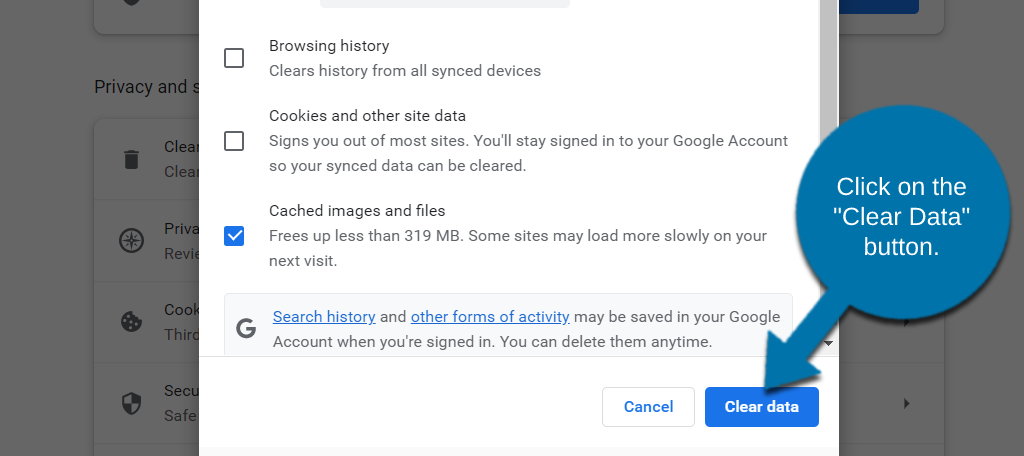
This will open a new tab and a new pop-up. Make sure the “Cached images and files” box is checked and click on the “Clear Data” button. You don’t have to check the other boxes if you do not want to.
This should resolve the issue if your browser was to blame.
How to Fix a 403 Forbidden Error in WordPress
Although the above are some of the most common fixes for the 403 forbidden error, sometimes WordPress can cause issues in the background.
Let’s take a look at a few that might be causing a problem if you’ve already tried the other methods.
Method 8: Verifying Plugins as the Cause of the 403 Error
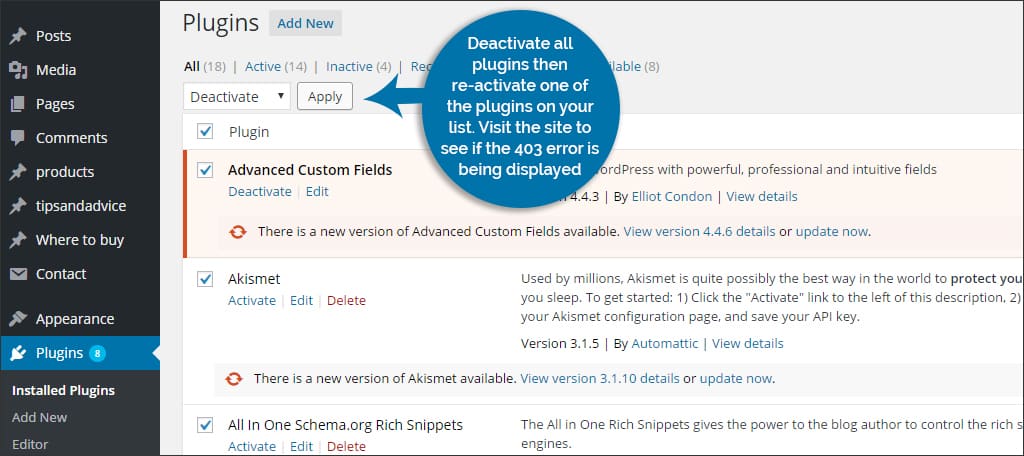
Not every plugin you come across in WordPress will be compatible with your site. In fact, there are several plugins that simply don’t work well when put together. In order to verify that a plugin is causing the 403 forbidden error on your site, you’ll need to do the following:
- Deactivate all plugins that are installed on your WordPress Site.
- Re-activate one of the plugins on your list.
- Visit the site to see if the 403 error is being displayed.
- Repeat steps two and three until the 403 error is shown. This is the plugin that is causing the problem. You may need to change its configuration settings or remove it entirely.
If you deactivate all of your plugins and the 403 forbidden error is still being displayed, then the problem may not be plugin-related. If this is the case, then you’ll need to do additional troubleshooting.
What if You Can’t Access WordPress to Disable Plugins?
If you are not able to access WordPress to delete plugins, then you can log in to your cPanel and jump into the file manager section. Access the wp-content directory and look for the Plugins folder. Once in the Plugins folder, delete any plugins you want directly out of the file manager.
An alternative is to move these plugins to a new location, such as a temporary directory. This way, you don’t have to lose any custom tools or premium plugins by deleting them outright.
My point is that WordPress will not detect and run the plugins from this folder if they are not present. So, if it was a plugin causing the 403 forbidden error, your website will return to normal.
Then, you can add the plugins back one at a time until you find the one that is causing the issue.
Method 9: Use a Plugin to Scan for Malware
It is possible that your website has taken on some malware that is causing the 403 error. This could come from a variety of sources and can pose serious security risks to your website’s data.
Thus, you should have a security plugin in place that protects against this. Many of these plugins also come with malware scanners that allow you to check your website with the press of a button.
While there are many plugin options available, I recommend using the WordFence Security plugin. It is a comprehensive security tool that is easily the best in WordPress and should be able to clear up any malware issues on your website.
If WordFence says it’s not malware, then that isn’t the cause of the 403 forbidden error.
What if You Don’t Use WordPress? Can You Still Scan for Malware?
Most content management systems will have extensions or add-ons available for safety and security. Check to see if there is one for your platform that will scan your site’s files.
You can also contact customer support and have a malware scan done on your files from your web hosting company.
Another option is to use online scanning platforms such as SiteLock. A lot of these online platforms are not that expensive and could provide you with an incredible sense of ease.
Fix The 403 Forbidden Error ASAP!
A 403 forbidden error can be somewhat debilitating for the site if it’s not addressed immediately. Keep an eye on your web pages and analytical data as this will show you if visitors are experiencing this problem.
Keep your thumb on the pulse of the website and make sure it’s always active – even if you’re not.
Yes, 403 errors on a website can be confusing. I hope this article was able to show you some techniques to use to help you rid your website of these types of errors.
If you are still having trouble after trying all the methods above, then contact your host and see if they can help you.
What kinds of errors plague your website? What kind of tools do you have readily available to fix these kinds of problems?

This does not address the issue of INTERMITTENT 403 errors, which is the search parameters which found this article. That is, yes, if you ALWAYS get 403 errors, then you have a bona fide permission problem, and this article will help. BUT, when your permissions are already 100% correct, but you still get 403 errors, say, 20% of the time — THEN WHAT?
Hi
I had the problem that not only were the sitepages, and preview pages not being displayed and had “You don’t have permission to access” without any error code.
I carried out the procedure of resetting permissions, and wen as far as 775.
Then I deleted the ,htaccess file , went to permalinks and clicked save. Following which I went to appearance, themes, selected a theme preview, where I get:
with currently used theme:”Forbidden
You don’t have permission to access this resource.”
or with a new theme:
“Not Found
The requested URL was not found on this server.
Additionally, a 404 Not Found error was encountered while trying to use an ErrorDocument to handle the request.” in the preview window. ”
All along I have the menu down the left side visible.