
The digital world is all about speed, and boosting the speed of WordPress can put you ahead of the race. A fast website not only retains user attention but also gets a thumbs-up from search engines.
However, as your website grows, so does the clutter associated with it. Over time, accumulated plugins, images, scripts, and outdated content can turn your speedy site into a slow, conversion-killing one.
If you notice that your website’s loading time is continuously slowing down, it’s high time to crank the gears and boost that speed.
This guide is here to help you figure out what’s slowing down your WordPress website. More importantly, we’ll dig into the details of how to speed it up.
By the end of this blog, we’ll get your website up to speed and ready to race past the competition with WordPress speed optimization tricks up your sleeve!
Why Do You Need A Fast Website?
Website speed affects your user experience, how Google sees you, and potentially your conversion rates.
User Experience
A fast website makes visitors satisfied. When your pages load fast, people can easily find what they want without waiting. But if your site is slow, people might leave and look for answers somewhere else.
Search Engine Rankings
Search engines, with Google at the forefront, consider website speed a crucial ranking factor in their algorithms. The underlying principle is simple; they aim to deliver the best user experience to their users.
Therefore, faster websites are more likely to rank higher in search engine results.
Conversion Rates
Conversion rates are a measure of the percentage of website visitors who take desired actions. This includes making a purchase, signing up for a newsletter, or completing a form.
Studies show that even a small delay can make people leave. Even a one-second delay in page load time can result in decreased conversion rates as a slow website can create friction and lead to visitor abandonment before they complete the desired action.
With this in mind, optimizing your WordPress speed is a smart move to make your site a pleasant place for visitors and to reach your online goals.
Getting Started Optimizing WordPress Performance
Now that you’re convinced to optimize your WordPress speed, where should you start?
Let’s begin by running diagnostics on your current site speed.
Conducting Speed Test
Speeding up your WordPress site begins with understanding its current performance metrics. This foundational step can be effectively executed through various speed testing tools available online.
You can utilize three prominent tools to gauge your site’s performance: Google PageSpeed Insights, GTMetrix, and WebPageTest.
Google PageSpeed Insights
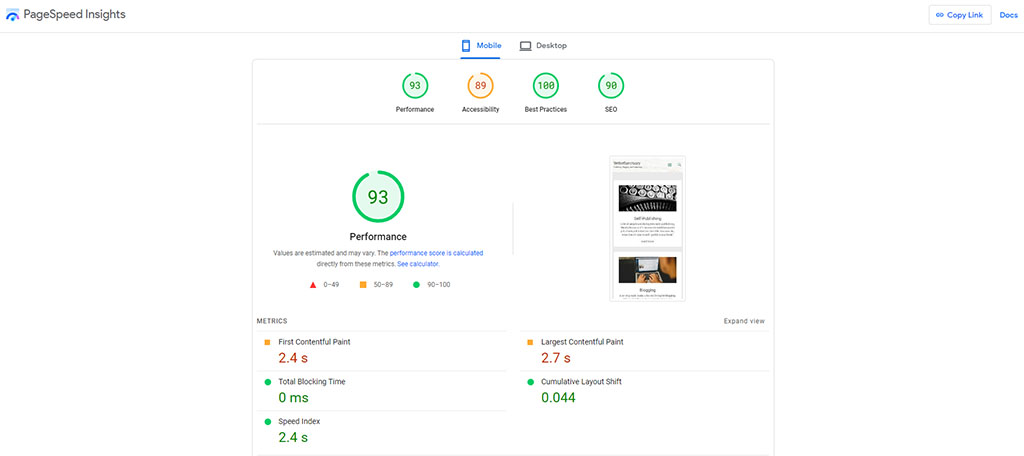
Google PageSpeed Insights is a handy tool made by Google. It helps you find ways to make your site run faster and work better on mobile devices by giving you tips based on what the web experts suggest.
It also gives you a score to tell you how your website is doing. The scoring works as follows:
- A score of 90 and above means your site is fast.
- A score between 50 and 89 means it’s average.
- A score of 49 and below means it’s slow.
The score helps you know where you stand and what you need to work on to improve your WordPress speed.
GTMetrix
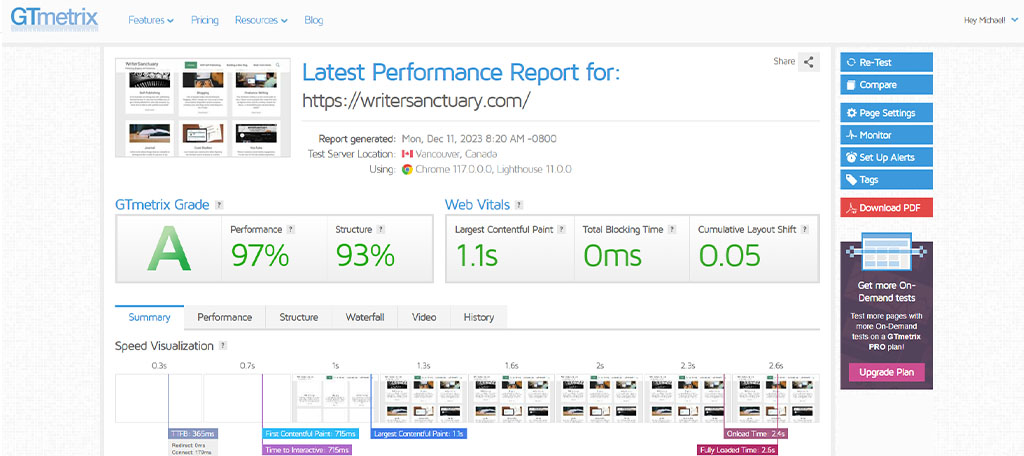
GTMetrix is another tool to use to understand how fast your website loads.
One of its key features is that it can be used right from your WordPress dashboard. Unlike many other tools, you don’t have to leave your site to check how well it’s doing.
As soon as you use GTMetrix, you’ll see important details like how quickly your pages are loading, the size of your pages, and how many requests are being made to load them.
For someone new to web development, these details might seem confusing at first. But GTMetrix helps by breaking it down into simpler terms.
It does this by showing two scores. One score comes from Google Page Speed and the other from YSlow. Each of these scores gives different tips on how to make your website faster.
WebPageTest
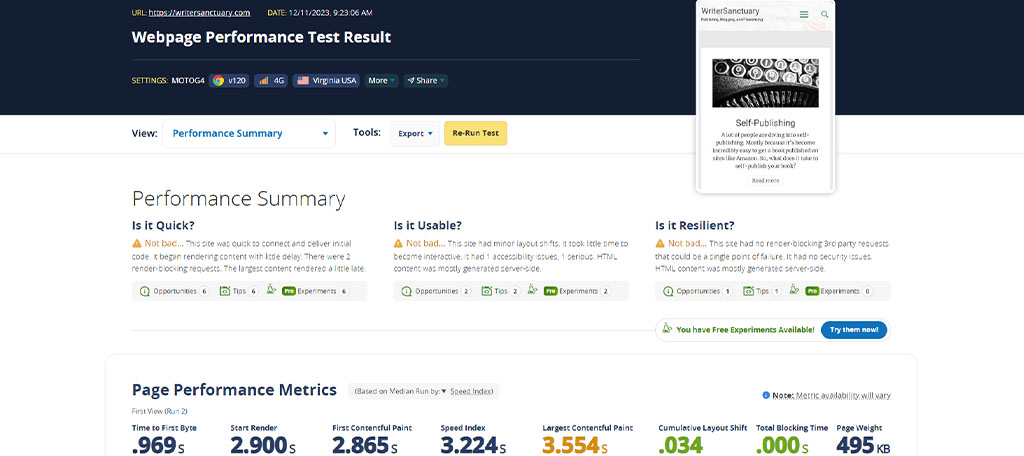
In the past, WebPagetest was a bit tricky to use, but thanks to a recent redesign, it has now become user-friendly. Both new and advanced users can now easily find value in this tool.
It shows different metrics, including new ones from Google’s Core Web Vitals initiative, which is a crucial factor for your WordPress optimization.
A key feature of WebPagetest is that you can run up to nine tests at the same time. This way, you get a more balanced view of how your site is doing, rather than relying on just one test.
Setting up a test is easy. You start with a Simple Configuration option where you can choose basic settings like testing for mobile or desktop visitors from different places and with different internet speeds.
But if you want more control, you can go to the Advanced Configuration area. Here, you can pick any test location from around the world, choose from 12 internet speeds or make your own, decide how many tests to run, choose which browser and device type to use, turn off JavaScript, and more.
What Slows Down Your WordPress Site?
By doing the speed tests above, you’ve already confirmed that you need to do some WordPress speed optimization.
But first, knowing what causes the slowdown and fixing it is a big step toward a better site speed.
Here are some usual suspects and how they affect your site:
1. Heavy Images
Pictures make your site interesting. However, large, heavy images can make your site slow. Optimizing images by making them smaller in size can help your site load faster.
2. Outdated Plugins
Plugins add more features to your site, but outdated or poorly made plugins can slow things down. Keeping plugins updated and avoiding bad ones can help keep your site running smoothly.
3. Poor Hosting
Your hosting provider is like your site’s home. If it’s not a good one, your site can load slowly.
4. Unoptimized Code
Clean code helps your site run smoothly. Using themes and plugins with clean code is key to optimizing WordPress.
5. Too Many Ads
Ads can make you money, but too many can slow down your site. It’s best to limit ads to optimize speed and revenue.
6. External Embedded Media
Using media from other places can slow down your site. It’s better to host videos and other media on your own site or use fast, reliable third-party services.
7. Too Many Redirects
Each redirect triggers an HTTP request-response cycle, extending the time it takes for a page to load. Minimizing redirects, especially chained redirects, can reduce milliseconds of your loading times.
8. Not Utilizing Caching
Caching is like having a shortcut to your frequently accessed data. Not utilizing caching mechanisms means your server has to work harder and take more time to deliver your site’s content to visitors.
9. Not Using a Content Delivery Network (CDN)
A Content Delivery Network (CDN) places your site’s data on servers around the globe, ensuring that your content is delivered swiftly to users no matter where they are located.
Not using a CDN can result in slower loading times for users located far from your server.
9 Best Optimization Techniques
Now, we’ve come to the ‘How’ part of this guide. Below, you’ll find actionable tips on how to truly boost your WordPress site speed.
Tip #1: Basic No-Coding Speed Optimization
Before we deep dive into the more complicated WordPress speed optimization techniques, let’s try some basic tweaks first.
Tip #1.1: Use a Caching Plugin
First on the list is installing a caching plugin. Caching is a mechanism that stores copies of your website’s pages in a ready-to-go state, so when a user visits your site, the pages load faster.
Two popular plugins that facilitate caching on your WordPress site are W3 Total Cache and WP Super Cache. Installing these plugins is also a straightforward process.
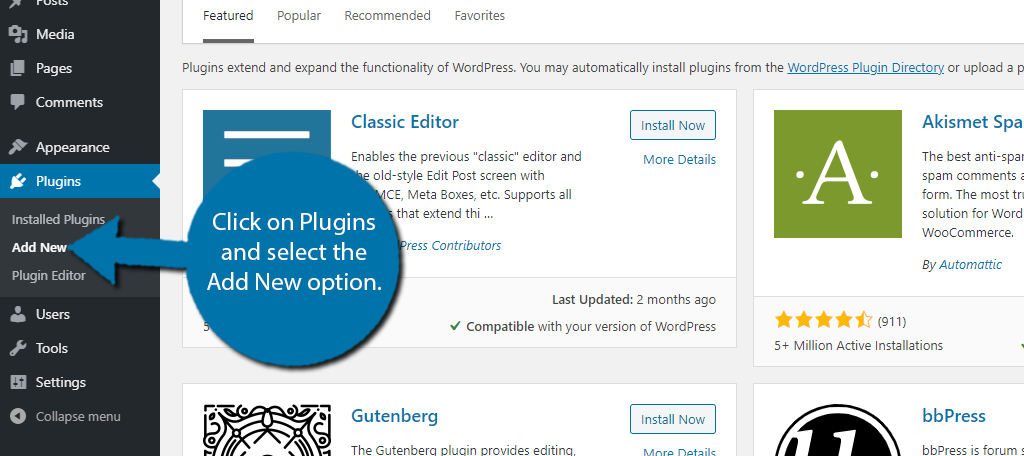
Simply navigate to your WordPress dashboard’s left side admin panel, click on ‘Plugins’, then ‘Add New’, search for either W3 Total Cache or WP Super Cache, and click ‘Install Now’ followed by ‘Activate’.
Once activated, these plugins come with a settings area where you can configure the caching to suit your site’s needs. The default settings are often sufficient, but you have the leeway to tweak settings to get the caching behavior that aligns with your site’s requirements.
Tip #1.2: Optimize Images for Speed
Now let’s move on to another potent yet simple strategy: optimizing images for speed.
Images are a crucial part of your site’s appeal, but they are also heavy files that can slow down your page loading times drastically.
Optimizing images involves reducing their file size without compromising their quality.
Tools like Smush or ShortPixel are excellent for this task. They compress your images, making them lighter and faster to load. Before uploading images to your WordPress site, it’s advisable to optimize them using these tools.
Once installed, they will automatically compress new images as you upload them. Additionally, they can also bulk-optimize the existing images on your site, which is a fantastic feature if you have a lot of images already uploaded.
Tip #2: Advanced Optimization Techniques
As your WordPress site grows, it needs more advanced optimization techniques to keep the loading time in check. The advanced tactics, though might sound technical, can significantly contribute to achieving a blazing-fast website.
Here’s a deep dive into some of the advanced optimization strategies that can help in enhancing your site’s performance:
Tip #2.1: Minify CSS, JS, and HTML
Minification is about simplifying the code on your website. It removes unnecessary characters like spaces and comments from the CSS, JavaScript, and HTML files.
This makes them lighter and quicker to load without changing their functionality.
Autoptimize is a popular plugin that can help with minification. Just install it from the WordPress plugin directory, activate it, and then go to its settings to configure it. The plugin will take care of the rest, minifying your site’s CSS, JS, and HTML files.
On a side note, Autoptimize also doubles as a great caching plugin, so you could kill two birds with one stone with this tool.
Tip #2.2: Enable GZIP Compression
GZIP compression is like putting your website into a zip file. It compresses your site’s files, making them smaller and faster to send to visitors.
You can enable GZIP compression using a plugin like W3 Total Cache or WP Super Cache.
While GZIP is effective, it’s not suitable for image files. Fortunately, there are other reliable image compression tools specifically for WordPress sites.
The effectiveness of GZIP with media files varies; it works well with some formats like MPEGs and WAVs, but with others like MP3s, it could actually make the file larger rather than smaller.
Tip #2.3: Optimize Core Web Vitals
Google’s Core Web Vitals is a set of metrics that measure how fast your pages load, become interactive, and how stable they are as they load.
Good scores on Core Web Vitals not only ensure a better user experience but also are favored by Google’s search algorithm, potentially leading to better search rankings.
Optimizing Core Web Vitals involves various steps like ensuring your site is mobile-friendly, keeping an eye on your site’s Largest Contentful Paint (LCP), First Input Delay (FID), and Cumulative Layout Shift (CLS) scores, and working on feedback provided by tools like Google PageSpeed Insights.
Using Google’s Search Console can also reveal issues directly from the search engine involving Core Web Vitals.
Tip #2.4: Utilize Lazy Loading
Lazy loading is a technique used to defer the loading of non-critical resources (like images and videos) at page load time. It significantly reduces initial load times, as not all images and videos need to be loaded upfront.
Instead of loading everything at once when a page loads, lazy loading only loads the essential content immediately, like text and layout, while other resources are loaded as they are needed, such as when a user scrolls down the page to where these resources are located.
Installing a plugin like a3 Lazy Load makes implementing lazy loading easy. Once the plugin is installed and activated, it will automatically apply lazy loading to your site’s images and videos.
Tip #3: Plugin and Theme Management
Choosing the right plugins and theme, as well as properly maintaining them, is a crucial step toward achieving a fast WordPress site.
Here’s how you can fine-tune these aspects to keep your website as fast as they can be.
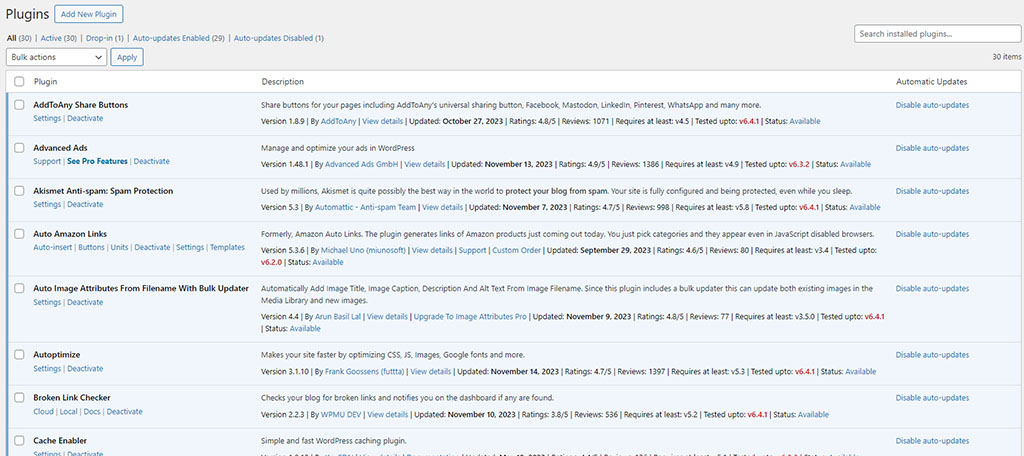
Tip #3.1: Delete Unused Plugins and Themes
Every plugin and theme on your WordPress site carries some code that the server needs to process.
Unused or outdated plugins/themes add unnecessary bloat, and this slows down the speed of WordPress. They also pose a security risk as they can be a gateway for hackers if they are not updated.
To delete a WordPress theme through the admin dashboard, you can follow the steps below:
- Navigate to Appearance » Themes in your dashboard.
- Click on the theme you want to remove.
- In the theme details popup, click ‘Delete’ and confirm by clicking ‘OK’.
On the other hand, follow the steps below to delete a WordPress plugin via the admin dashboard:
Note: Once you uninstall a plugin, you can’t undo it, and all settings for that plugin will be lost. Be careful if the plugin is in use on your site.
- Head to Plugins, then to Installed Plugins.
- Deactivate the plugin you wish to remove (if it’s not already inactive).
- After deactivation, click Delete on the plugin.
- Confirm by clicking Yes, Delete These Files on the subsequent prompt.
Tip #3.2: Choose a Lightweight Theme
A lightweight theme has no unnecessary features, scripts, or flashy animations that could slow down your site. It’s designed with efficiency and speed in mind, often offering just the essential features with an option to extend functionality through plugins as needed.
When searching for a lightweight theme, it’s important to look for themes that prioritize speed and are regularly updated for performance improvements.
It’s also a good practice to read reviews and check ratings to gauge the theme’s performance and support.
Moreover, a good lightweight theme should be customizable to suit your brand’s aesthetics while maintaining its speed. Customizability in terms of layout, color, typography, and other design elements is crucial to ensure your site looks unique and professional.
Tip #3.3: Keep Your WordPress Site Updated
Updates often come with bug fixes and performance improvements. Developers continually work to optimize the code, reduce bugs, and enhance the speed and functionality of the themes, plugins, and WordPress core itself.
By updating, you ensure that you’re leveraging these improvements.
Moreover, updates often contain security patches to protect against newly discovered vulnerabilities.
An outdated WordPress site is a prime target for hackers and malicious bots. By keeping your site updated, you are minimizing the risk of security breaches and potential data loss.
Sometimes, updates might bring changes that could potentially break certain elements on your site, especially if there’s a compatibility issue with a particular plugin or theme.
Hence, it’s a good practice to test these updates on a staging environment before applying them to the live site.
Tip #4: Database and Media Library Management
The effort invested in managing your media library and database pays off in the form of a fast website. Here’s how you can tune them up for optimal performance.
Tip #4.1: Clean Up Your Media Library
Your Media Library is where all your site’s images, videos, and other media files are stored. Over time, it’s easy to accumulate a lot of unused media files that just sit there. This takes up server space and makes your site heavier.
Below are tips on how to declutter and organize your Media Library for better WordPress speed.
Delete Unused Media
Go through your Media Library and delete any media files that are no longer being used. Be cautious and make sure that the media is not being used anywhere on your site before deleting it.
Organize Media Files
Create folders and categorize your media files. This will not directly impact your site’s speed but will make managing your media much easier, which is beneficial in the long run.
Optimize Images
Before uploading images, optimize them for the web using tools like TinyPNG or ShortPixel. This reduces their file size without losing quality, which in turn, reduces your page load times.
To learn more on how to clean your media library, check out our blog on How to Clean the Media Library in WordPress.
Tip #4.2: Keep Your Site’s Database Clean
The database is the heart of your WordPress site where all your content, settings, and data are stored. Here’s how to keep your database in top shape:
Regular Cleanups
Over time, your database can get clogged with old revisions, trashed items, transient options, and outdated metadata. Regular cleanups to remove this unnecessary data will keep your database lean and fast.
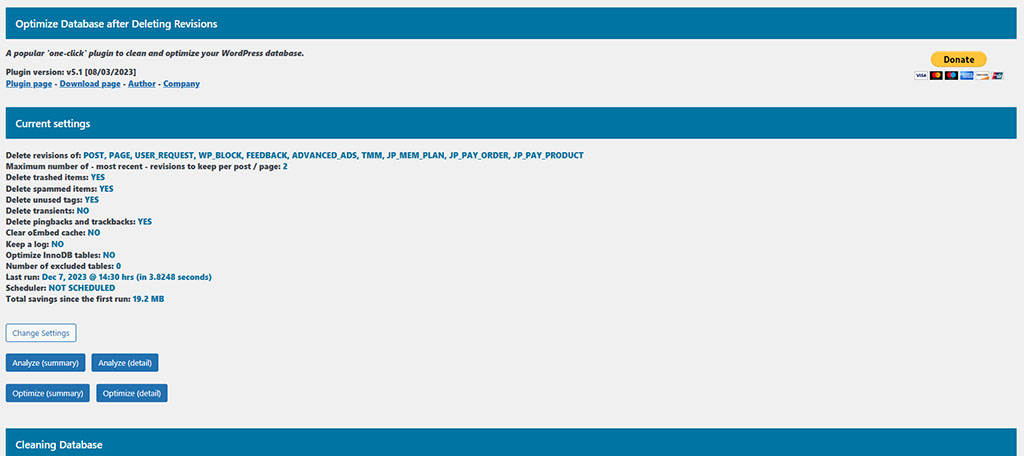
Database Optimization
Use plugins like WP-Sweep to clean your database. It’s a simple, highly effective tool to keep your database streamlined. This plugin can delete old revisions, clean up auto-drafted posts, and remove spam comments, among other things.
Manual Optimization
If you’re comfortable with phpMyAdmin, you can optimize your database manually. However, this is for advanced users and a single mistake can break your site. Always back up your database before attempting manual optimization.
Periodic Backups
Regular backups of your database are crucial. They ensure that in the event of a mishap, you can restore your site to a working state. Use plugins like UpdraftPlus to schedule automatic backups.
Tip #5: Use A Content Delivery Network (CDN)
A Content Delivery Network (CDN) is a network of geographically distributed servers that work together to deliver internet content, such as text, graphics, and videos, as quickly, cheaply, reliably, and securely as possible.
The primary goal of a CDN is to improve web performance by reducing the distance between a website’s server and the visitor.
Here’s how it works:
Content Replication
A CDN stores copies of your website’s content in multiple locations around the world. These locations are known as “edge servers.” When you update content on your website, the CDN updates it across all edge servers.
Location-Based Content Delivery
When a user requests to view a page on your website, the CDN redirects the request to the nearest edge server. By delivering content from a location closer to the user, the CDN decreases the amount of time it takes for the content to travel, which in turn decreases the page load time.
Load Balancing
CDNs also distribute network traffic across several servers, minimizing the risk of server overload during high-traffic periods. This feature is known as load balancing.
Optimization and Security
Besides improving load times, CDNs can optimize content for different device types and screen sizes, and provide security features like DDoS protection.
Cache Control
CDNs also manage content caching, deciding which content to store, when to update it, and when to remove it from the cache based on predefined rules. This ensures that users always get the most recent content without overloading the origin server.
Setting Up a CDN
Consider the solutions below when setting up your CDN.
Cloudflare offers a worldwide content delivery network (CDN) with distinct performance enhancement features. It caches static content, speeds up dynamic content, and simplifies the optimization of outbound content.
StackPath has features such as unlimited file size and segmented file downloading. It is an excellent choice for sites with large files like software and game installers.
Google Cloud CDN includes free SSL certificates. It also allows users to utilize custom certificates for free.
Fastly supports encryption and uses secure tokens that restrict access to your media files.
Tip #6: Comment and Revision Management
Engaging with your audience through comments is a great way to boost interaction and gather feedback on your WordPress site.
However, a long list of comments on a single page can significantly slow down your page load times.
Similarly, while having revisions of your posts can be a lifesaver, over time, they can also slow down your site. Here’s how you can manage comments and revisions for better WordPress speed.
Tip #6.1: Paginate Comments
Pagination is a useful feature that allows you to divide your comments into separate pages instead of loading them all at once on a single page. By doing so, you reduce the amount of content that needs to be loaded initially and speed up loading.
To paginate comments in WordPress, navigate to the WordPress dashboard, then go to Settings > Discussion.
Look for the option that says “Break comments into pages,” and specify the number of comments you want to display per page.
Tip #6.2: Paginate Long Posts
Aside from comments, pagination can be used for long posts too.
Readers and search engines love long and highly informative posts. However, publishing long-form posts with too many images and videos can significantly decrease your website loading time.
Similar to the tip on paginating comments above, breaking up long WordPress posts into multiple pages can enhance readability. This makes it easier for your readers to understand your content.
To paginate your long-form WordPress posts, there are two options available:
Method 1: Without a Plugin
- Use the Block Editor in your WordPress content editor to insert a ‘Page Break’ block where you want to split the post.
- If you’re using the Classic Editor, type <!––nextpage––> in the ‘Text’ view of the blog post, or use the shortcut Alt + Shift + P in the ‘Visual’ view to insert breaks.
- Preview and publish your post, and pagination will appear at the bottom.
Method 2: Using a Plugin
- Install and activate your chosen pagination plugin. Examples of these plugins are Pagination by BestWebSoft and WP-PageNavi.
- Configure the plugin under Settings » Reading by selecting post types and deciding on whether to split posts by page count or word count per page.
- Click Save Changes.
- The plugin will paginate posts automatically, but manual page breaks are also possible while the plugin is active.
Both methods offer a simple way to divide content into digestible sections, improving user experience and potentially boosting your site’s performance.
Tip #6.3: Reduce Post Revisions
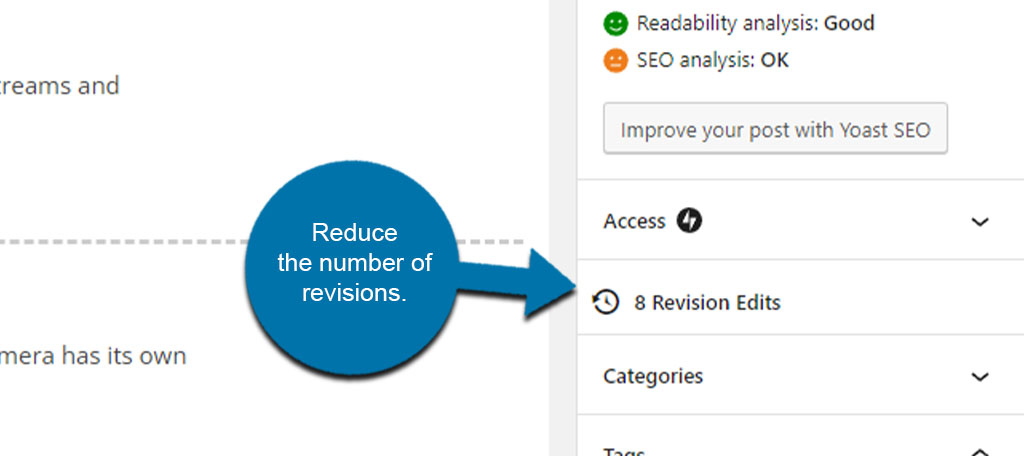
Every time you save a draft or update a post, WordPress stores a revision. While this feature can be a lifesaver when you need to revert to previous versions, it can bloat your database over time, causing slower load times.
To manage post revisions, consider using a plugin like WP Revision Control. It allows you to limit the number of revisions saved per post or delete old revisions.
Alternatively, you can limit revisions by editing a line of code to your wp-config.php file:
define( 'WP_POST_REVISIONS', 3 )
You can choose to change the number on the last part depending on the number of revisions you’d like to store. The line of code shown above limits the number of revisions per post to three.
By reducing the number of post revisions, you keep your database lean, which contributes to better WordPress speed optimization.
Tip #7: Optimize Your Server and Hosting Infrastructure
The server technology and hosting environment significantly impact how swiftly your website pages load. Let’s look into the specifics of how you can tune your server and hosting infrastructure for optimum speed.
Tip #7.1: Upgrade PHP Version
PHP is the cornerstone of WordPress, and like any software, it evolves over time with newer versions offering better performance and features.
Upgrading to the latest PHP version can provide a substantial speed boost to your WordPress site. The newer versions come with performance optimizations, faster code execution, and lower memory usage.
Before upgrading, ensure your WordPress site, plugins, and themes are compatible with the new version.
To upgrade, you can check the cPanel of your hosting provider or contact their support to assist with the upgrade. This upgrade is a straightforward yet effective step toward the performance optimization WordPress sites need.
Tip #7.2: Move to a Dedicated Server
As your website grows in traffic and content, the server resources required to maintain a quick loading time also increase.
Various hosting infrastructures impact WordPress speed differently.
- Shared hosting is economical but might affect your site speed if other sites on the same server experience traffic surges.
- Virtual Private Servers (VPS) provide a middle ground with dedicated portions of server resources.
- Dedicated servers offer the best performance but come at a higher cost.
- Cloud hosting is scalable and pays-as-you-go, but the performance can be similar to VPS or better depending on configurations.
- Lastly, managed WordPress hosting is optimized for WordPress speed and security, relieving you from many management tasks.
It’s beneficial to move when your site starts to slow down due to increased traffic or when you need more control over server configurations.
The steps to move to a new server can be technical for beginners, but many hosting providers offer migration services to make the process smoother.
Tip #8: Reduce Redirects
Redirects are essentially instructions that automatically take visitors from one page to another, usually used when a page’s URL has changed.
While they are useful, having too many redirects can cause a delay in page loading time, impacting your WordPress speed negatively. Each redirect triggers an HTTP request-response cycle, which can accumulate to a noticeable delay.
To minimize redirects, identify them using tools like Redirect Mapper or Screaming Frog. Once identified, eliminate unnecessary redirects, and update any outdated links on your site or in your marketing campaigns to point directly to the correct URL.
For unavoidable redirects, ensure they are server-side redirects (such as 301 permanent redirects) as they are faster than client-side redirects.
Additional Tips to Minimize Redirects
- Avoid linking to pages that are set to redirect, as this can cause multiple redirects and frustrate visitors.
- Check your site for outdated redirects, especially after changing hosting providers or making significant content updates.
- Review your plugins and remove any that are unnecessary to prevent unwanted redirects.
Tip #9: Disable Pingbacks and Trackbacks

Pingbacks and Trackbacks are methods used by WordPress to alert other blogs that your posts link to.
While they might seem like a good way to engage with other bloggers, they can also negatively affect your site’s performance. Each time another blog mentions you, it sends a request to your site, which in turn can slow down your WordPress performance, especially if you start getting many of these.
Disabling pingbacks and trackbacks can, therefore, improve your site’s speed. To disable them, navigate to the WordPress dashboard, go to Settings > Discussion, and uncheck the box next to “Allow link notifications from other blogs (pingbacks and trackbacks) on new posts”.
FAQs About WordPress Speed
For WordPress speed optimization, lightweight themes from Astra, Divi, and Neve are popular choices. These themes are designed for speed so that your website performs well.
You can gauge your website’s speed using tools like Google PageSpeed Insights, GTmetrix, or WebPageTest. Using these tools provides insights into your site’s performance and loading times.
Several common mistakes can adversely affect WordPress speed. These include not optimizing images, using outdated plugins or themes, failing to utilize caching solutions, and selecting poor-quality hosting providers.
A good WordPress speed is when your site loads within 2 to 3 seconds. Faster load times, like under 1 second, are excellent and contribute to better user experience and potentially higher search engine rankings.
A website can’t be too fast. Improved WordPress performance always contributes to a better user experience, higher SEO rankings, and increased conversion rates.
Regular speed tests using tools like Google PageSpeed Insights can provide valuable data on your site’s performance.
Staying updated on the latest best practices for WordPress performance optimization, monitoring server resources, and upgrading your hosting plan when necessary are also crucial steps.
Optimizing WordPress speed without relying on plugins is indeed possible. A few strategies include choosing a lightweight theme, optimizing images before uploading them to your site, minimizing the use of external scripts, utilizing a Content Delivery Network (CDN), and enabling browser caching through your web host or server settings.
Final Thoughts
Each step you take towards optimizing your site contributes to better user engagement, higher search engine rankings, and overall improved website performance.
The cascade of benefits stemming from a fast-loading site underscores the importance of speed optimization in the digital space.
Now, it’s your turn to put these strategies into action. Start by analyzing your site’s current speed, identifying areas for improvement, and progressively implementing the recommended optimizations.
And don’t just stop here; continue exploring, learning, and applying new strategies to maintain a fast website. Soon, you will enjoy the rewarding outcome of all your efforts.
very useful tips on how to increase wordpress speed, thank you!
You’re welcome