Are you looking to make your library more accessible online? If so, you can create virtual bookshelves for your library in WordPress with the Library Bookshelves plugin to bring your library online.
This plugin supports a variety of library archives, which allows you to easily import your entire catalog. In the event that your catalog system is not supported, the plugin creator can add it for you if you message them.
As such, it is one of the best options for creating virtual bookshelves in WordPress.
Today, I will demonstrate how to use it.
Why Build Virtual Bookshelves in WordPress?
Trying to find a specific book in a library is not the easiest task, especially if you do not understand how libraries sort their books.
Creating virtual bookshelves can help users search for them online just like they would in an actual library. Not only this, but it could act as a tool to keep track of where books are located.
This can help users know exactly where to find a specific book when they come to the library.
Thus, it makes a great addition to any library website. It can also be a tool to help staff learn where the books are located.
It’s also worth mentioning that while I have only mentioned books, the truth is that most library catalogs work on DVDs, eBooks, and other types of media that your library stores.
In any case, a virtual bookshelf can be a great addition to your site.
How to Build Virtual Bookshelves in WordPress
The Library Bookshelves plugin allows you to build virtual bookshelves that get filled by importing your library catalog. It supports over 20 catalog systems with plans to add more. This makes it incredibly easy to build them in no time.
The plugin also allows you to decorate the catalog by importing images of the books from CDNs like Amazon, OpenLibrary.Org, and more. As such, you can really make any bookshelf look great.
Step 1: Install Library Bookshelves
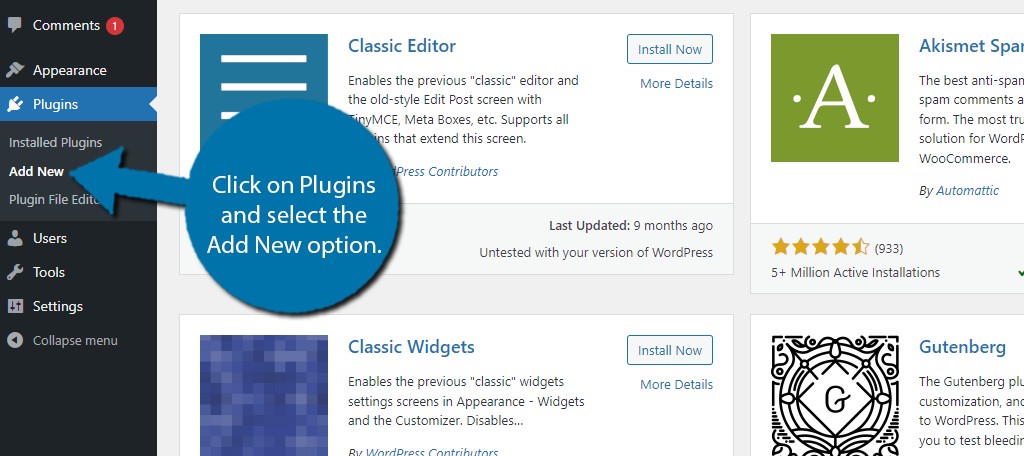
Let’s start by clicking on Plugins and selecting the Add New option on the left-hand admin panel.
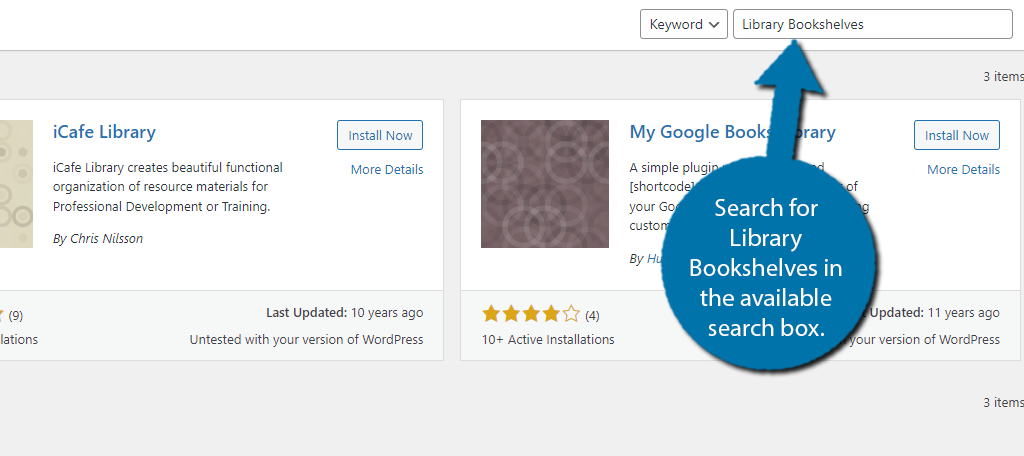
Search for Library Bookshelves in the available search box. This may pull up additional plugins that you may find helpful.
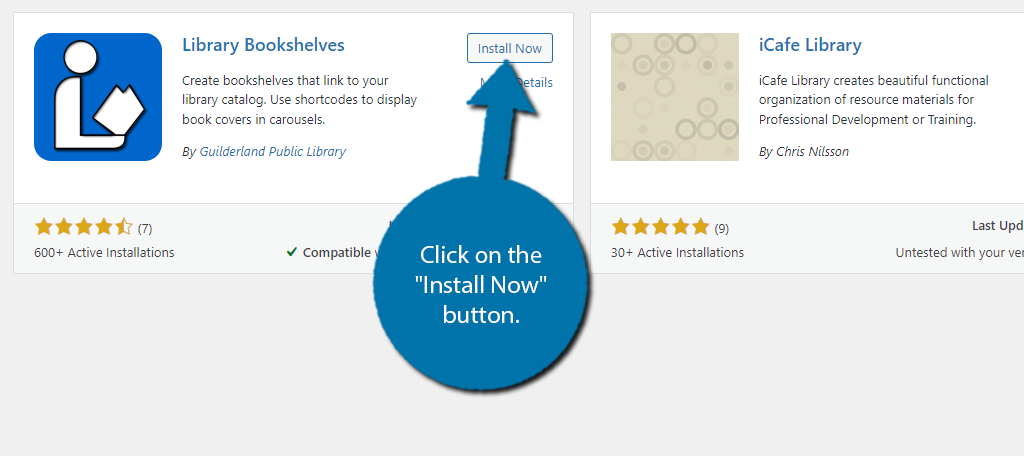
Find the Library Bookshelves plugin and click on the “Install Now” button and activate the plugin for use.
Step 2: Configure the Settings
You are almost done, but before you display the bookshelf, you should take a moment and configure the settings. To find them, click on the Settings option for the plugin itself.
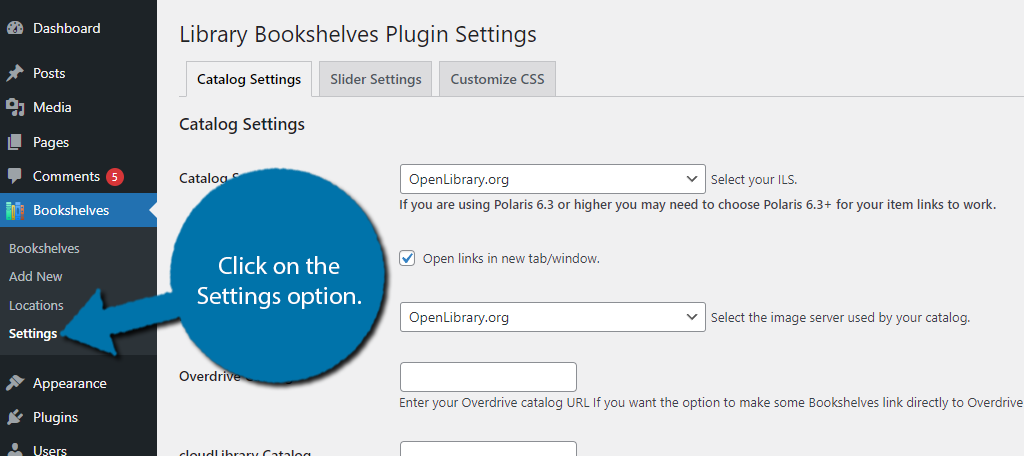
There are three sections that include Catalog Settings, Slider Settings, and Customize CSS. They are all pretty easy to configure and only require you to use the dropdown menus or enter some text into the appropriate space.
As such, I’ll keep these sections brief and just cover what options you can find in them,
Catalog Settings
The Catalog settings allow you to choose what catalog system you are using, if books should open up on a new tab, and where the book images you display come from. There are other options, but these are the major ones.
Again, these options just require that you make a choice from the drop-down menu. If you do not see your catalog in the list, try and reach out to the plugin developer. The plugin page says they will add more if requested.
Slider Settings
The Slider Settings consists of a series of checkboxes that adjust various settings on the display side. Sadly, the plugin doesn’t have a preview option, so this can be a bit tricky to get right unless you already have a bookshelf created that you can reference.
In any case, you’ll find options for lazy loading, captions, hover effects, pause on hover, and countless other options. Again. it’s really a matter of checking a box and seeing if you like the change.
Customize CSS
This section gives you far more control over the appearance of the bookshelf. Normally you would edit this with CSS code, but this plugin makes it easier by allowing you to adjust the values individually.
Again, you can’t see a preview, so knowing what you are changing can be a bit of a guessing game without a created bookshelf in place. That said, adjust the values as you see fit.
Step 3: Add Locations
The next thing you will want to do is add locations to your site. This is pretty much the equivalent of adding categories and tags in WordPress. If you know how to do these, you are good to go.
If this does not apply to you, go ahead and skip to step 4.
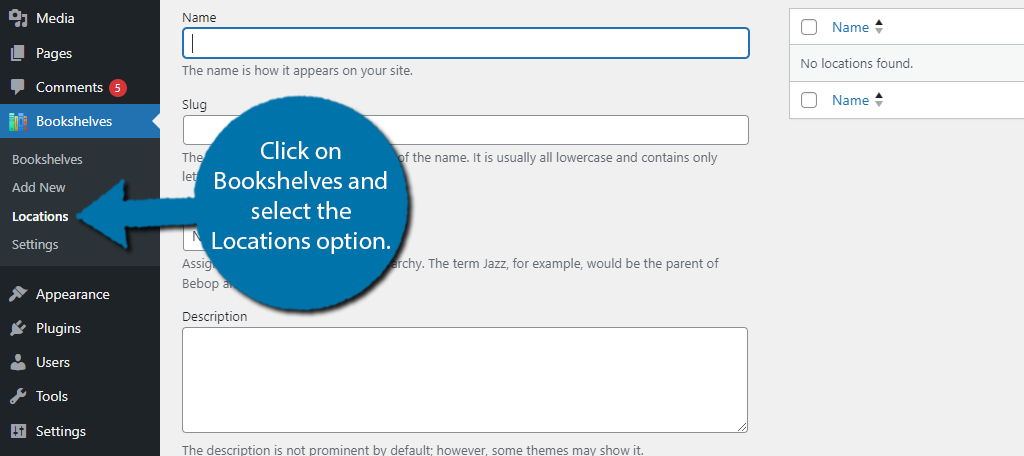
To do this, click on Bookshelves and select the Locations option.
If you have been using WordPress for a while, this area should look very familiar as it is the same for adding categories and tags. It works identically to these, but for those who don’t know how to make them, I will explain everything.
The Locations allow you to tell visitors where a book is located. For example, you may really want to read a book, but it may be out at your current branch. However, it may be available at a different branch.
As such, it helps the visitors know where to go. The process is quite simple. Enter the location in the Name field and enter a description of that location. In this case, it would be appropriate to enter the address.
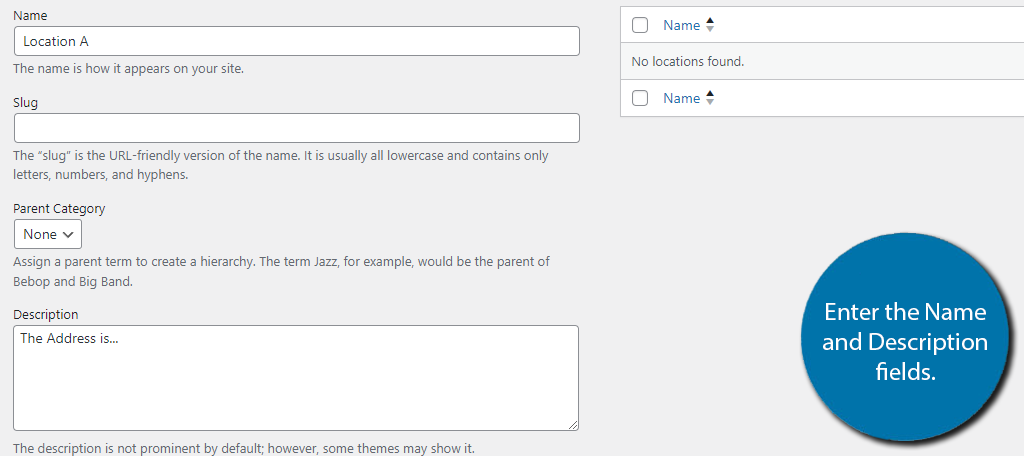
Click on the “Add New Location” button when you are finished. You can leave the Slug field empty as it will auto-fill for you. And that’s really all there is to it. You can repeat this to add as many locations as necessary.
I will show how to assign locations in the following steps.
Step 4: Create Bookshelves
Now to actually create the bookshelves in WordPress. You’ll have two main ways of adding the books. The first is to utilize your library catalogs API to import your catalog. The second is to add them manually.
Obviously, with hundreds or thousands of books to add, the manual method doesn’t really make a lot of sense, but the option does exist.
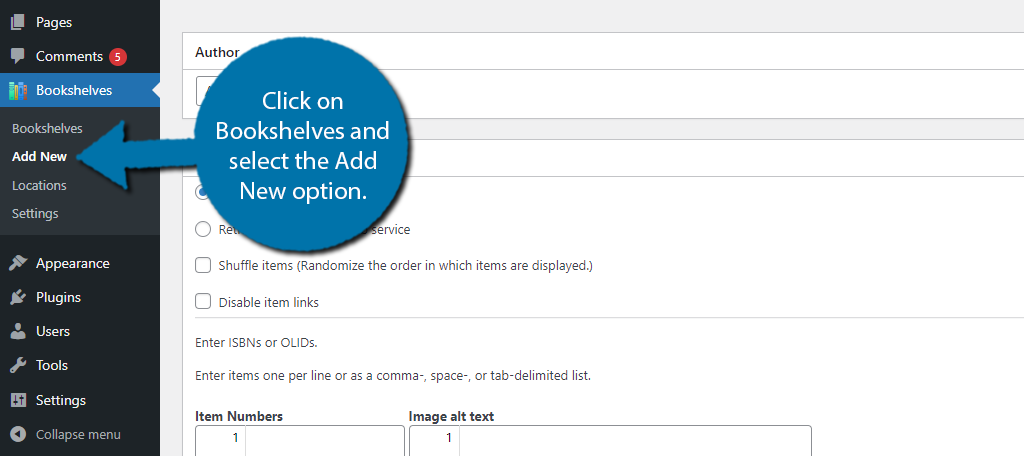
To begin, click on Bookshelves and select the Add New option.
At the top, you can enter the name of the bookshelf. You can enter anything, but the best option would probably be to copy what is done in the actual library. That said, you could create custom shelves like best sellers or something along those lines.
Below the title field is the Items category. This is where you will actually add the books to the bookshelf. There are two options to choose from. The first is to enter them manually, and the second is the recommended way of using your library catalog to import books.
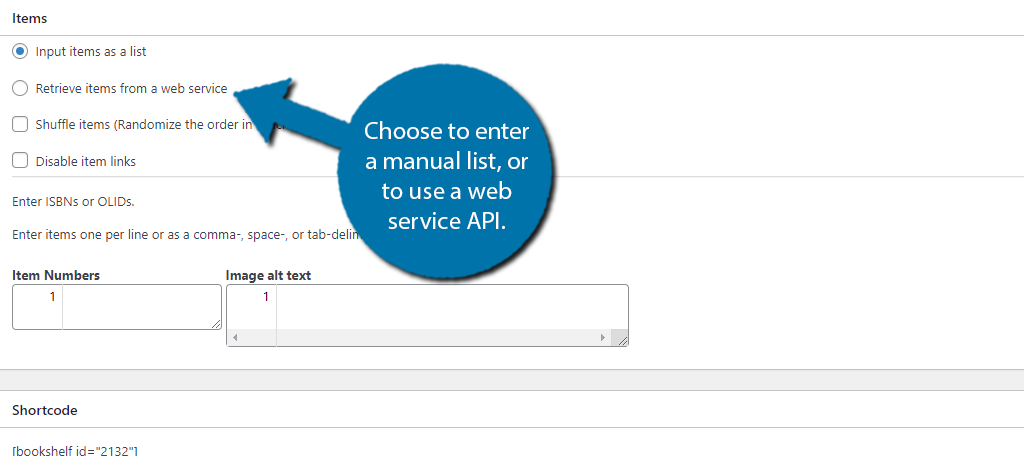
If you choose to import them as a list (manually) I would recommend taking the time to build an Excel spreadsheet that contains the list and then copy it into WordPress. This ensures you always have that spreadsheet available.
That said, most will just use the catalog approach. So, let’s select that.
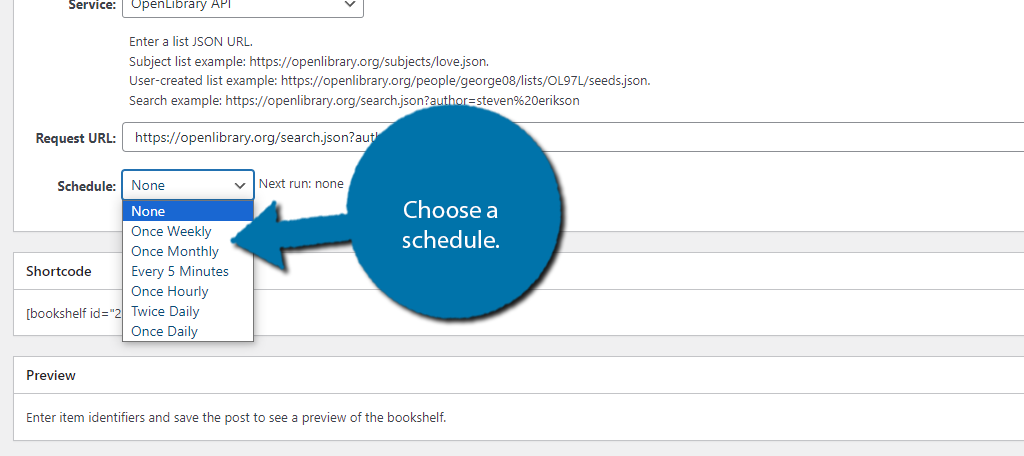
The first thing you’ll need to do is actually select the service you use for your catalog. Do this by selecting one from the drop-down menu.

When you select one of the APIs, the plugin will display multiple examples of how it works. You’ll need to enter a Request URL that basically contains all of the books you wish to add. For more information, refer to that API documentation.
You can also select how regularly the API is called. This ensures that the bookshelf keeps up when you add new books to a shelf. You can choose it to be daily, weekly, monthly, or every 5 minutes for the most accurate results.
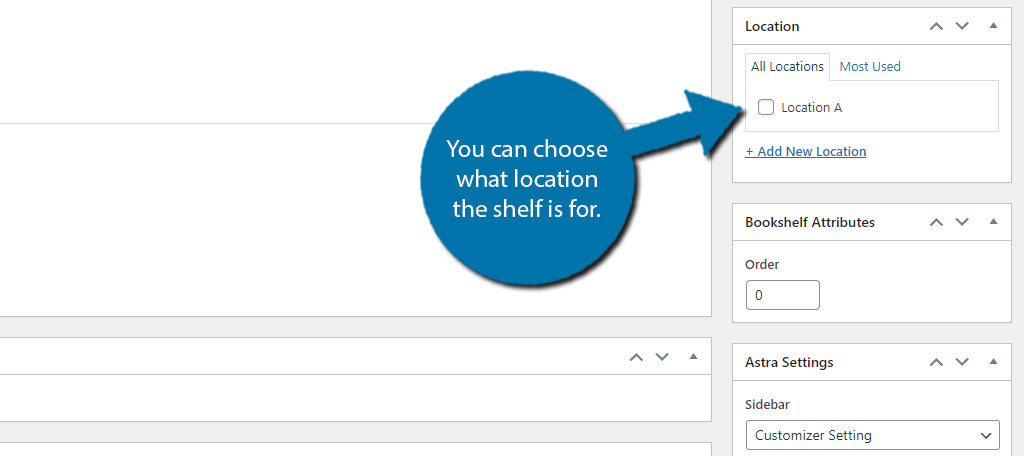
On the right-hand side, you can select what location this bookshelf is for. If you do not see any locations, that is because you did not add them in step 2.
Once you have added everything, save the changes so it is stored in WordPress. You should repeat this step as many times as necessary to build multiple bookshelves.
Step 5: Displaying the Bookshelf
With the library bookshelves created in WordPress, all that is left is to actually display them. Luckily, that’s pretty easy because this plugin utilizes shortcodes. They are generated for every bookshelf you create.
You can find this code in the Bookshelves section under the Shortcode column.
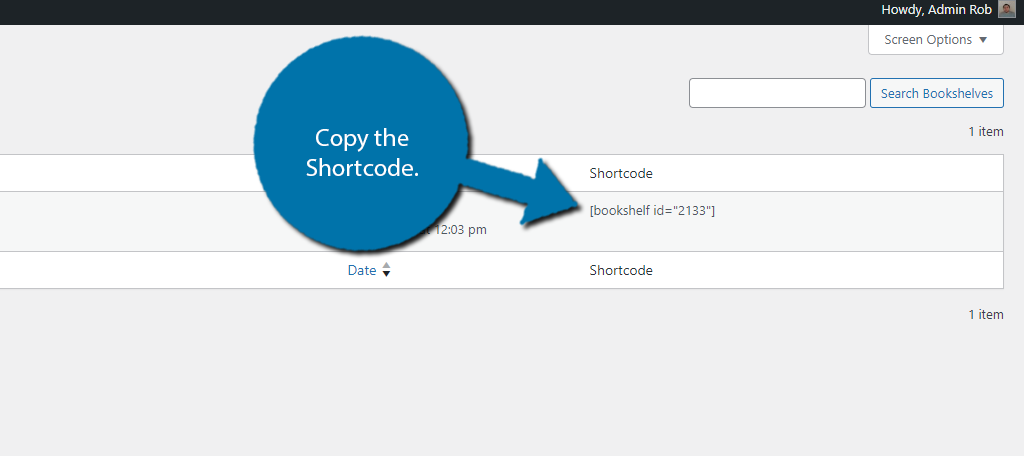
Simply copy the library bookshelf’s shortcode to use it in WordPress. You can paste it into any shortcode block on a post, page, or even in a widget area. And that covers how to use the Library Bookshelves plugin for WordPress.
Add Library Bookshelves to WordPress Today
The Library Bookshelves plugin is perfect for any library WordPress website. It allows you to easily display a bookshelf and ensure that it also includes the correct image for them via a variety of CDNs.
Overall, the plugin is very easy to use and includes all of the features a library would hope for.
How easy did you find the Library Bookshelves plugin to use? Why did you need a bookcase plugin in WordPress?