OpenClaw Browser Relay is a Chrome extension and local server bridge that lets an OpenClaw AI agent control a real Chrome tab through the Chrome DevTools Protocol. The relay is what makes an OpenClaw agent useful inside authenticated browser sessions, where reusing existing cookies and logins matters more than running a clean Chromium instance from scratch. This guide covers the prerequisites, the installation flow, the configuration file, common deployment scenarios, and the errors that show up most often during a first install.

What OpenClaw Browser Relay Does
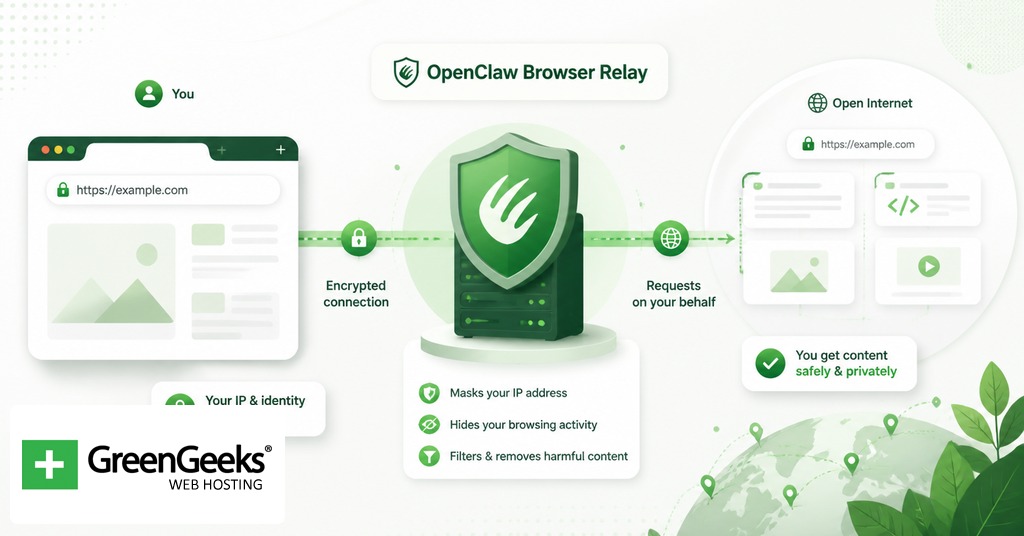
The Browser Relay connects an AI agent to a real Chrome browser using CDP, so the agent can move between pages, click, fill forms, take screenshots, and read the DOM of pages the user is already signed into. According to the docs at docs.openclaw.ai, OpenClaw exposes three browser control paths. Extension Relay attaches to a Chrome tab the user already has open and runs commands on port 18792. OpenClaw-Managed launches an isolated Chromium instance on a port in the 18800 to 18899 range. Remote CDP points the agent at a remote browser endpoint, which is the path used in cloud automation pipelines.
The relay is the right choice when controlling an already-open tab is the whole point. Authenticated SaaS dashboards, workflows that depend on cookies set during a manual login, and tasks that rely on extensions already loaded in the user’s Chrome are the most common reasons to use it. Managed mode covers the opposite case, where the agent should start from a clean profile and leave nothing behind.
The relay also works well for human-in-the-loop tasks, where a person handles a manual step (a captcha, a multi-factor prompt, a payment confirmation) and then hands the tab back to the agent. Because the tab is the same one the user was working in, no session needs to be re-established. The agent picks up exactly where the human left off, with the same scroll position, the same form state, and the same DOM.
Prerequisites for Installation
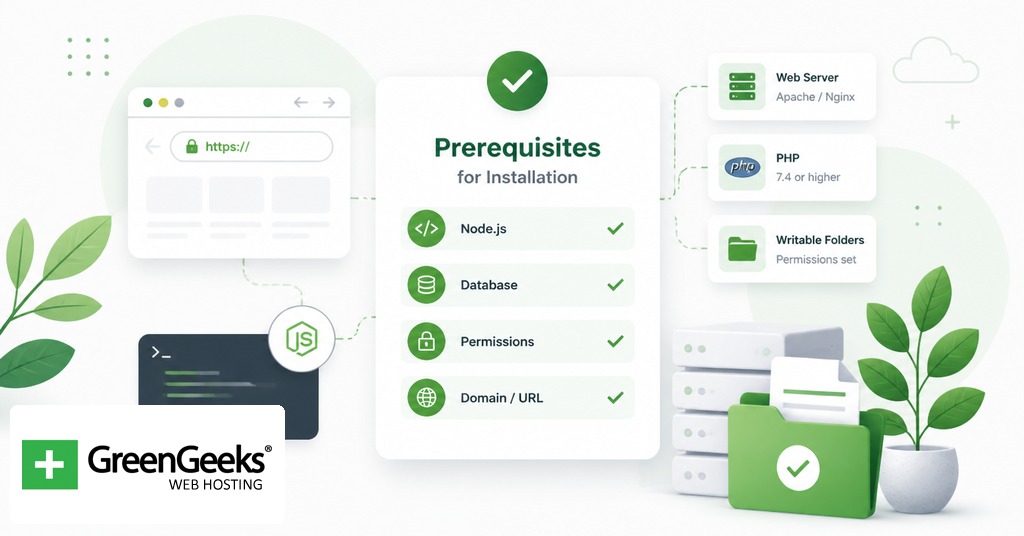
Three things need to be in place before the install starts. First, Node.js with a recent npm. Second, a working Google Chrome installation, because OpenClaw uses CDP and a stable Chromium build. Third, an OpenClaw account and a Gateway token retrieved from the Config to Gateway page in the OpenClaw dashboard.
On Ubuntu and other Debian-derived systems, the default Chromium is often a snap package. The snap version’s AppArmor confinement blocks the way OpenClaw spawns and monitors the browser process, which causes the Browser Relay’s most common Linux startup failure. The recommended path is to install the official Chrome .deb package from Google before continuing.
Network expectations differ by deployment. If OpenClaw runs on the same machine as Chrome, the loopback interface handles everything and no extra config is required. If OpenClaw runs on a VPS and Chrome runs on a workstation, a node host program runs locally to relay instructions, and a tunnel such as Tailscale or an SSH forward usually carries the WebSocket traffic between them.
Installing OpenClaw and the Browser Relay Extension
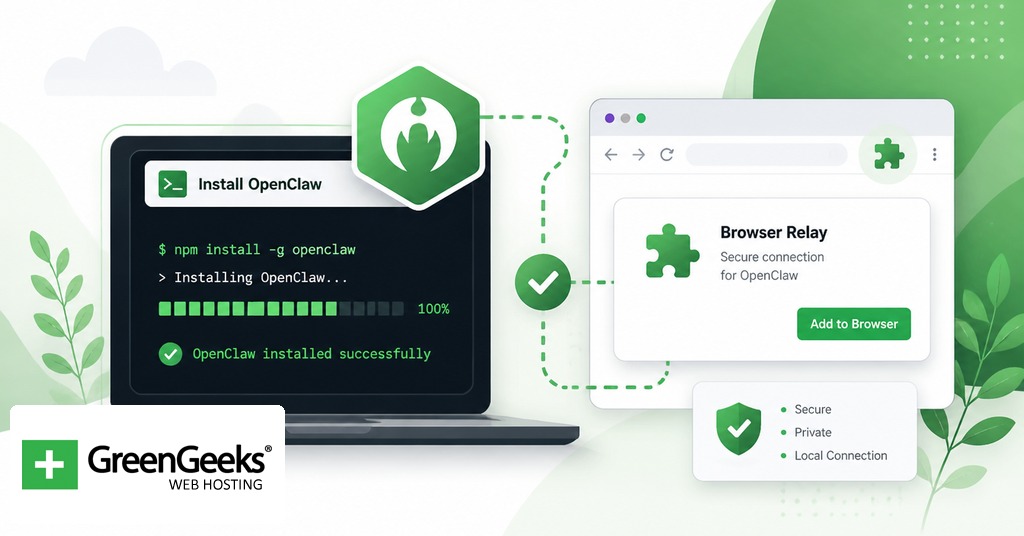
OpenClaw ships through npm. Install it globally on the machine that will host Chrome:
npm install -g openclaw@latest
The Chrome extension is bundled inside the npm package as static files. The canonical install command copies the extension into a stable location under the OpenClaw state directory:
openclaw browser extension install openclaw browser extension path
The path command prints the directory where the unpacked extension lives. Open Chrome, go to chrome://extensions, switch on Developer mode, click Load unpacked, and select that directory. Community-published copies of the extension also exist in the Chrome Web Store, but loading the version that ships inside the npm package keeps the extension version in sync with the gateway version, which removes one source of mismatch errors during upgrades.
After loading, click the extension icon in the toolbar, then open the Options page through the extension’s right-click menu. Two fields need values there: the Gateway port (default 18789) and the Gateway token from the OpenClaw dashboard. Save, then click the extension icon on any tab you want the agent to control. The badge reads ON when the relay is attached.
Configuring the Gateway and Node Host
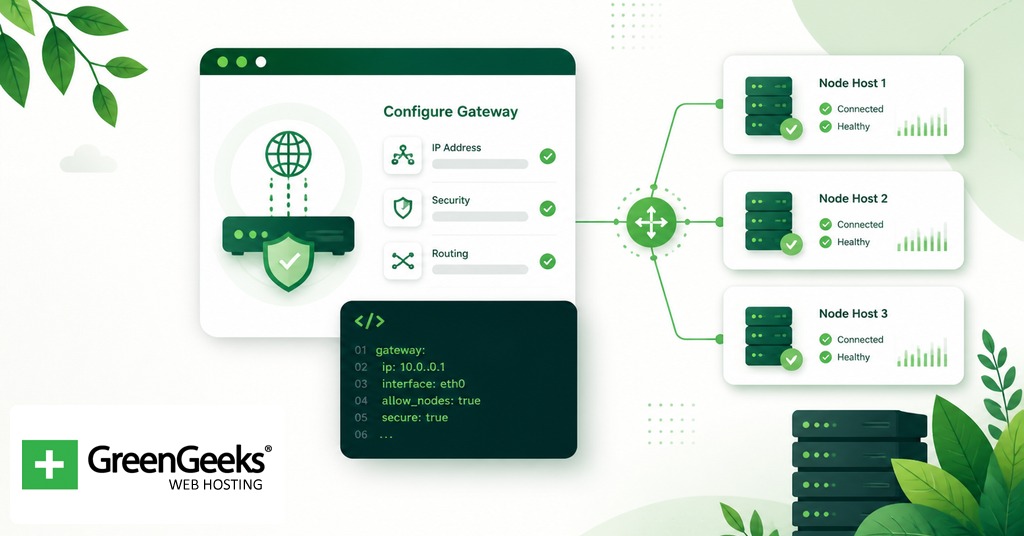
For a single-machine setup, no further network configuration is needed. The Gateway auto-starts the relay server on loopback at http://127.0.0.1:18792 once it detects the extension. Start OpenClaw, attach the extension, and the relay is ready.
For a remote setup, the install pattern looks different. OpenClaw runs on the VPS and a node host runs on the local machine where Chrome is open. The node host is what the extension talks to. On the local machine:
export OPENCLAW_GATEWAY_TOKEN="<your-token>" openclaw node run –host <vps-ip> –port 18789
The extension Options page on the local machine then points at 127.0.0.1:18789 rather than the remote IP, because the node host is the local end of the tunnel. If the WebSocket has to traverse a private network, Tailscale removes most of the firewall pain, and the OpenClaw documentation lists it as the supported tunneling option for this layout. An SSH reverse tunnel works for one-off testing, though community issue reports show that long-running CDP traffic over an unstable SSH session can produce the “no tab is connected” error described later.
Browser Profile Configuration in openclaw.json
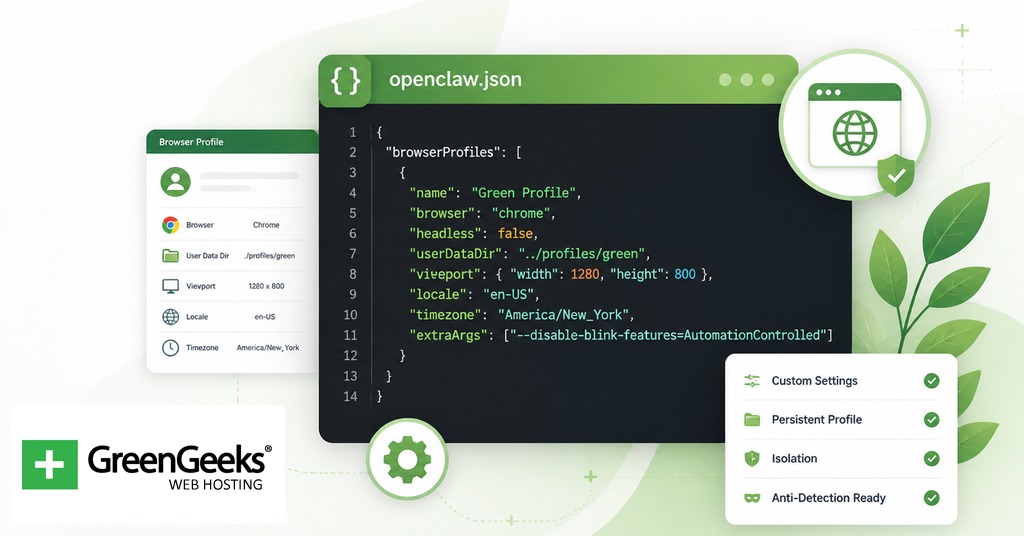
OpenClaw reads its configuration from ~/.openclaw/openclaw.json. The file uses JSON5, which means trailing commas and comments are accepted. A profile entry describes how OpenClaw should obtain a browser session. The relevant fields are driver, attachOnly, cdpUrl, userDataDir, and color. A minimal entry that attaches to an existing Chrome started with –remote-debugging-port=9222 looks like this:
{ "browser": { "cdpUrl": "http://127.0.0.1:9222" }, "profiles": { "chrome": { "driver": "existing-session", "attachOnly": true, "cdpUrl": "http://127.0.0.1:9222", "color": "#3b82f6" } } }
Two profile names are reserved by default. The openclaw profile is auto-created if missing and is used for OpenClaw-Managed Chromium. The chrome profile is the built-in profile for the Extension Relay and points at http://127.0.0.1:18792. Setting attachOnly to true tells OpenClaw not to launch its own browser. Without that flag set, OpenClaw treats any loopback CDP URL as a managed profile and tries to spawn the browser itself, which causes a port conflict on Linux when Chromium is already running.
Common Configuration Scenarios
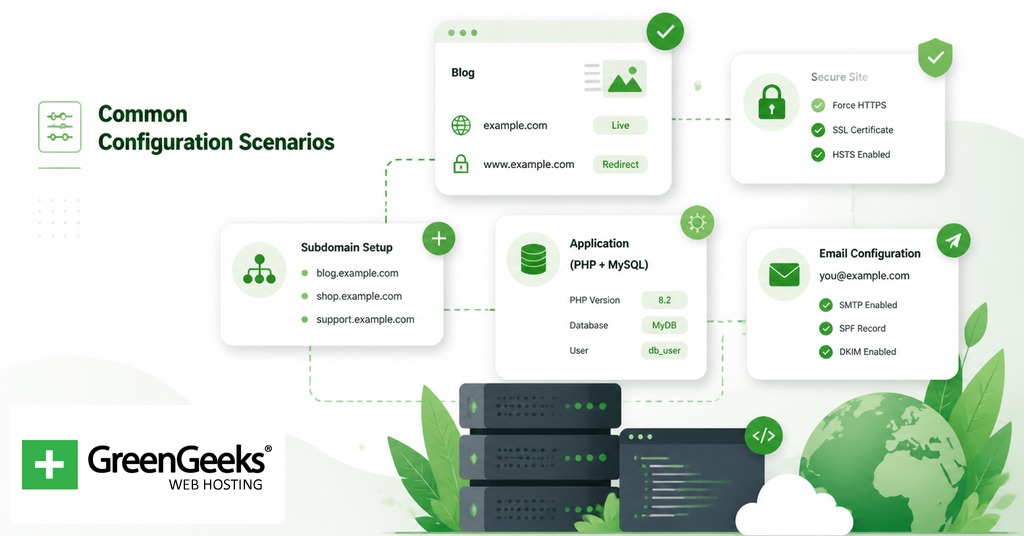
The four scenarios below cover most first-time deployments.
Attaching to an existing Chrome tab with logins. This is the default Extension Relay flow. Install the extension, paste the Gateway token, click the extension icon on the tab, and run the agent. No openclaw.json edits are needed for this path.
Running an isolated managed Chromium for headless work. Skip the extension entirely. Let OpenClaw create the openclaw profile and launch its own Chromium on port 18800. This is the right path for scheduled scrapes, test harnesses, and any workflow where session state should not leak across runs.
Connecting to a remote Browserless container. Browserless containers expose a CDP endpoint over loopback or over an internal network. Add a profile with the container’s CDP URL and set attachOnly: true. The flag is required because OpenClaw treats loopback CDP without attachOnly as a local managed browser.
Connecting to Chrome started manually. Launch Chrome with –remote-debugging-port=18800 –user-data-dir=/some/path, then point the OpenClaw profile at that port with attachOnly: true. This pattern is the workaround for systems where snap-packaged Chromium prevents OpenClaw from launching the browser itself.
Troubleshooting the Browser Relay
The error categories that show up most often in the OpenClaw issue tracker break down roughly as port conflicts (45 percent of reports), service not running (30 percent), and configuration errors (15 percent), with extension reconnection bugs and tab-switch CDP loss accounting for the remainder. The fixes below cover the main offenders.
“Failed to start Chrome CDP on port 18800 for profile openclaw.” On Ubuntu, this is almost always the snap Chromium issue. Install Google Chrome from the .deb package and update the executable path in openclaw.json. If the snap version has to stay, set attachOnly: true in the profile and start Chromium manually with –remote-debugging-port=18800.
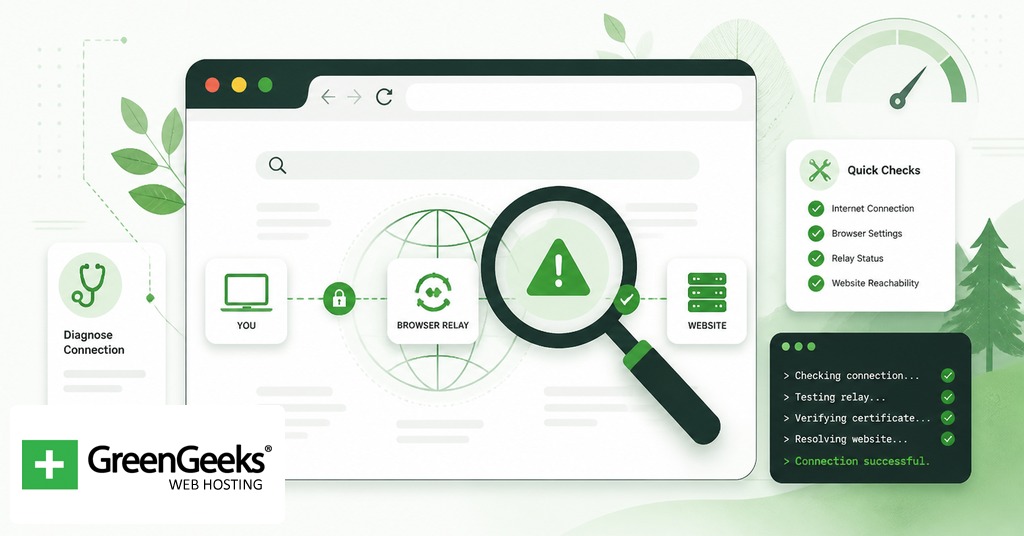
“No tab is connected” while the extension shows ON. Causes include changing pages during attachment, an SSH tunnel that drops the WebSocket, and the lazy port 18792 not opening until the first agent command. Reattach by clicking the extension icon, confirm the tunnel is live, and send one test command from the agent before assuming the relay is broken. GitHub issue #23914 tracks the SSH tunnel variant.
Port 18792 not listening. This is expected behavior when nothing has been issued yet. The CDP relay is lazily initialized and only opens once the first browser command is sent through the gateway. A netstat check before any agent activity will look like a failure when nothing is wrong.
“Playwright is not available.” Some features need Playwright, including ARIA snapshots, role snapshots, element screenshots, and PDF rendering. Install the full Playwright package and restart the gateway, or reinstall OpenClaw with browser support, then retry.
When the cause is unclear, run the diagnostic command first:
openclaw status –all
The output identifies which component has failed (gateway, control service, or relay) and saves time over trying fixes against the wrong layer.
Security Considerations for Production Use
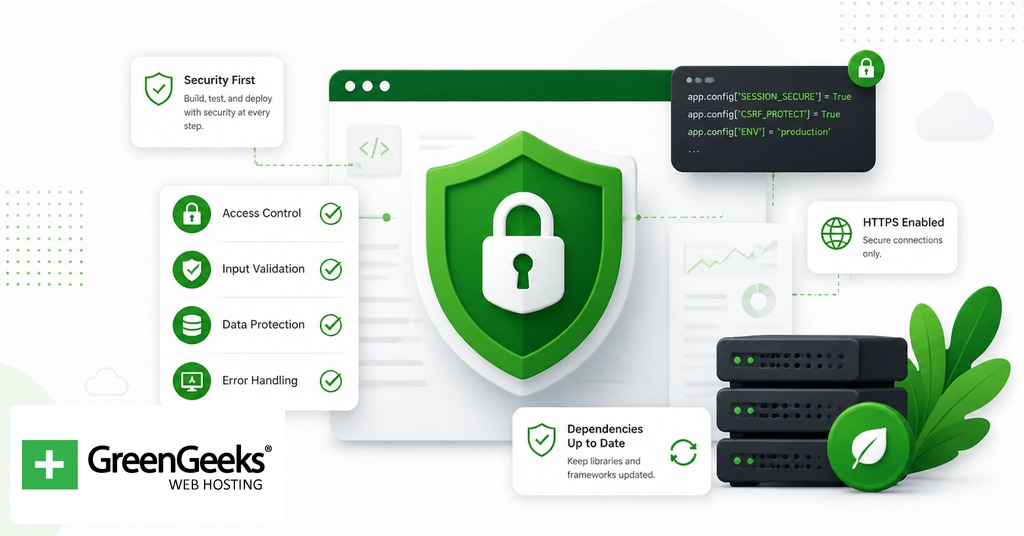
The Browser Relay grants an agent full DOM access to whatever tab it is attached to. Treat that access as if it were an API key with write permission. The official documentation and community tutorials make a few specific security recommendations for keeping it contained.
Use a dedicated Chrome profile for the relay. Do not attach the extension inside the profile that holds personal mail, banking, and password manager sessions. A separate profile signed into only the accounts the automation requires limits what the agent can read or modify if a prompt goes wrong.
Handle the Gateway token like an API credential. Store it in an environment variable or a secret manager rather than a checked-in config file. Rotate it if it is shared, and revoke it through the dashboard if a workstation is lost.
For remote VPS setups, keep the Gateway port off the public internet. The token is the only access control, so a bound socket on 0.0.0.0:18789 becomes a soft target. A Tailscale subnet, a WireGuard tunnel, or an SSH forward all keep the surface area small without changing the OpenClaw configuration.
Log review is the last piece. The Gateway and Control Service write request logs that include the URLs and selectors the agent hit during a session. Reviewing those logs after a run gives a record of what the agent did, which matters for any task that touched account data or external services. The community fork at github.com/Unayung/openclaw-browser-relay adds auto-reconnect and state persistence on top of the official extension and is worth knowing about for long-running sessions.
Frequently Asked Questions

What is OpenClaw Browser Relay?
OpenClaw Browser Relay is a Chrome extension and local server bridge that connects an OpenClaw AI agent to a real Chrome tab over the Chrome DevTools Protocol. The agent can move between pages, click, fill forms, and read content while reusing the user’s existing logins, cookies, and installed extensions. It is one of three browser control paths in OpenClaw, alongside OpenClaw-Managed and Remote CDP.
What ports does OpenClaw Browser Relay use?
The relay uses port 18789 for the Gateway WebSocket, 18791 for the Control Service that handles profile and lifecycle management, and 18792 for the CDP Relay that forwards commands to the attached Chrome tab. OpenClaw-Managed Chromium launches on a port in the 18800 to 18899 range. Port 18792 is lazily initialized and opens only after the first browser command.
What is the difference between Extension Relay and OpenClaw Managed mode?
Extension Relay attaches to a Chrome tab the user already has open, which preserves cookies, logins, and any extensions running in that profile. OpenClaw Managed launches a separate isolated Chromium instance with no shared session state, which is better suited to headless pipelines where a clean profile is the goal. The two modes can coexist in the same openclaw.json and are selected by profile name at run time.
Where is the OpenClaw configuration file located?
The configuration file lives at ~/.openclaw/openclaw.json on Linux and macOS. The file uses JSON5, which accepts comments and trailing commas. It contains the gateway token, profile definitions, and any cdpUrl overrides the user has set for managed or attached browsers.
Does OpenClaw Browser Relay require Playwright?
The base relay does not require Playwright, but several features do, including ARIA snapshots, role snapshots, element screenshots, and PDF rendering. When the agent reports “Playwright is not available,” the fix is to install the full Playwright package and restart the gateway, or reinstall OpenClaw with browser support so the Playwright dependency is pulled in automatically.