
WordPress provides the ultimate editing experience through its block-based Gutenberg editor. Not only can you create any kind of content, but you can also change the background color of the editor and blocks in WordPress.
Changing the individual blocks is quite easy and you can easily do this in Gutenberg by adjusting the settings but doing that every time you add a block can be tedious. Thus, you probably want to use a plugin.
In this case, the Block Editor Colors plugin can help create more default block colors. That way, when you add a block, you won’t need to enter the Hex value for the color you want.
However, the editor background color is not so easy. Instead, you will need to actually add some code to change this, but it just boils down to copying and pasting the code and adding the correct color to it. Thus, it’s not overly difficult.
Today, I will demonstrate how to change the background color of individual blocks and the entire Gutenberg editor.
Why Change a Background Color in WordPress
Depending on what you change the background color of the impact is completely different, so let’s take a moment to understand the difference between the editor background and an individual block background.
By default, both the editor background and block background are white. This helps everything match, but be aware that some themes will change the editor background or block default color, but this is quite rare.
If you change the block background color, this will not only change its appearance in the editor but also on the front end of your website.
If you change the editor background, it has no impact on the front end and is purely cosmetic for the author.
As such, each one has different benefits associated with them. Let’s take a look at each.
Benefits of Changing the Block Background Color in WordPress
Changing the background color of a block changes the color for all users on both ends of the website. As such, it is typically used when you are looking for a particular element to stand out on a page or to help improve readability.
For example, let’s say you wanted to highlight a definition. Well, you could put it in its own block and change the background color to gray. Or perhaps you want to highlight an environmental fact, so you make it green.
Note: These types of choices can help the user identify certain elements on your site, thus making it easier to read.
See what I did here?
Of course, while ensuring your content is readable should be the number one concern, there’s no denying that improving the design of your site goes hand in hand with color palettes. As such, changing the background color could just be for site design purposes.
Benefits of Changing the Editor Background Color in WordPress
While this is mostly a cosmetic choice, there are actual benefits that you may be able to take advantage of.
If your website utilizes a background color that is not white, you may run into a text visibility issue. As such, it is very important to choose the appropriate font color, and that can be made easier by changing the background color of the editor.
Normally, you can just use the Preview feature to confirm if the colors you chose work or not, but that does take time and has you shifting tabs. By changing the editor color, you can see everything in one location.
This change is more for the author, so let’s look at that angle for a moment. When you write for hours, staring at a screen can cause eyestrain. In many cases, a white background and black text are ideal, but not for everyone.
If the writer suffers from sensitive eyes or some kind of visual impairment, a darker color can help reduce eyestrain. This is why dark mode has become a prominent feature on websites in recent years.
In any case, actually changing the background color of Gutenberg is very easy.
How to Change the Gutenberg Editor Color in WordPress
Let’s start with covering how to change the background color of the entire Gutenberg editor. There is one thing to keep in mind when making this change:
- This will not impact the color of the post or page on the front end of your site
As such it comes down entirely to preference. There is no way to actually change the editor color in WordPress, which is why we need to add a few lines of code to your theme’s functions.php file.
It is always recommended to create a backup of your site before editing the code of your website. While the odds of you making a mistake in this case are quite small, it is always better to be safe than sorry.
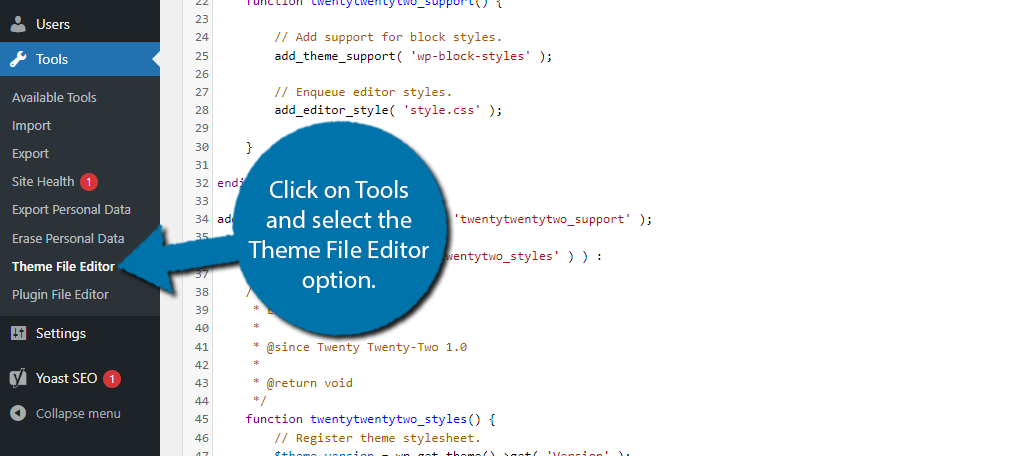
Step 1: Locate the functions.php File
There are several ways to edit the functions.php file in WordPress. In this tutorial, we will be using the Theme File Editor available in WordPress. With it, you can quickly edit files located in your active theme.
To access this, click on Tools and select the Theme File Editor option.
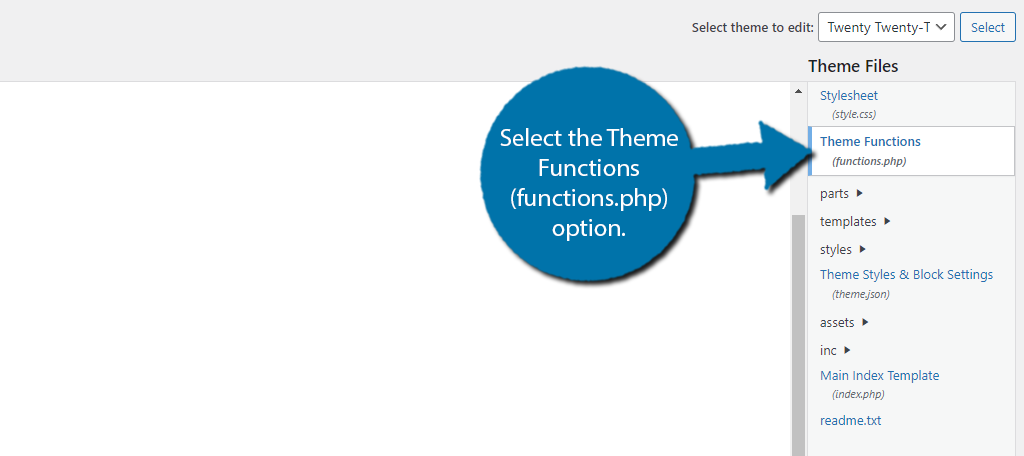
When you first open the Theme File Editor, you will be in your theme’s stylesheet. You can change what file you are editing on the right-hand side.
In this case, select the Theme Functions (functions.php) option.
Step 2: Add Code
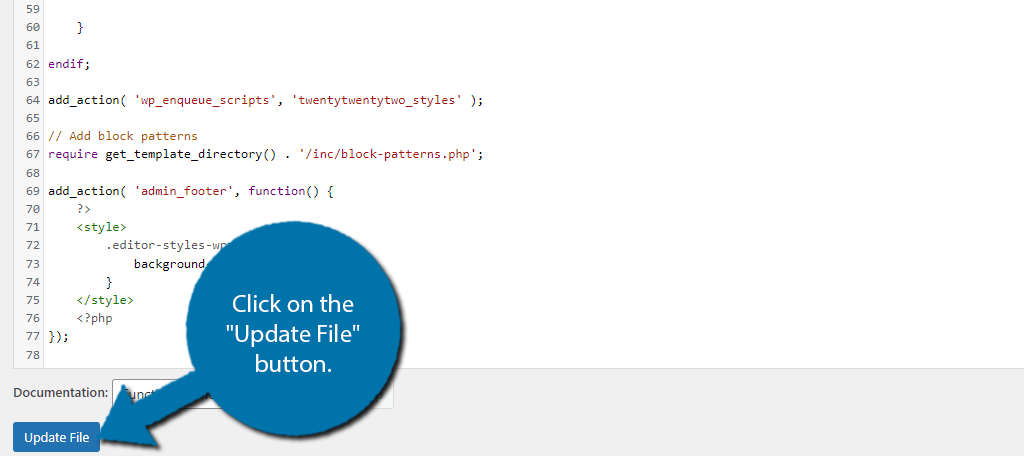
All you actually need to do is scroll down to the bottom of this file and paste the following code:
add_action( 'admin_footer', function() {
    ?>
    <style>
        .editor-styles-wrapper {
            background-color: #beecda;
        }
    </style>
    <?php
});
Once you have this in place, take a look at the line that contains the “background-color.” Insert the Hex code of the color you want to use. After that, just click on the “Update File” button.
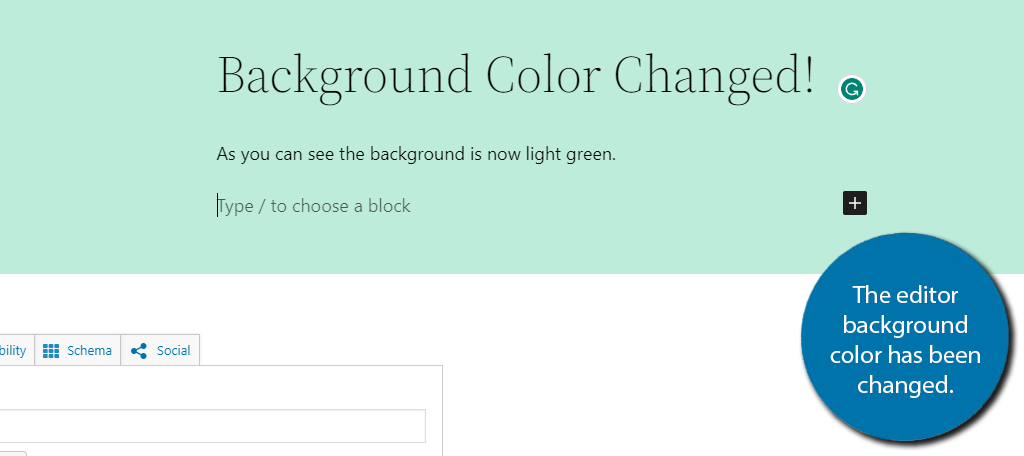
After this, you can go back to any post or page and see that the editor has changed color.
And that’s really all there is to it. Just remember that in some cases, a theme will actually change the editor color. This is usually to match the background color of the website.
Also note that in this example, I edited the primary theme’s files. In the event the theme is updated, this snippet could be removed. That’s why it’s always best to use a child theme in WordPress.
How to Change Block Background Colors in WordPress
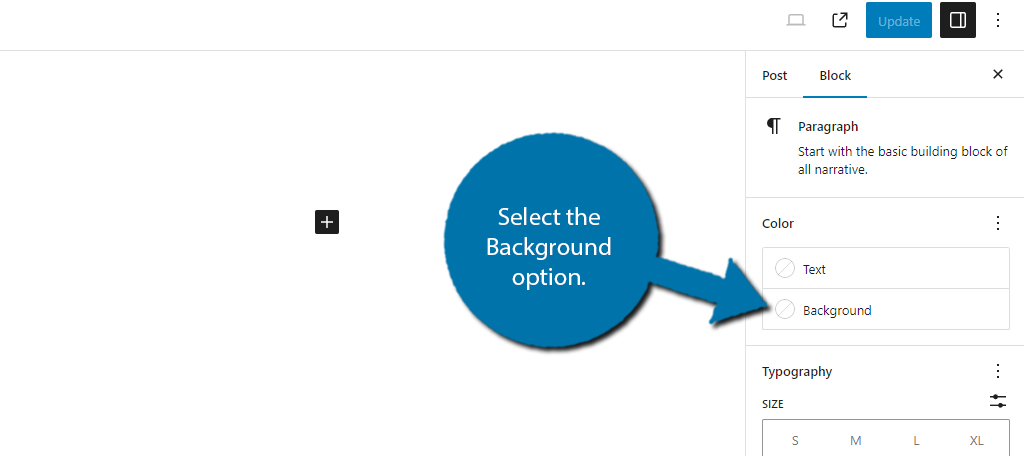
WordPress allows you to change the background color of any block, and it’s actually really easy to do and takes less than a minute.
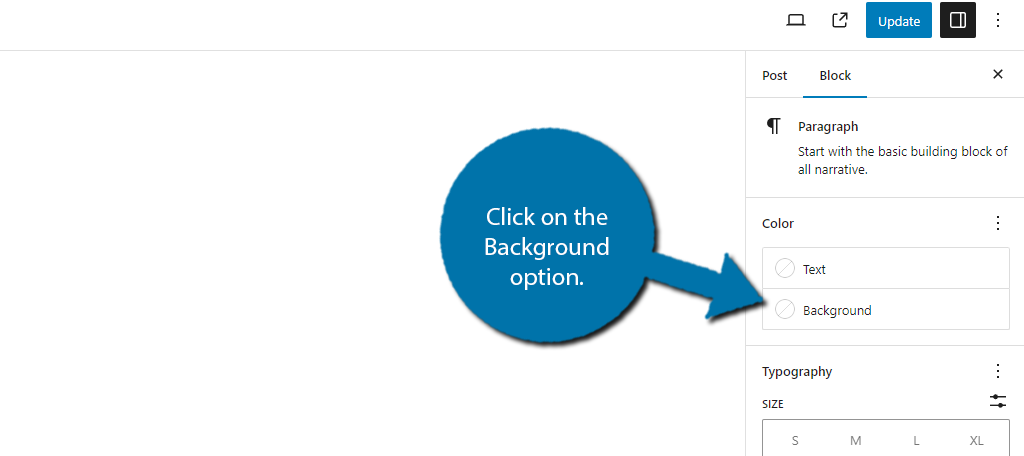
Go to any post or page in WordPress and select the block that you want to change the background color of. On the right-hand side, select the Background option.
WordPress provides three options. First, you can use a slider, or insert the Hex value to add your own custom color.

Below this, you will find the theme section. Each theme will include any color it uses throughout your site. In some cases, you will have several colors to choose from, and in others, only one or two may appear.
The point of these colors is to help users match colors with the theme.
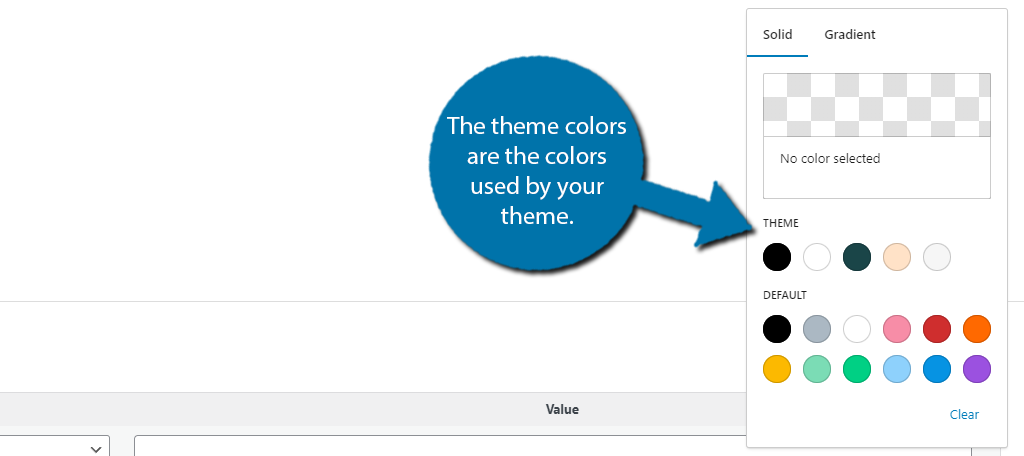
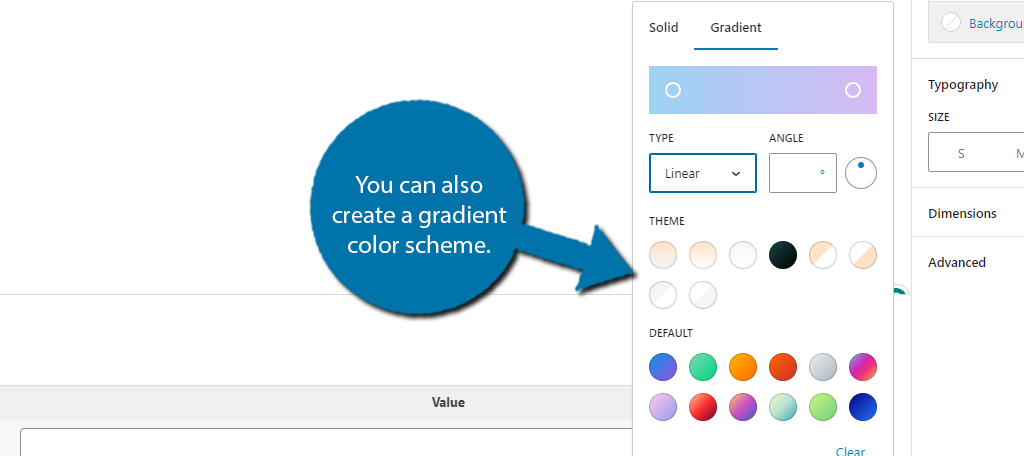
Then, there is the Default section. These are the default colors that WordPress makes available. There’s nothing special here, so just select what you like. You might also notice that there is a Gradient tab.
The Gradient tab allows you to add a gradient color scheme as the background color. Here, you can adjust which color is more prominent, what colors to use, and there are some preset options from both the theme and WordPress.
Regardless of what you choose, the end result will look something like this:
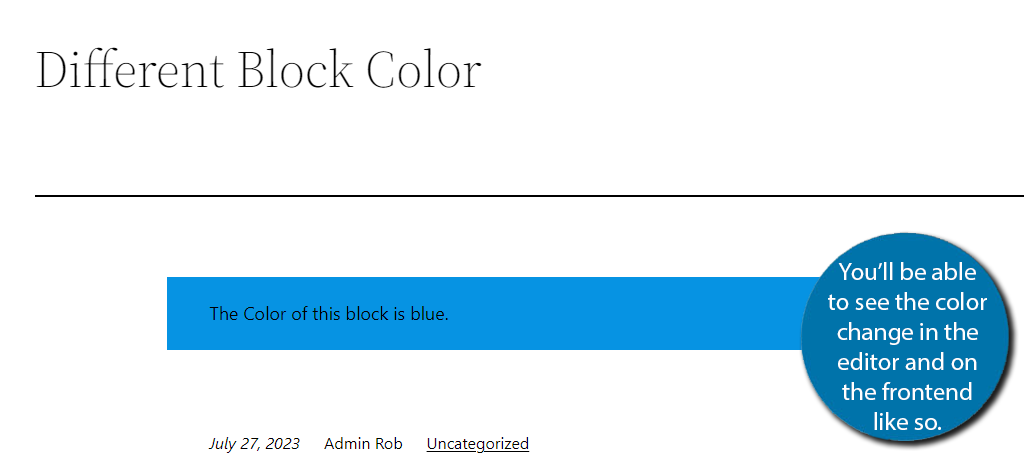
That covers all of the default options for changing a block’s background color in WordPress.
What About Other Blocks?
Now, you might have noticed I used a text block as an example here and may be wondering how to do this with other blocks. Well, it depends on the block.
For example, the Image block does not offer such a feature for obvious reasons. You are adding an image and a background color would not be visible.
There are ways of adding a color box around the image, but that is not done through the block.
In other cases, some blocks may go about it differently. For example, the Button block is a unique case where you can change the color of the button, but it isn’t technically the background.
Other blocks allow you to create color margins that you can make extra thick. Every block is different, so be prepared.
How to Add More Default Block Colors to WordPress
The Block Editor Colors plugin is quite simple. As we just saw, WordPress provides some default background color options for blocks and so does the theme.
However, it doesn’t save any of the custom colors you create.
Thus, if you plan on reusing that color throughout your content, well, you will have to manually add it every time. While it isn’t that hard or time-consuming, it can get pretty tedious.
The Block Editor Colors plugin fixes this by allowing you to add your own default color options.
Note: You may want to obtain the Hex values for the theme colors if you want to use them, as they will be removed while the plugin is active.
Step 1: Install Block Editor Colors
Let’s start by clicking on Plugins and selecting the Add New option on the left-hand admin panel.

Search for Block Editor Colors in the available search box. This will pull up additional plugins that you may find helpful.
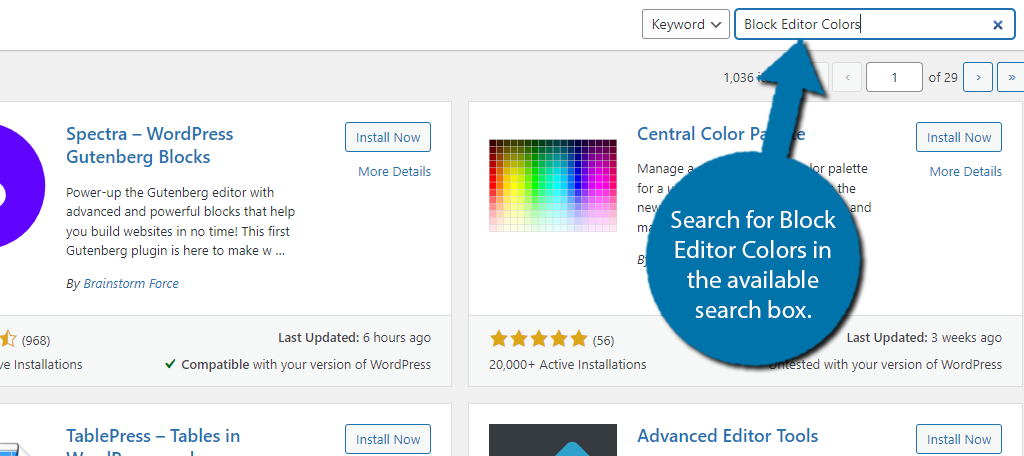
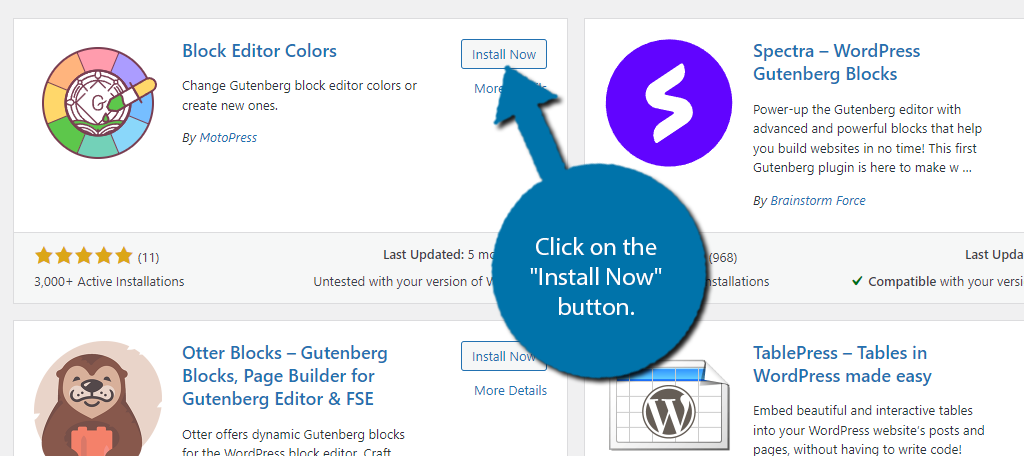
Scroll down until you find the Block Editor Colors plugin and click on the “Install Now” button and activate the plugin for use.
Step 2: Create New Default Color Options
This plugin allows you to create preset block colors you can choose from. Thus, the first thing you need to do is set the default colors you can choose from.
Click on Settings and select the Editor Colors option.

There are 12 default colors in the plugin. You can edit any of the existing ones or add your own color to the section. The process is identical so we will just cover how to create a new one from scratch.
At the top of the page, you will see a Custom Colors section. Simply click on the “Select Color” button to choose the new color. You can enter a Hex value or use the color slider to make your choice.

You can also add a color name. For example, let’s say you want to use a yellow background color on a text block that displays a definition.
You could call it Definitions, or simply Yellow. The choice is really up to you. Do the same for the Slug field.
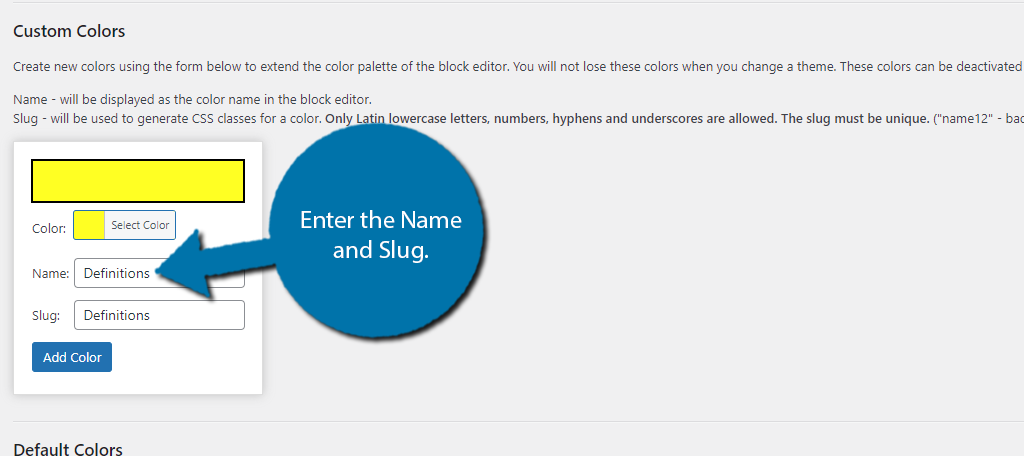
Then just click on the “Add Color” button. This will add a new custom color slot that you can use to repeat this step.
Step 3: Choosing a Background Color
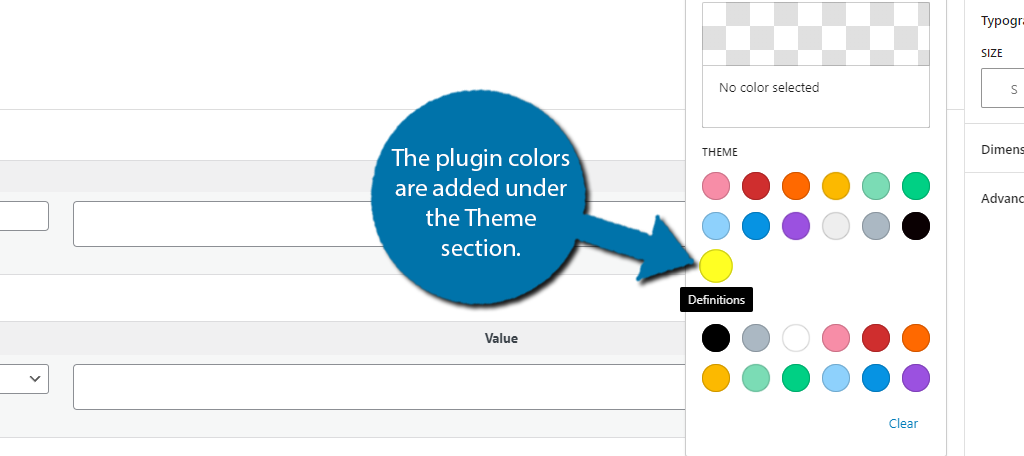
Adding the color to your blocks is identical to doing it the normal way. The colors that this plugin adds are located in the background color section when you select a block on the right-hand side.
The colors that the plugin adds are located under the theme list. If you hover over them, you will see the name.
That’s really all there is to it. Congratulations on learning how to change the default block background colors in WordPress.
Customize Your Website Today
Without a doubt, changing the background color of the Gutenberg editor, or of an individual block within it, is a form of customization. And this is really just scratching the surface of what is possible with this platform.
WordPress is easily the most customizable CMS platform, which is why it is also the most popular one. Be sure to explore more ways you can customize the appearance of your website like checking out how to add dark mode in WordPress.
Why do you want to change the background color of your WordPress editor? How easy do you find the plugin to use?
Would be nice if it would also allow to change font color in the editor.
First worked perfectly but after updating wordpress no more