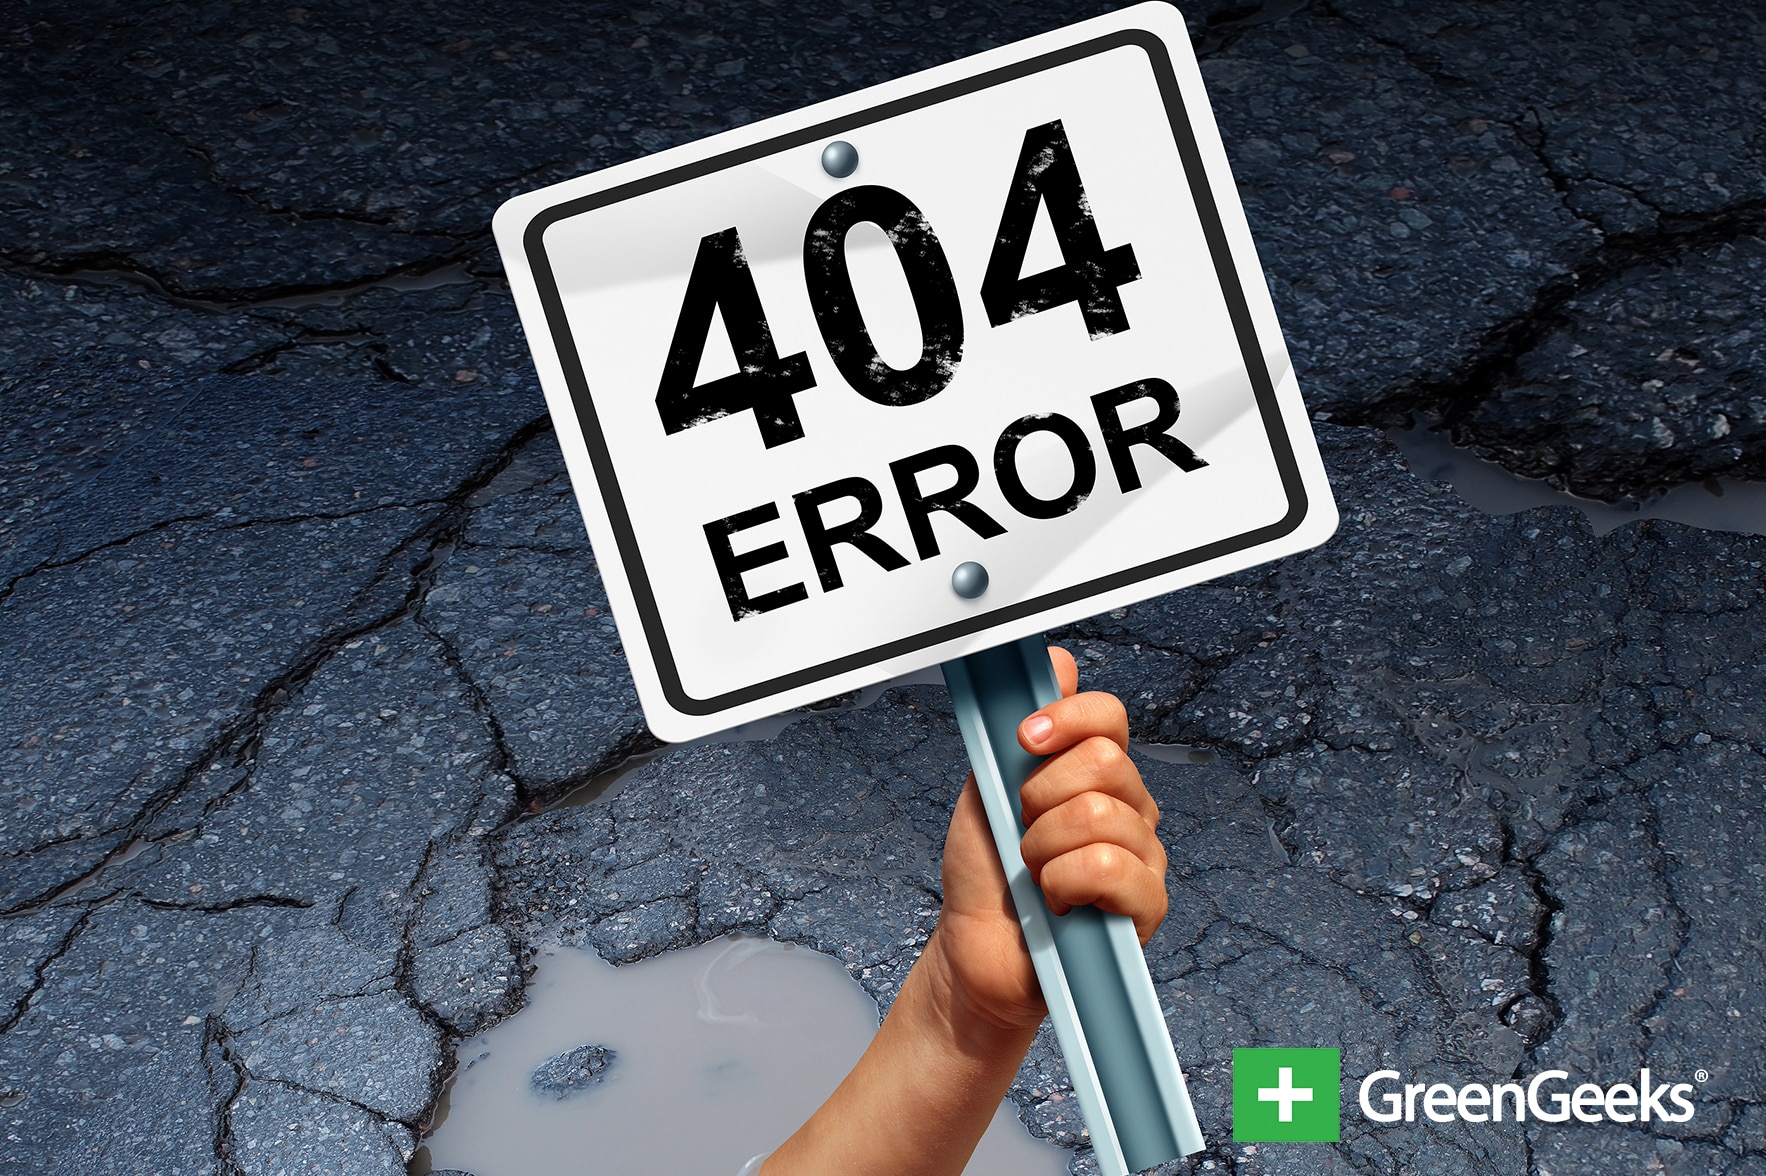
WordPress is a very useful tool when it comes to developing content. Unfortunately, sometimes things can happen or settings change to cause a post to throw out a 404 error. This doesn’t necessarily mean the post was deleted, though.
Changes in settings or modification of files can cause a post to disappear. Unless it was permanently deleted from WordPress, you just need to get it to show up again.
On the upside, at least visitors can see your cool custom 404 screen if you have one. These are nice because you can edit them to give the visitor a bit of insight as to what the issue is and give them hope that you’re fixing the problem.
This is just one of a few common WordPress errors you may come up against at some point. Even though WordPress is a reliable and stable system, nothing in the digital world is 100 percent perfect.
In this tutorial, we’re going to show you a few solutions to recovering a post that is displaying a 404 screen. These are simple fixes and should be able to get your website working normally again.
Fixing the 404 Error in a WordPress Post
When a post shows a 404 screen stating the file cannot be found, it can be caused by several things. You may have to troubleshoot the problem a little before you can get to the exact root of the issue.
Before you continue, it doesn’t hurt to make sure the post is still in existence. Go to the posts area of your WordPress admin panel and search for the “missing” document. If you find the post in question and it has been published, then you can continue looking for the solution.
Here are a few things you can check to fix the problem.
Solution 1: Save Your Permalink Settings, Again
WordPress gives users the ability to change how permalinks are set up on the website. Some will even refer to these as “pretty” links. At any rate, changes to the rewrite code could have altered how permalinks are functioning on your site.
To fix this problem:
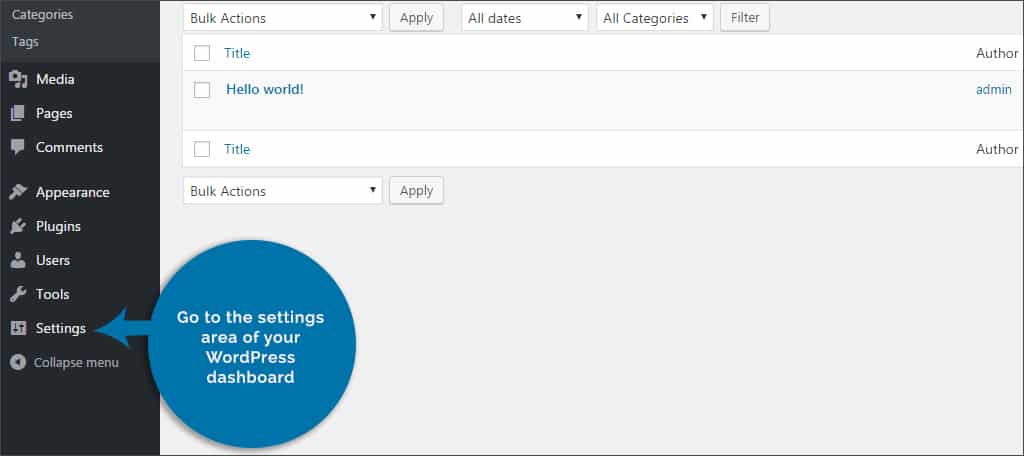
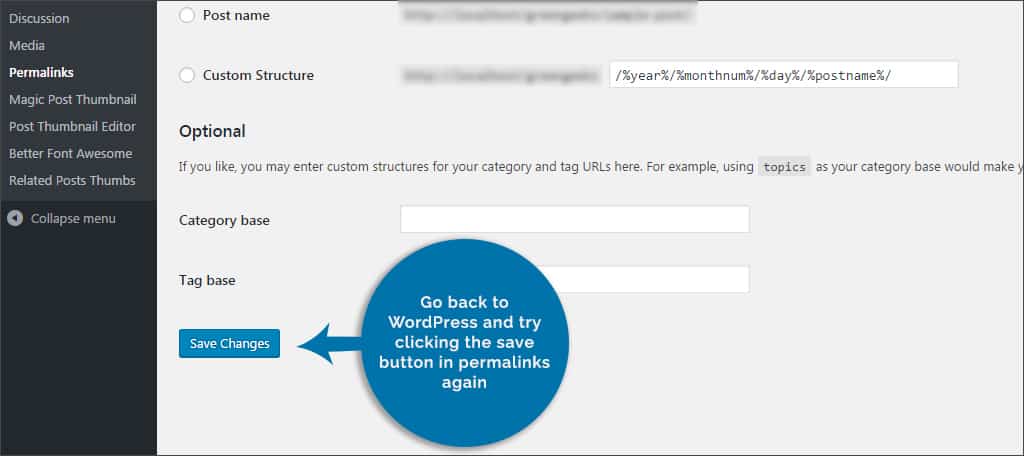
Step 1: Go to the settings are of your WordPress dashboard.
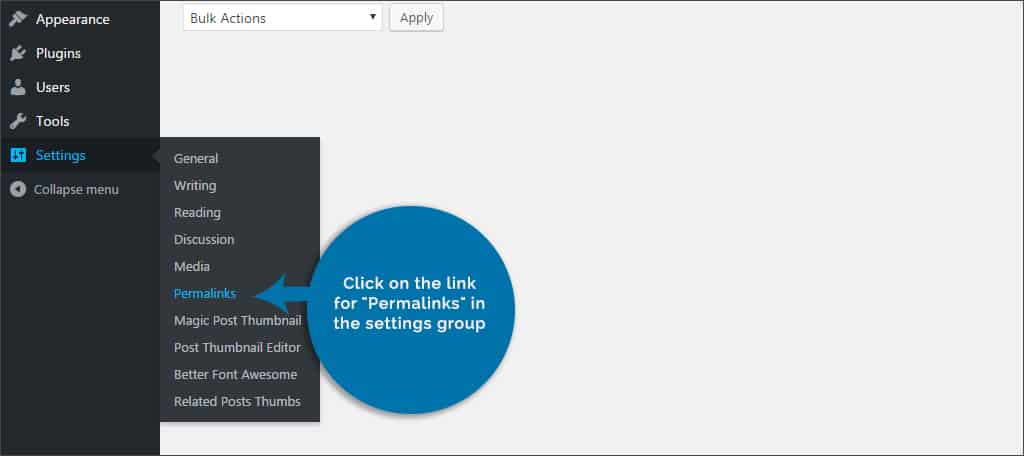
Step 2: Click on the link for “Permalinks” in the settings group.
Step 3: Click the “Save changes” button on the bottom left.
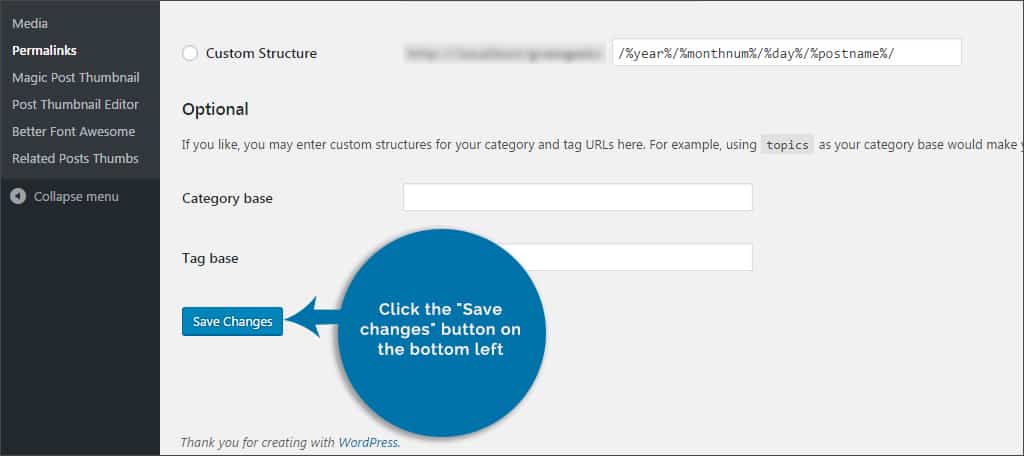
No other adjustments need to be made. Just clicking on the save button will cause WordPress to update the permalinks settings and dump the rewrite rules for the site.
This solution is one of the most common fixes for this problem.
Solution 2: Changing the .htaccess File
The rewrite rules for your website are stored in the .htaccess file in the root folder of your web host. If the first solution did not fix your problem, you might need to change the permission of this file.
There are two ways this can be done easily: through FTP or cPanel.
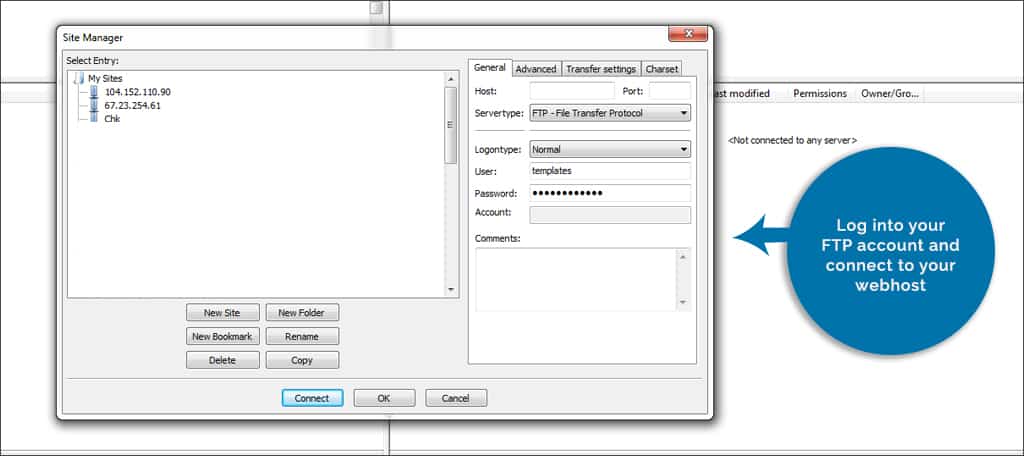
To Modify Permissions through FileZilla FTP:
File transfer protocol, or FTP, can be quite a useful tool. Free applications such as FileZilla make modifications and troubleshooting much easier. To change the permission of .htaccess:
Step 1: Log into your FTP account and connect to your web host.
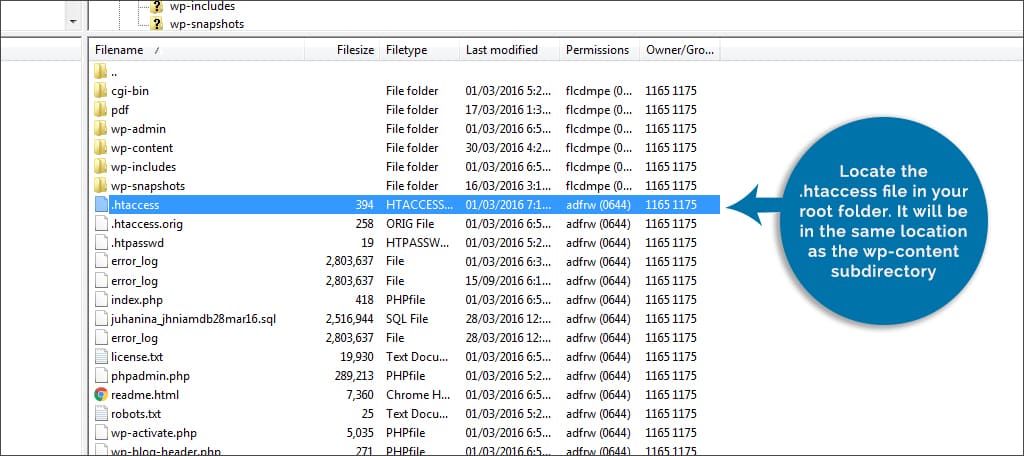
Step 2: Locate the .htaccess file in your root folder. It will be in the same location as the wp-content subdirectory.
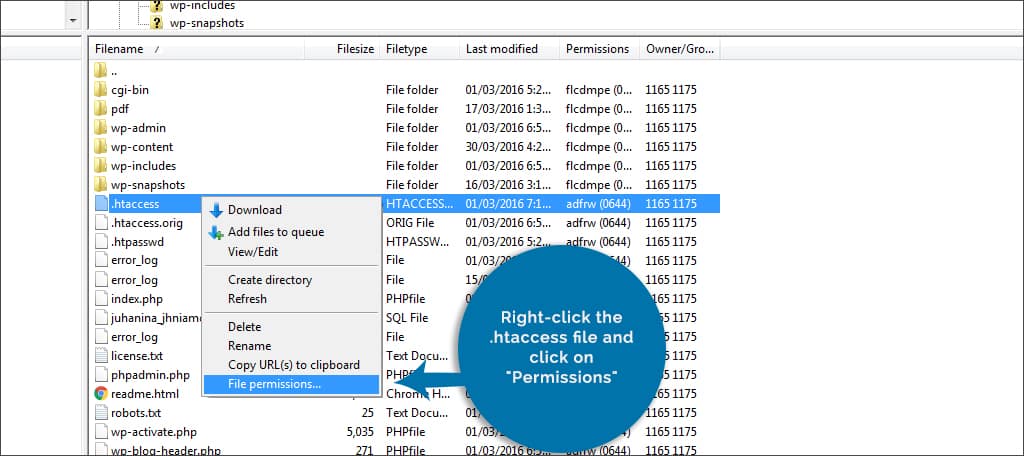
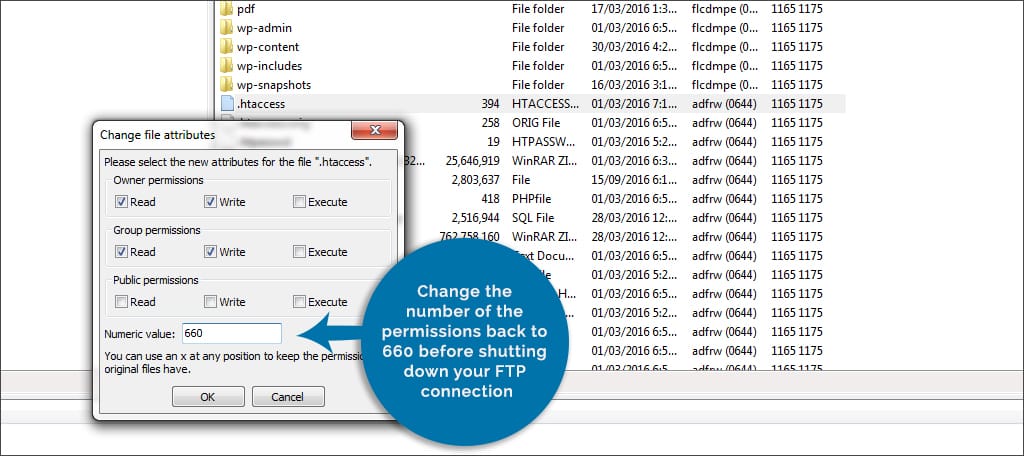
Step 3: Right-click the .htaccess file and click on “Permissions.”
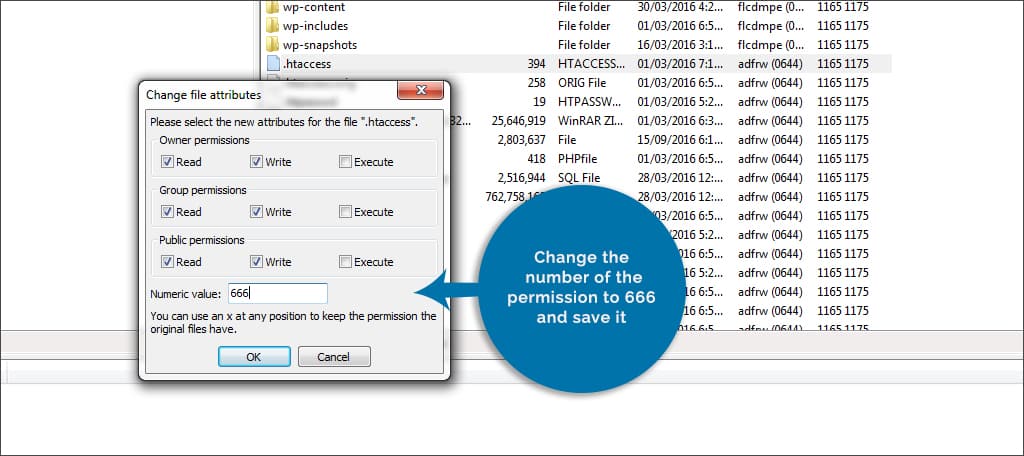
Step 4: Change the number of the permission to 666 and save it. This makes the file writeable.
Step 5: Go back to WordPress and try clicking the save button in permalinks again.
Step 6: Change the number of the permissions back to 660 before shutting down your FTP connection.
To Modify Permissions Using cPanel
There are a lot of tools built into the cPanel platform. Among these, you have access to a file manager. This system allows you to make a variety of changes including changing permissions to files. To use this method:
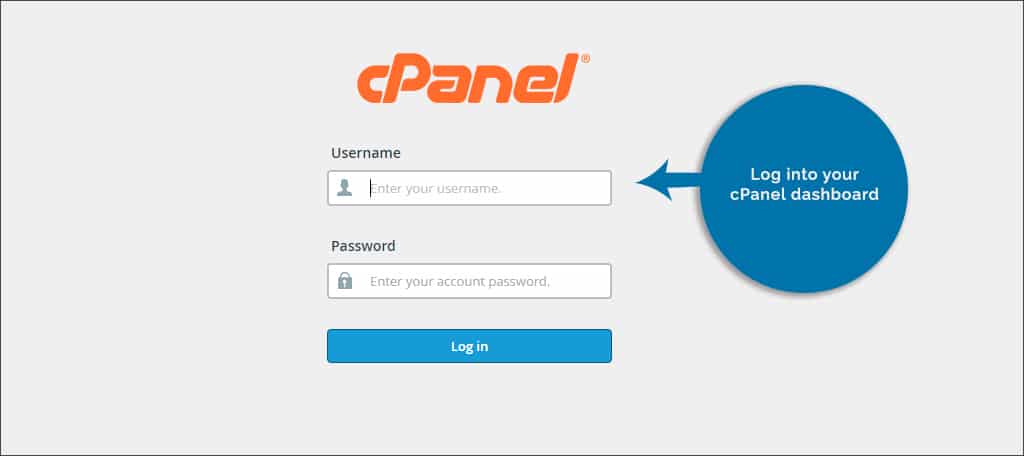
Step 1: Log into your cPanel dashboard.
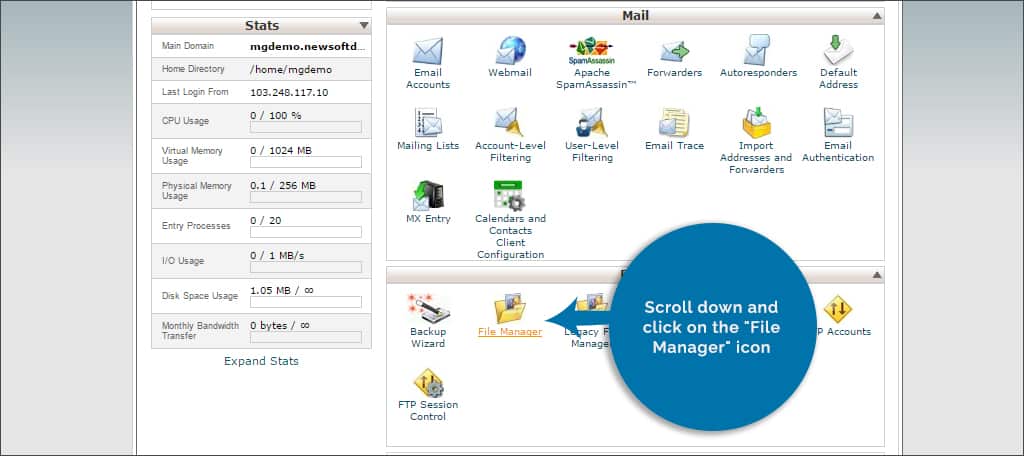
Step 2: Scroll down and click on the “File Manager” icon. If a new window appears asking which domain you wish to edit, use the drop-down window to select the website you’re trying to fix. Otherwise, the file manager will simply load your root folder.
Step 3: Find the .htaccess folder for your website and right-click it.
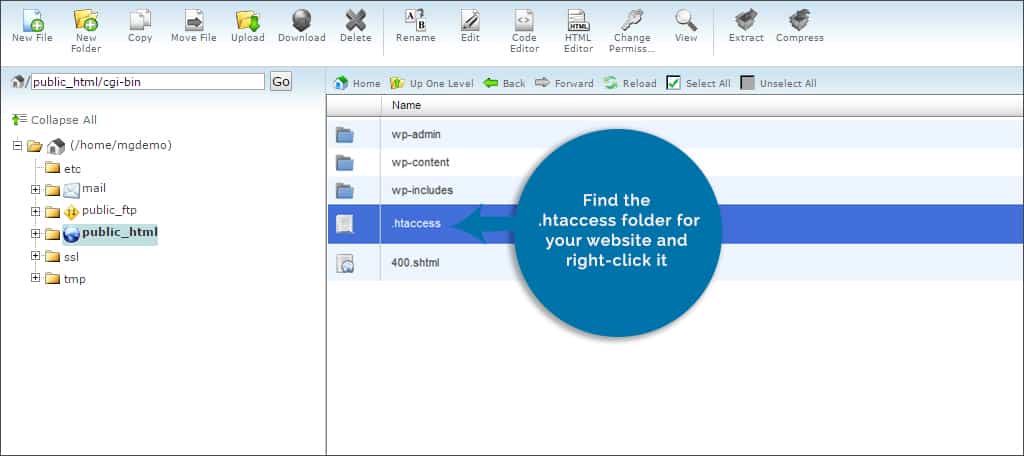
NOTE: You may have to enable “show hidden files” in the settings of your file manager. The newest versions of cPanel may have hidden files turned off by default.
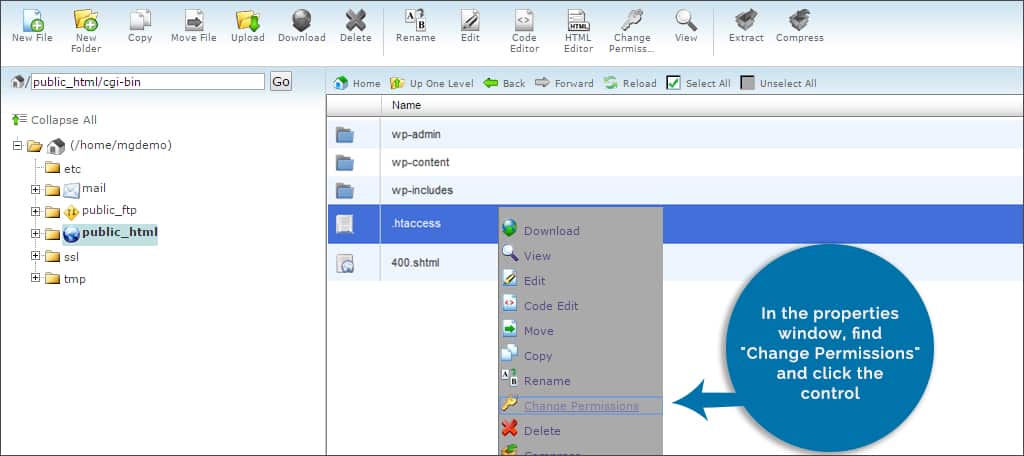
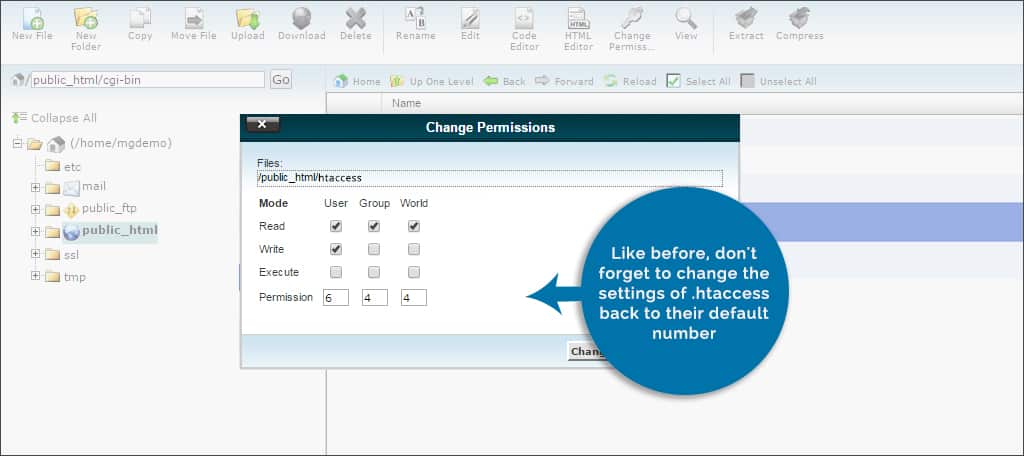
Step 4: In the properties window, find “Change Permissions” and click the control.
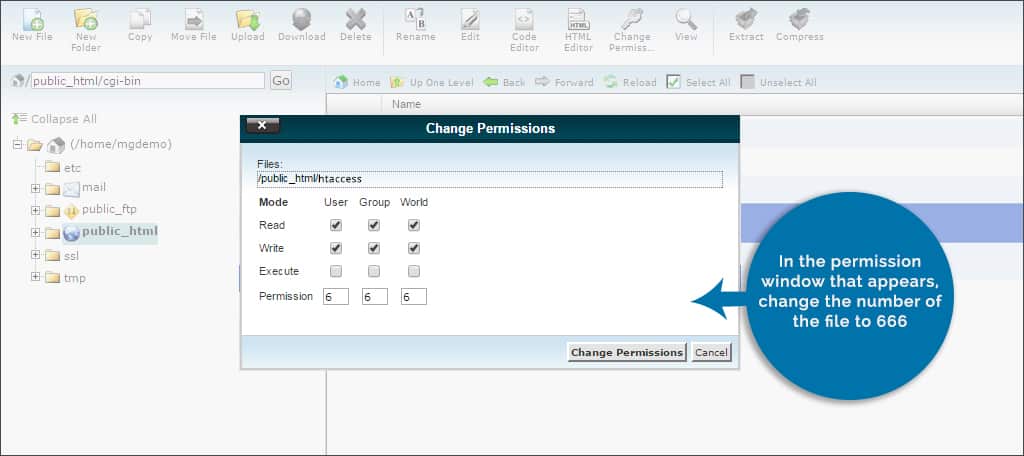
Step 5: In the permission window that appears, change the number of the file to 666.
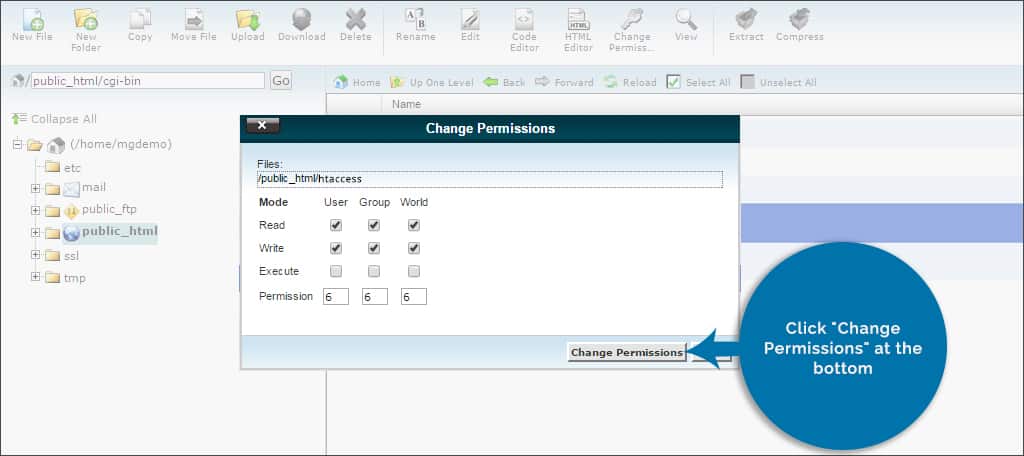
Step 6: Click “Change Permissions” at the bottom.
Step 7: Go back to your WordPress permalinks settings and click the save button again.
Step 8: Like before, don’t forget to change the settings of .htaccess back to their default number.
Solution 3: Manually Code .htaccess for Changes
If the above solutions do not work, you may have to make changes to your .htaccess file manually. Access the .htaccess file again whether through FTP or cPanel. This time, you want to edit the file.
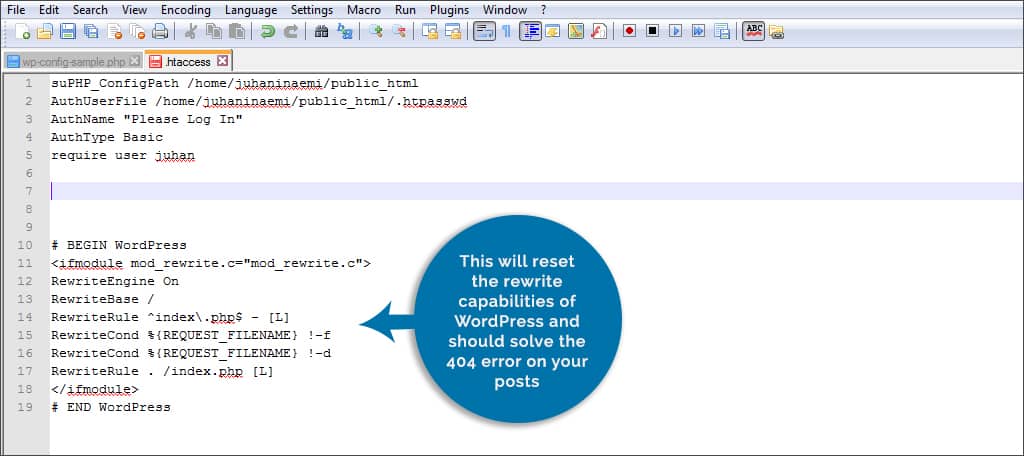
Add the following code to .htaccess:
# BEGIN WordPress
<ifmodule mod_rewrite.c=”mod_rewrite.c”>
RewriteEngine On
RewriteBase /
RewriteRule ^index\.php$ – [L]
RewriteCond %{REQUEST_FILENAME} !-f
RewriteCond %{REQUEST_FILENAME} !-d
RewriteRule . /index.php [L]
</ifmodule>
# END WordPress
You may already have something similar in .htaccess. You can simply replace the old code between the “# BEGIN WordPress” and “# End WordPress” with the module coding.
This will reset the rewrite capabilities of WordPress and should solve the 404 error on your posts.
Solution 4: Is it a Plugin Issue?
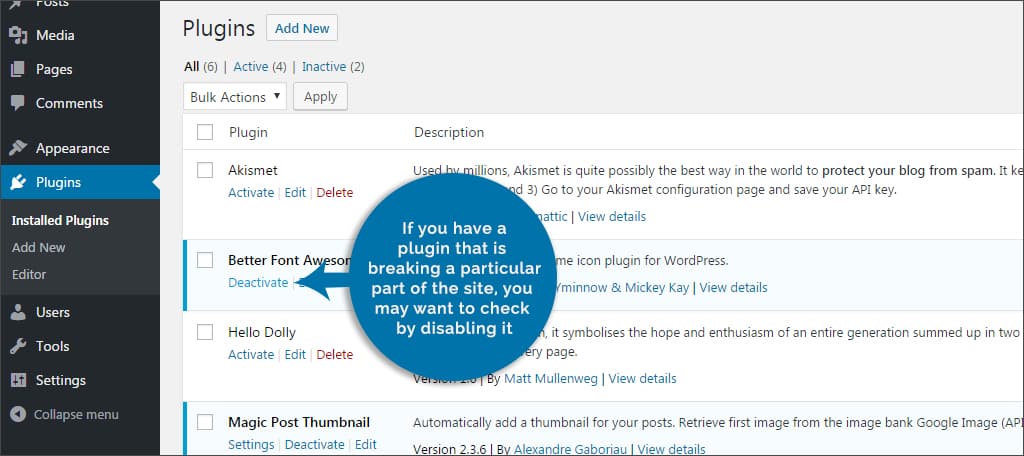
Although it doesn’t happen very often, plugins can do some strange things in WordPress. If you have a plugin that is breaking a particular part of the site, you may want to check by disabling it.
You can disable these through the admin panel by going into the “Plugins” area and clicking deactivate on the most recent. If you’re unsure which one, you can disable all of them and see if that fixes the problem.
If your 404 screen disappears after disabling all of the plugins, activate each until you come across the one that is causing the error. At that point, you can check its settings to make sure it’s configured correctly. Otherwise, you may need to remove it and look for a similar tool that won’t break your site.
Will changing how permalinks work in the middle of creating content cause this?
WordPress is usually quite efficient when it comes to tracking links. The system will keep old methods of links saved while incorporating new ones. This means that changing the appearance of how permalinks are created will not result in lost links.
For example, let’s say you started your site using the “Month and name” scheme for creating URLs of your posts. A few months later, you decide on a custom structure for permalinks to help organization. Your original posts from the beginning will retain their structure even though the new content you create is under the custom design.
This prevents search engines, social media and general backlinks from losing their connection to your website. It would be highly unlikely that changing the link appearance would result in the 404 problem.
Usually, it’s modifications to the permalinks that cause WordPress to throw a 404 screen. Tools such as Yoast SEO and others have the ability to modify these, and sometimes conflicting plugins can cause issues. Before you panic about a missing webpage, troubleshoot with the above steps. A lot of the time, it’s a simple fix that can get your site running again.
What kind of problems have you come across in WordPress? Have you customized your site to the point of it breaking?
I do not have permalinks on my wordpress.com settings. What can I do?
Hi Art,
Permalinks are only available on self-hosted WordPress blogs, such as those hosted by GreenGeeks. You can learn more by going to our WordPress Hosting page.