
At one point or another, you are going to need to access the files on your backend. Normally, this can be done through the cPanel’s File Manager, but another approach is to use a File Transfer Protocol or FTP like FileZilla.

This is a program designed to help users quickly access the backend of their website and upload new files, delete existing ones, move them around, or even edit them without having to go through the cPanel.
While there are many options to choose from when it comes to FTPs, FileZilla remains one of the more popular options.
In this guide, I will show you how to use FileZilla and what it can do for you.
Why Use FTP Programs to Make Modifications?
The use of FTP software can give you access to files on your website directly. This means you can remove, change, delete, or upload modifications to your site from your computer.
Many developers use these kinds of tools in order to work on webpages offline. Once the files are created, you can easily upload them to your FTP hosting account.
In addition, these programs also help you create a mirror of the site on your computer system. This can be very beneficial when you need to recover from file corruption thanks to malware attacks.
Essentially, you can create a backup copy by downloading all of the files from your website.
With all of this said, it is worth pointing out that you can use the File Manager in cPanel to do everything you’ll need, but many developers prefer an FTP program because it is quicker to access than the cPanel.
What is FileZilla and Why Use It?
We’ve talked about what and FTP is and why you should use it, but let’s get a bit more specific and talk about FileZilla.
FileZilla is a free FTP program that been around since 2001. It utilizes a two-panel design that places the files on your computer on the left-hand side, and the files from your site on the right-hand side.
This simple interface makes it incredibly easy for beginners to use and gives experts the flexibility they need to carry out simple uploads, downloads and file transfers in seconds. For this reason, it remains one of the most popular FTP clients online.
One of the main reasons to use FileZilla over the cPanel is because it supports bulk uploads.
Normally, if you had to upload multiple files through the cPanel, you would have to do each one individually. With FileZilla, you can upload everything at once. Combine that with a great UI and quicker access time, and it’s easy to see why people use FileZilla.
How to Use the Client for FileZilla
FileZilla is not a hard tool to use, but when first starting out the sheer quantity of options can be overwhelming. And while the interface is simple, it can seem quite foreign when you first get started. Let’s take a look at the client itself and getting started.
Installing FileZilla
Before we can really get into any details about FileZilla, we need to go through the initial setup process for it. Luckily, it is rather simple and is the equivalent of installing any other program off the internet.
Step 1: Download FileZilla
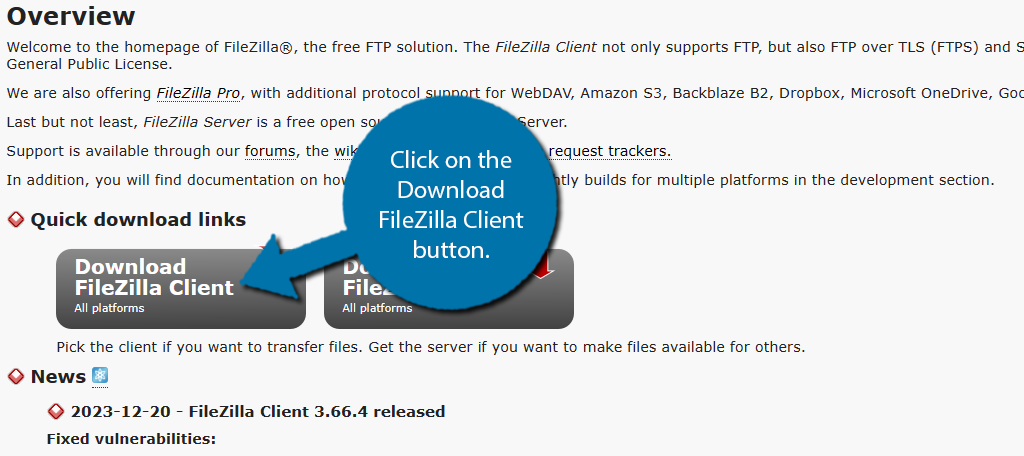
Simply visit the FileZilla website. Here you will see two options. One is the FileZilla Client, and the other is the FileZilla Server. The main difference between them is that a client is for personal use, and the server allows for others to connect to it.
In this case, click on the Download FileZilla Client button.
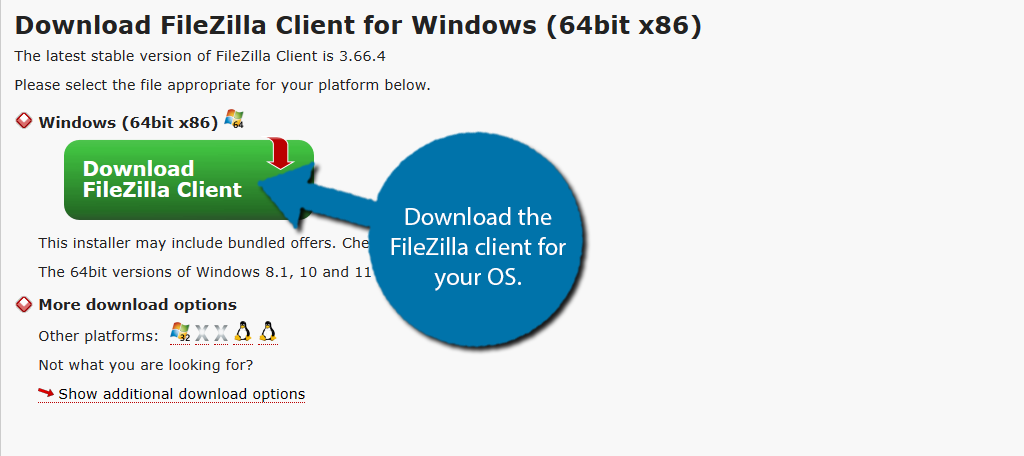
On this next page, you will select which operating system you use on your computer.
Note: FileZilla is compatible with the following OS:
- Windows 64-bit
- Windows 32-bit
- Mac OSX
- Linus
Simply download the version that matches your device.
Step 2: Installation Wizard
Once you have downloaded the software, it will be in your device’s Downloads folder. Go to this folder and run the file. This will bring up the FileZilla installer. This is your standard installer that most software on the internet shares.
There are no special settings to configure, or anything like that. Thus, I’ll leave this to you, but it really just asks you where you want the files to be stored on your computer. Once it is done installing, FileZilla will open on your computer.
Step 3: Explore FileZilla
After you install FileZilla, it should open automatically. The program itself is ready to use, but you should take a minute to examine the interface. Take note of the toolbar at the top.
If you hover over each item, you can read the tool tip to learn what the icon is.
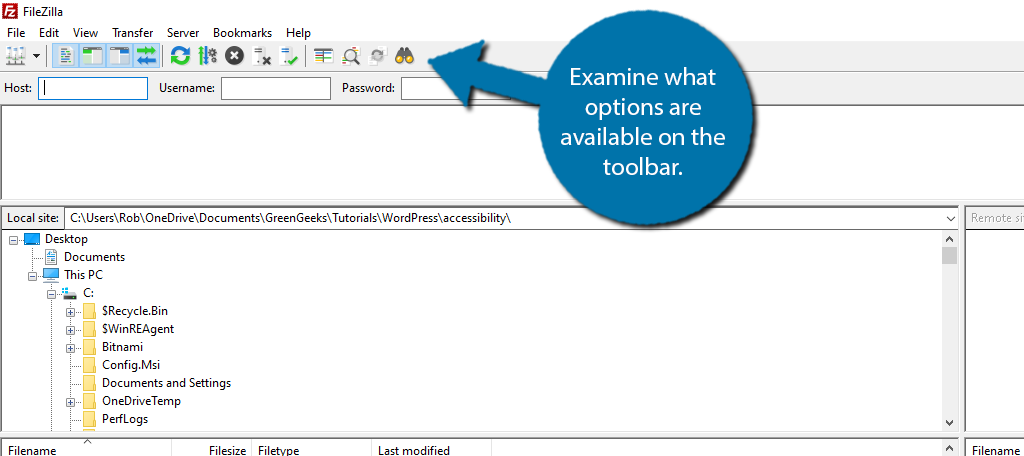
You can also explore the files stored on your computer using the left-hand panel. This will give you some experience practicing with the interface before you connect to site’s host.
Once you are comfortable with the interface, it’s time to connect to the web server.
Connecting to Your Server with Quickconnect
Installing FileZilla by itself, doesn’t do us much good. Without it being connected to your web server, it can’t do anything. As such, we need to connect it, however, this requires a small amount of setup from within the cPanel.
Note: Previously, it was possible to use a configuration file from cPanel to connect FileZilla and your web server, but that has been removed. Manual input still works fine.
Step 1: Create An FTP Account
The first thing we need to do is create an FTP account on the cPanel. This is quite easy to do and only takes about a minute. If you already have one of these made, go ahead and skip to Step 2.
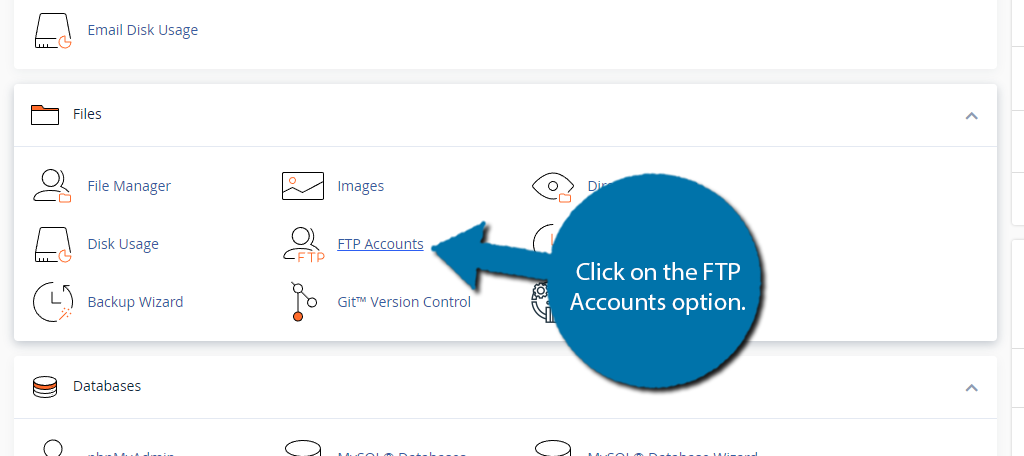
Log into your cPanel and locate the Files section. Click on the FTP Accounts option.
You will see the Add FTP Account section. Here you can create an FTP account to login on FileZilla with, or any FTP for that matter.
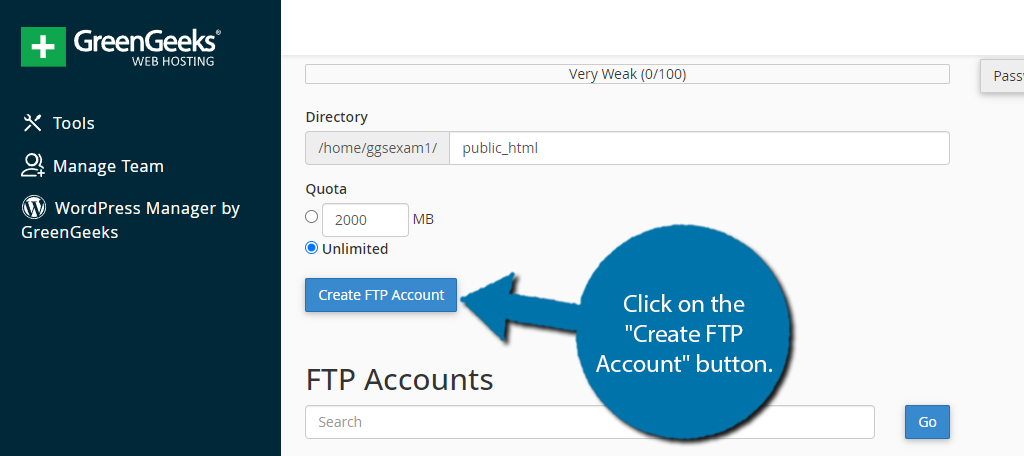
All you need to do is enter the login name, choose the domain (only applicable if you have multiple domains), create a password, and most importantly, set a path.
The path determines what file you have access to; thus, you want to set it to the root directory of your website. In most cases, this will be something like “/home/domain/public_html”.
However, it can be something slightly different depending on your web hosting environment. The most important aspect of the path is usually public_html.
Click on the “Create FTP Account” button to finish.
And with that, the account is ready to use.
Step 2: Obtain FTP Account Credentials
You should know the username and password that you created in the previous step, but you probably don’t know the server’s name itself. Thus, we need to take a minute and get all of the credentials. Luckily, this takes less than a minute.
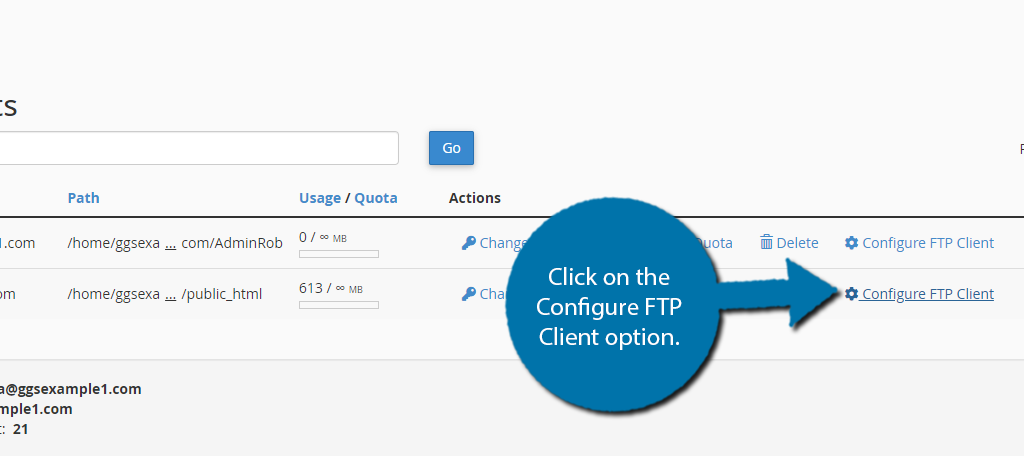
Below the Add FTP Account section, there is an FTP Accounts section. This lists all of the FTP accounts you have created. Locate the one you want to use and click on the Configure FTP Client option.
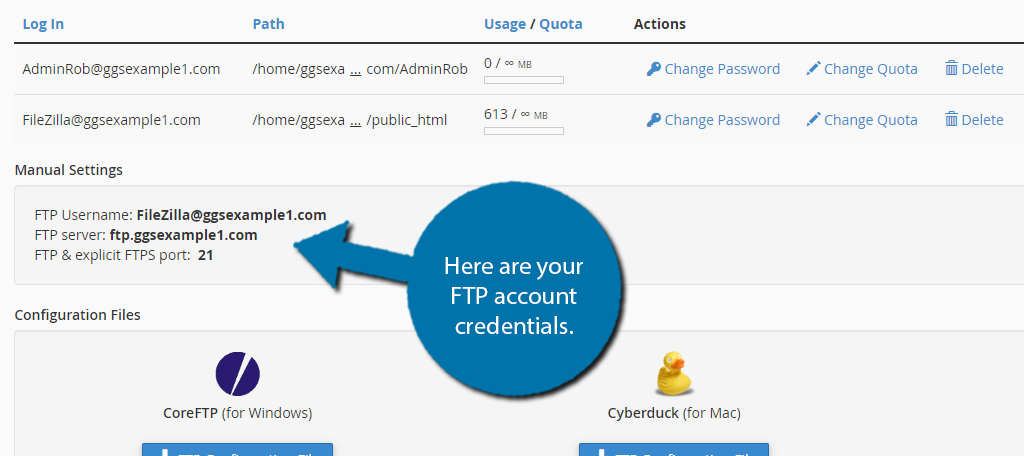
The Manual Settings section contains all of the login credentials except the password. Write down the Username, Server, and Port information, or keep this tab open to use as a reference.
Now that we have this information, we can use it in FileZilla.
Step 3: Log Into your FTP Account in FileZilla
Back in FileZilla, enter the account credentials in the area below the toolbar. Do note that the Host is the same as the Server we just obtained in the previous step. Click on the “Quickconnect” button to log in.
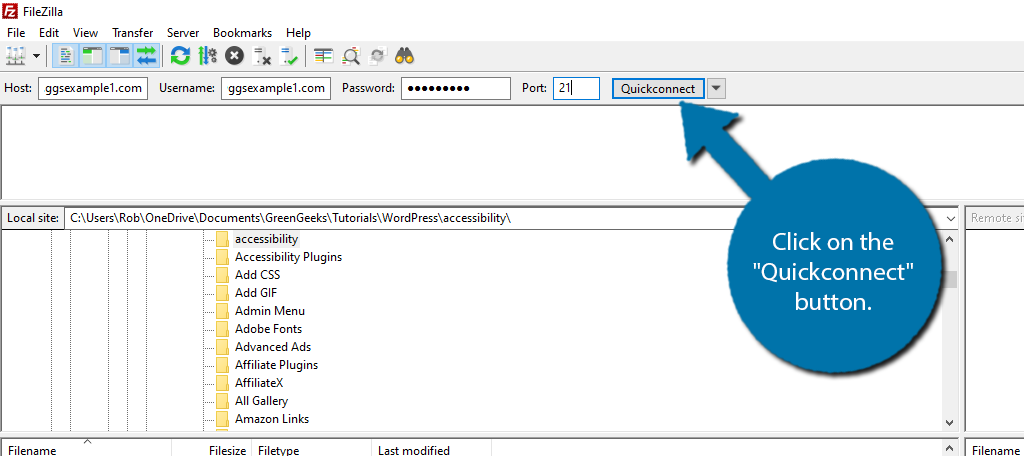
Once you do, you will see the files from your root directory appear on the right-hand panel.
You are now ready to use FileZilla.
Managing Your Site Servers
If you happen to have multiple sites that you would like to connect to FileZilla, you’ll be pleased to know there are no limits to doing so. FileZilla has a Site Manager that makes it easy to switch between the site servers.
Let’s take a quick look at this feature to learn about the potential benefits you can reap.
Step 1: Open the Site Manager
In FileZilla, click on File and select the Site Manager option. Alternatively, you can press CTRL+ S.
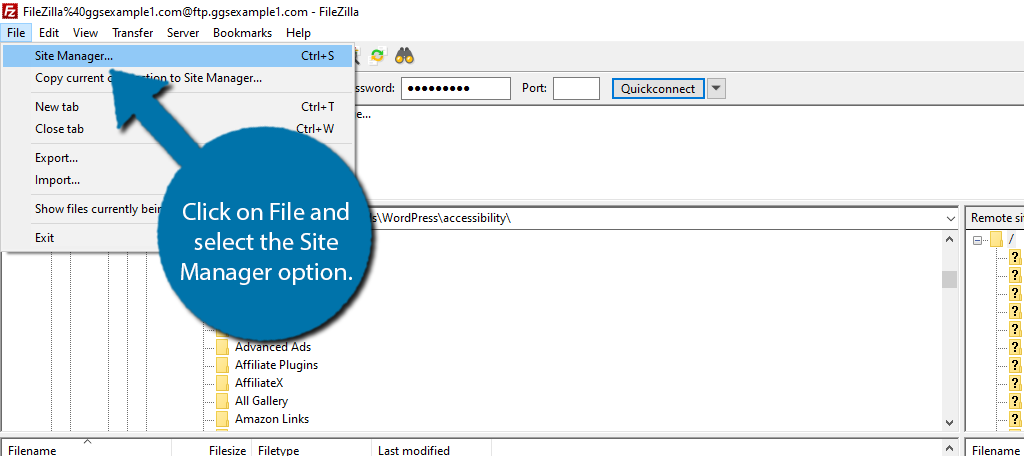
This will open the Site Manager window.
Step 2: Add A Site
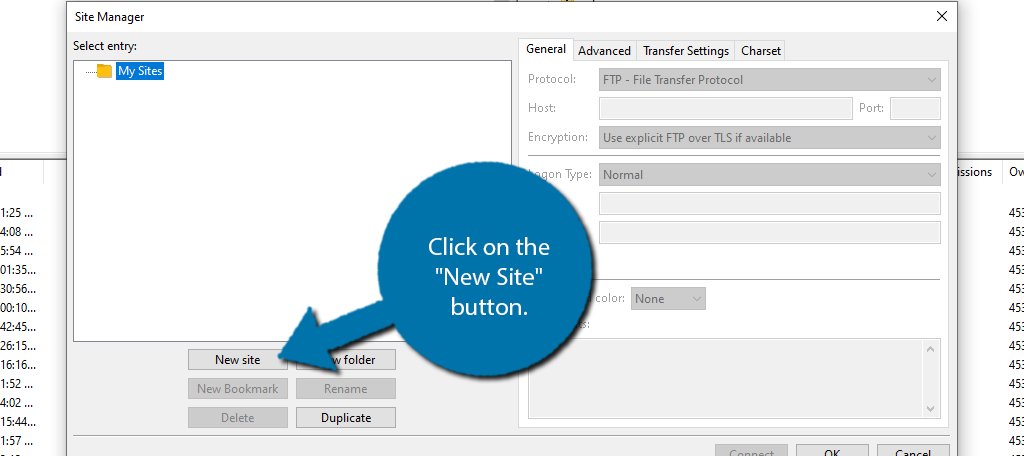
In this window, there are several options. Let’s ignore this for now and just click on the “New Site” button.
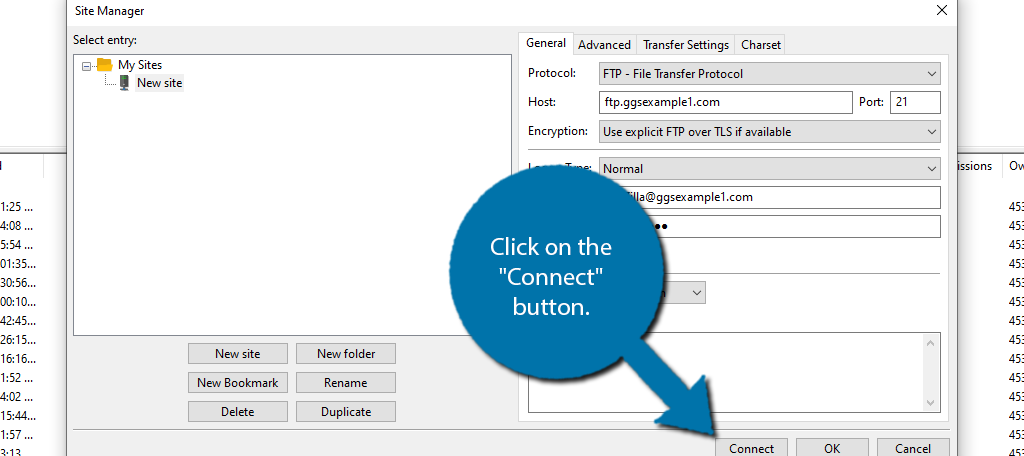
In the General tab, you can now enter your FTP Account details. This will add it to the Site Manager, so you can quickly connect to it, or switch between other registered sites.
You will need the Username, Password, Host (Server), and Port Number.
Below these options, there is also a background color. This is useful as you can assign a different color to each site. That way you can avoid editing the wrong site by recognizing the color. You can also ignore this if color coding isn’t for you.
Click on the “Connect” button to finish.
This will connect to the site, and if you changed the color, you would see that as well. You can use the Rename button to change the site name to that domain name.
Simply repeat this step to add multiple sites to the site manager.
Step 3: The Advanced Tab
Most users will never need to adjust the settings in here, but it is worth pointing out that they exist. By clicking on the Advanced tab, you will be able to configure a variety of settings.
The first option is the Auto Detect option. Again, most sites will want it this way, but there may be cases where you want to configure the server type.
The more useful option is the local directory option. While we set the path to the public_html directory, you may want it set to something else.
For example, perhaps you only use FileZilla when you want to bulk upload video content. Well, you can use this section to always have you start in the file you need to load them to.
The default remote directory works in much the same way as the local folder. The difference is that it will automatically go to the default remote location when you connect.
Synchronized browsing works well if you have an identical directory structure on both the local computer and the web server. This means that any move you make in one screen, it will be duplicated in the other.
Enabling directory comparison allows you to see the differences between local and remote files. This can help troubleshoot file sizes, modifications or identifying obscure files.
Again, I don’t recommend changing anything unless you understand what you are doing, but the options do exist.
How to Manage Your Files
Now that you’re able to connect to the web host server, it’s time to manage your files. You want to be careful as to what you change in the remote site area as you could inadvertently corrupt your website.
This could result in your web pages no longer working correctly.
As such, it is always recommended to have a backup of your site ready in case something goes wrong.
Creating a Local Site
One of the best practices when using FileZilla is to have a local site prepared on your computer. Essentially, this is a folder on your computer that will hold your website data.
It helps keeps our work separated from the rest of the content on your computer.
Step 1: Create a New Directory
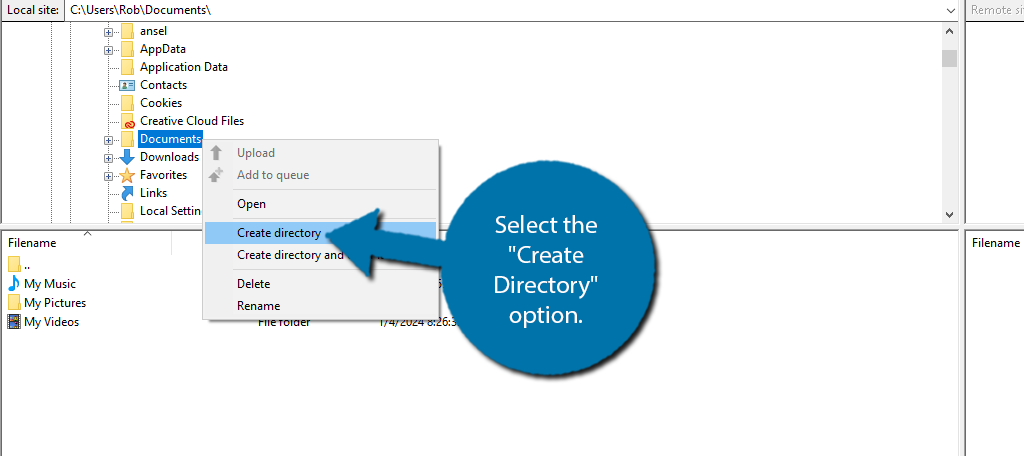
The left-hand panel represents your computer. You can choose to create this directory anywhere on your computer. For simplicity, I am going to put it in the Documents area of my computer.
You just need to locate the location you wish to create, right click in that area, and select the “Create Directory” option.
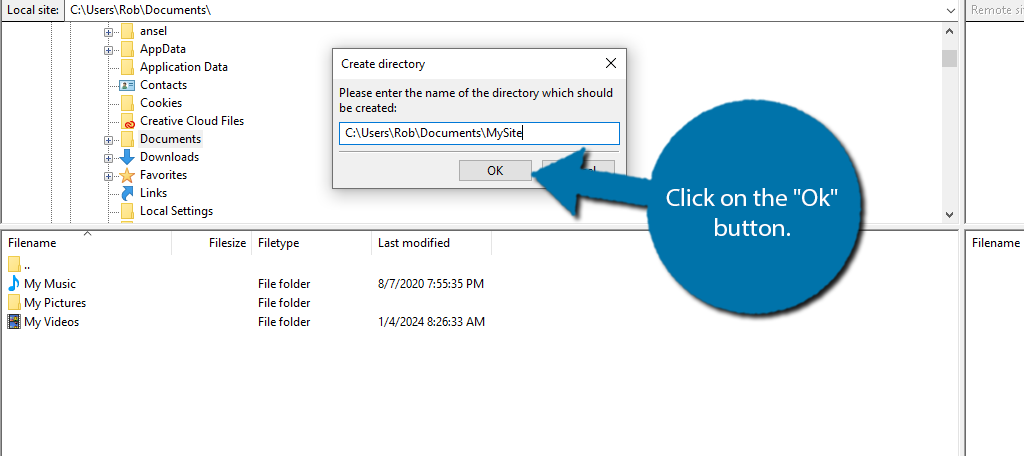
This will bring up a small window to name the new directory. You may call it whatever you want. In this case, I will call it MySite. The directory should now read something like, “C:\Users\YourName\Documents\MySite.” Click on the “OK” button.
And with that, we have created an empty directory with FileZilla. Now, we just need to actually fill it.
Step 2: Transfer Your Site to the New Directory
With the directory setup, we need to take a moment and actually transfer our site files to it. As such, use your FTP account to log in and connect with your web server.
Once the connection is made, we are just going to copy over the core files of your site. This can act as a local backup in case anything happens.
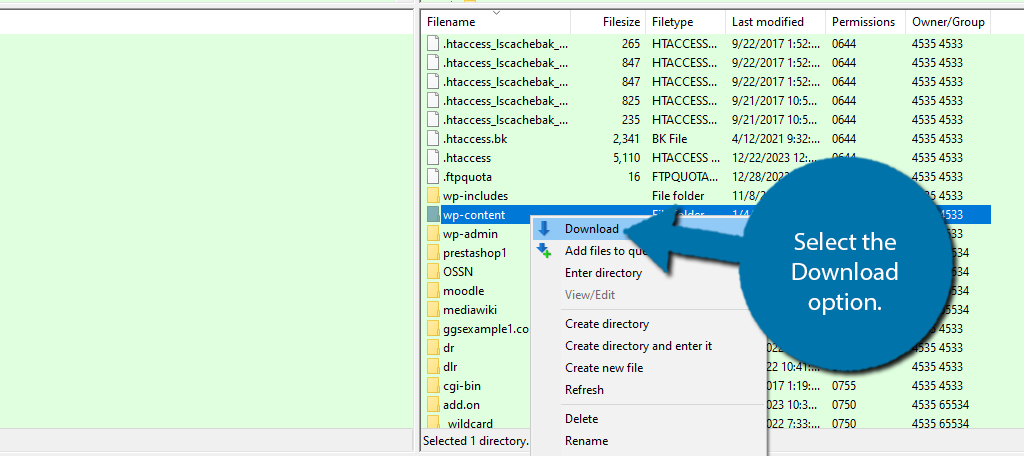
In your root directory, locate the wp-content directory, right-click it, and select the Download option.
This will cause it to download a copy of it into the current directory that is open on your computer, which should be the blank one we just created.
Afterward, you should have a copy of all of the WordPress content on your site, which can be used for an offline site with something like Xampp.
Editing Your Files
One of the big misconceptions about FTPs is that they only exist so you can upload or download files. While this is certainly one of their more popular uses, they can also be used to directly edit files located on your web server.
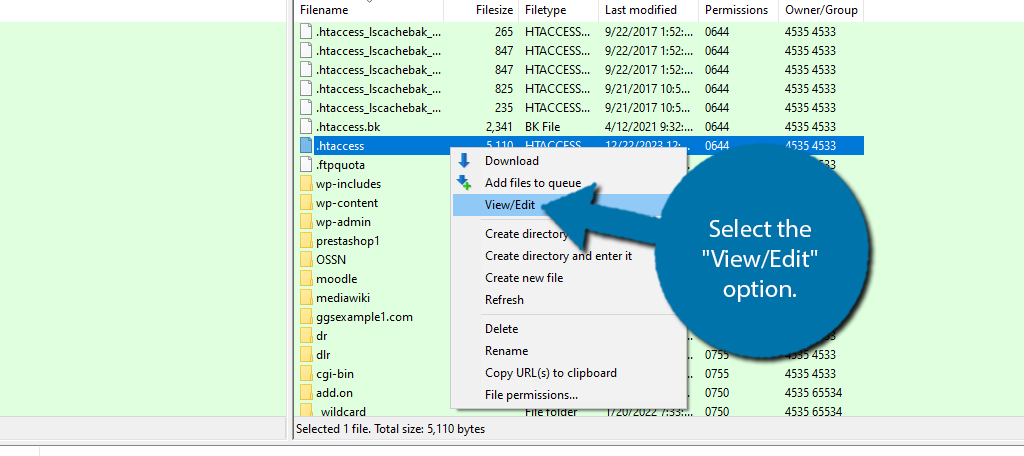
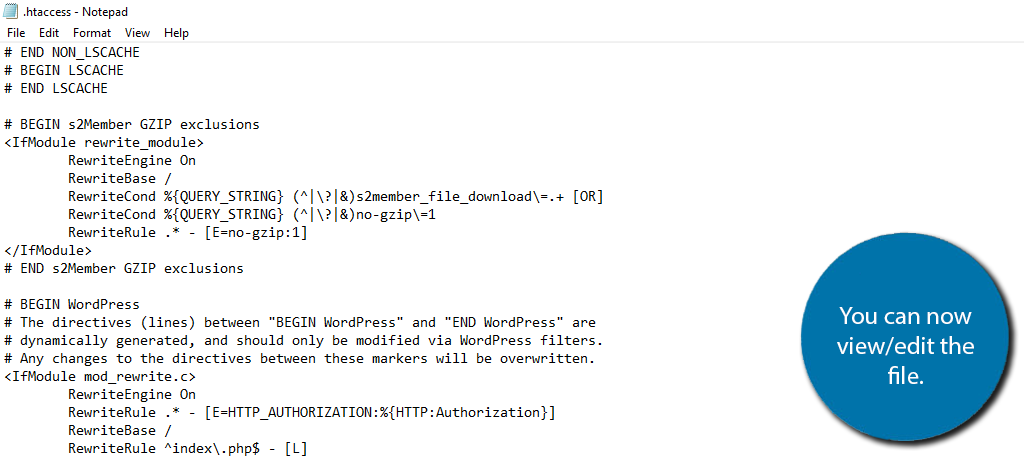
With FileZilla connected to your web server, locate a file that you want to edit. In my example, I will choose the .htaccess file.
Right-click the file and select the “View/Edit” option.
Note: If this option is not available, you may not have permission to edit or view that file.
A small window will appear asking if you want to use the default program to view them (Notepad for Windows), or if you want to pick a specific program. This is up to you but Notepad will suffice for most files.
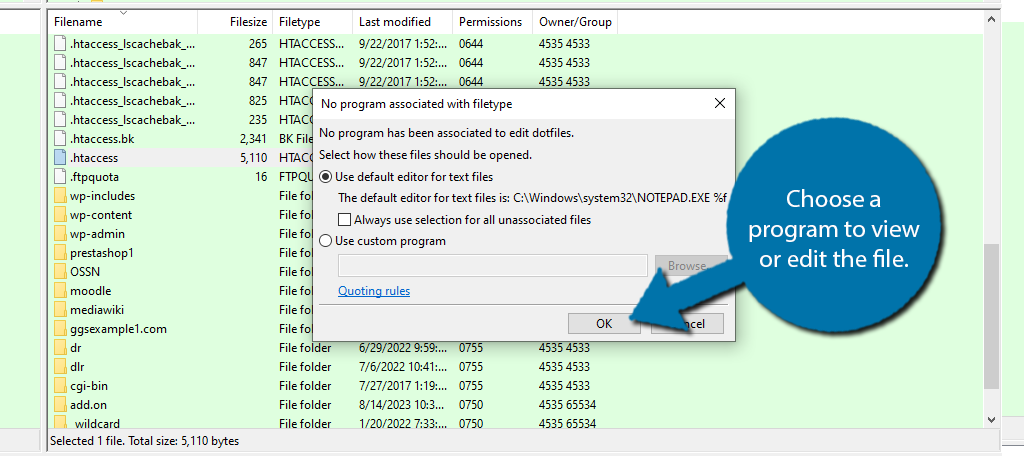
Once you click on the “Ok” button, Notepad or your default HTML editor will load up and show you the contents of the file. From here, you can just edit or view the file as you see fit. To make changes, be sure to use the save option.
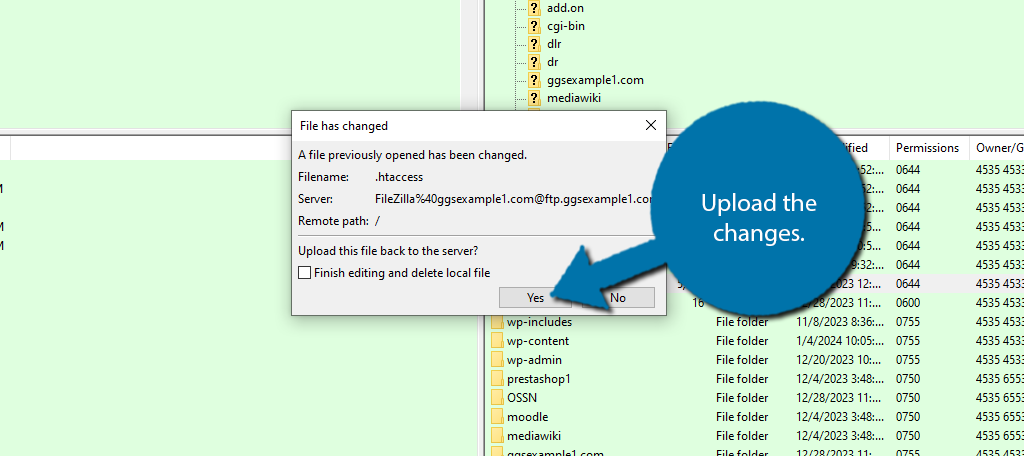
However, when you save the changes to that file, they are not saved to the web server, thus it does not impact your site. When you close the actual file editor, you will see a small dialogue box in FileZilla.
It will recognize a file was changed, simply click on the “Yes” button to upload the changes.
And that’s it. Just be mindful that you can also save it locally as a spare copy.
Changing File Permissions
I mentioned before that you may not be able to edit/view a file if you do not have permissions. Well, you can change this, assuming you are the site admin or set them up for other users.
Essentially, the file permission determines who can access a file. This can help you protect important files from being accessed by others. It can also act as an extra layer of security against hacking attempts.
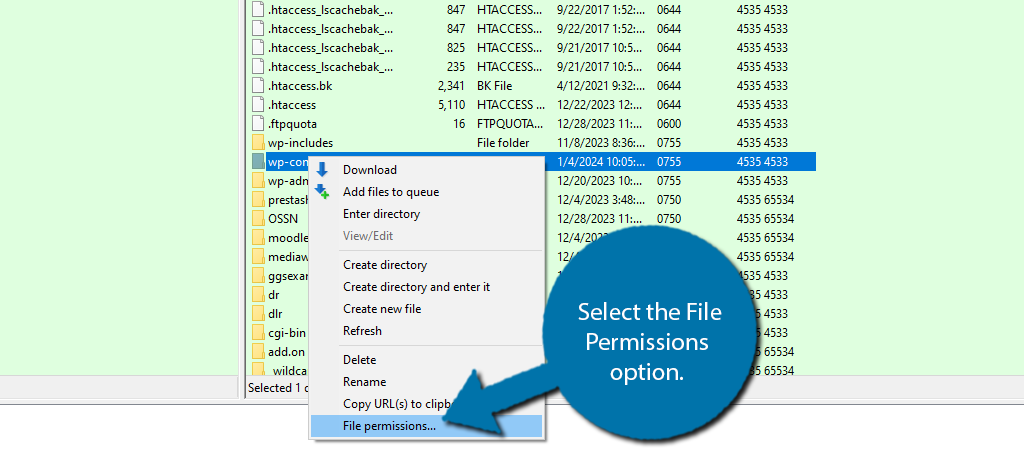
To do this, locate the file or directory that you wish to change the permissions for, right-click it, and select the File Permissions option.
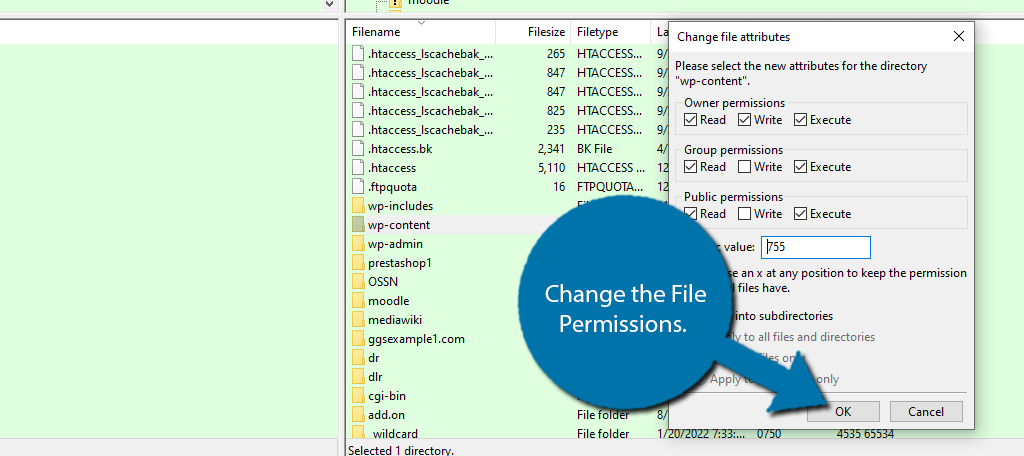
This will open up a small window with the file permission options. Here, you can select if it is viewable, writable, or if it can be executed.
Simply click on the “OK” button to apply the changes.
Note: You want to be careful when you set permissions. If these are set incorrectly, you could inadvertently give public access to your website which could lead to compromising your webpages or be one of the reasons why your website becomes hacked.
Creating New Files and Folders Online
While you can upload a file to the web server using FileZilla, you can also just create a new file on the web server itself. The same is true for directories. It is quite easy to do, and once the file is created, you can edit using the method I demonstrated.
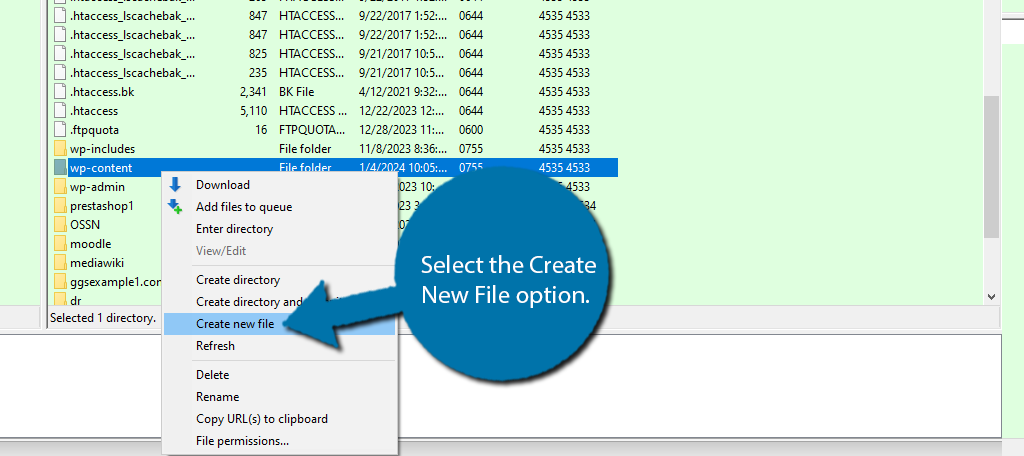
Simply locate the directory you want to create a file in, right-click it, and select the Create New File option.
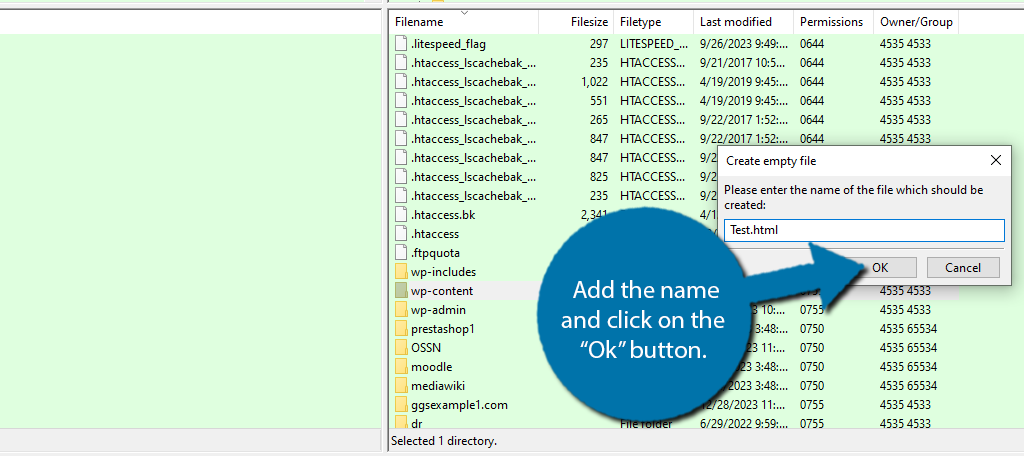
A small window will open up. Use it to enter the name of the new file. Don’t forget to add the extension.
For example, if it is an HTML file, it should end with “.html” to help make it identifiable.
And that’s all there is to creating a new folder or file. Just remember the file you create is blank and it will be added to the current directory.
Manual Transfers
In many cases, you may just want to manually transfer files between your computer and web server. This is more commonly known as uploading or downloading files between devices.
It’s quite easy to do once you have established the connection between your computer and web server.
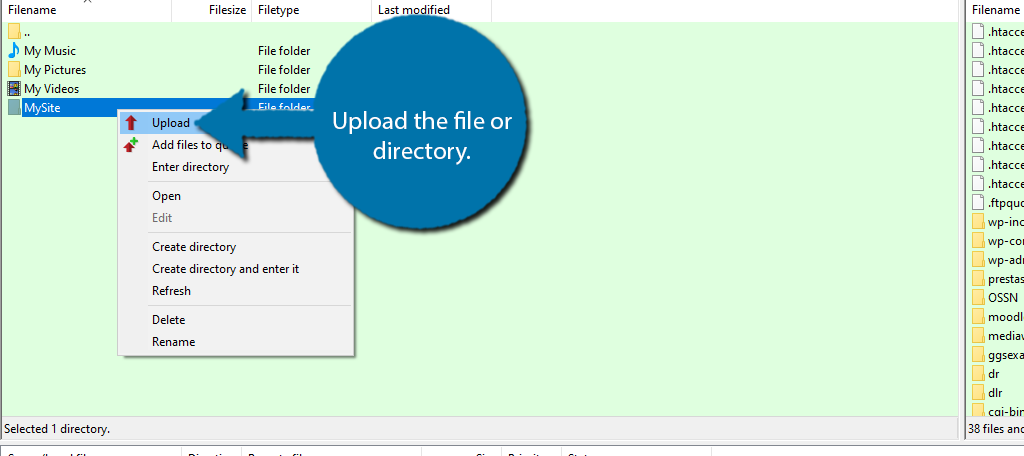
To upload a file, first, on the right-hand side (your web server), locate the directory you want to upload the file to. Once that is open, on the left-hand side (your computer), locate the file on your computer, right-click it, and select the Upload option.
A copy of the file or directory will now be on your web server.
Downloading a file from your web server is an identical process, but in reverse. It is also worth noting that this is not exclusive for between your computer and web server.
You can also use drag and drop between the screens to copy files back and forth.
If you use the Site Manager to connect to multiple sites, you can actually transfer files between them in the same fashion.
Disconnecting from FileZilla
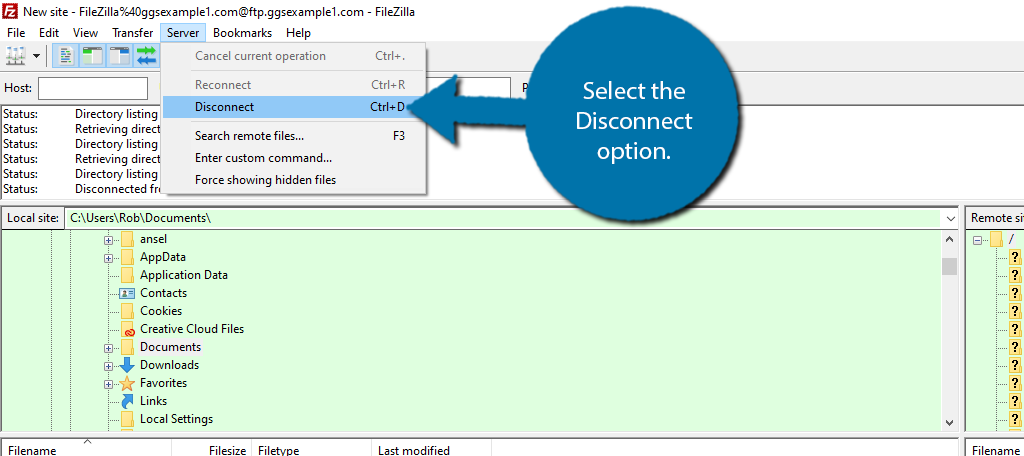
When you are done using FileZilla, you should disconnect from your web server. You can find this option by clicking on the Server option and selecting the Disconnect option. Alternatively, you can press CTRL+D.
It is also worth pointing out that just closing FileZilla will also end the current session and disconnect from the web server.
FAQs About FileZilla
Yes. One of the main advantages of FileZilla or FTPs in general is their ability to bulk upload files to your web server. In fact, it is the most common reason people use an FTP.
Possibly, but we can’t say for sure. Each FTP is unique, and it really comes down to the needs of the individual and what interface they prefer. As far as features go, FileZilla has everything you will need for free making it one of the best options.
Functionally, the free and pro versions are nearly identical with the pro version having more options. One of the key differences would be that the pro version of FileZilla has access to cloud storage protocols. If this sounds useful to you, it may be worth upgrading.
Some anti-virus software will detect FileZilla as a threat, but this is a false positive. The reason it gets detected is because FileZilla displays ads to you during the update process. It is a safe program to use.
The FileZilla Server is intended for when you want to make files available to others. For example, if you have a small web development team, you will want a server to ensure everyone can access the files.
Yes. The Site Manager allows you to connect to multiple servers. Each one is opened up in their own tab that you can freely switch between. This also allows you to transfer files between the tabs.
No. While you can ensure your information is not stored on that computer, many users forget to do this, which can lead to this information falling into the wrong hands. As such, it is recommended to only use it on your own computer.
Start Using FileZilla Today
As you can see, FileZilla is a simple program to use and offers a lot of versatility to developers. As such, it can be a powerful tool in the hands of a web developer, but more importantly, it can save you a lot of time.
It is much quicker to use an FTP client to access your files than logging in through the cPanel. Not to mention that the File Manager will limit you to uploading a single file at a time. FTPs like FileZilla get around this limitation.
Do you find FileZilla to be easy to use? Are you considering using another FTP client?

I do not see anything specific about moving files BETWEEN remote folders, rather downloading and uploading
I there a way to auto connect to a frequently used site when invoking filezilla?
Filezilla has a function called “Quick Connect” that may be useful to you. Check that out.