We’ve written a lot of articles about starting or building a WordPress website. But what happens if you acquire a WordPress website that someone else created? Whether or not you’re familiar with WordPress, there are steps you can take to ensure a graceful and stress-free transition.

Websites change hands for many reasons. Maybe you’re thinking about buying a website built with WordPress. Or taking over a site from someone who didn’t have time to run it, or lost interest.
Corporate websites commonly change hands as people come and go from the company, or move on to different roles.
Whatever the reason, taking over a WordPress site can feel overwhelming. But if you address each of the issues we discuss in this article, one by one, it’s completely manageable. You may even find yourself enjoying the experience.
Let’s take a look at what we have to do to take control of a website. We’re talking specifically about WordPress websites here, but many of these tips apply to any kind of site.
1. Get All of the Passwords and Email Addresses
One of the first steps necessary, when you acquire a WordPress website, is to get all of the login and management passwords and associated email addresses.
That’s often easier said than done. It will likely involve a bit of back and forth communication with the previous owner. If that owner is someone at your job or in your office, you’re in luck; it will be easy.
But if you’re communicating with the previous owner online, it can be trickier and take more time.
A few things to remember when rounding up all of the credentials for a website:
- Most sites have more than just an admin login. For a WordPress site, there’s usually an associated wordpress.com account, which is needed to use Akismet or Jetpack. Plugins and themes—especially paid plugins and themes—can also have user accounts.
- WordPress user accounts (including admin) are associated with email addresses. When you log in with the WordPress admin password, you can change the admin email address. Changing the admin user email address doesn’t change the site admin address, though. To change the site admin address, go to Settings > General > Administration Email Address.
- Don’t forget the logins for external services (website hosting, FTP, analytics, backup services, CDN, etc.). Make sure you’re aware of, and have access to, all of the billing accounts related to the site.
- Transfer the domain name to an account that you control. That won’t apply to most corporate or work-related sites. But for any site you’re buying or taking over, you have to control the domain name. Overlooking this detail can cause a lot of trouble down the road.
Of course, as soon as you have all of the passwords, the first thing you should do is change them. Changing WordPress passwords is easy once you have the admin login. But the plugins and external services may also require email address changes for the services.
2. Take Some Time to Become Familiar With the WordPress Back End
You may already know how WordPress works; you still have to understand how the particular WordPress site is configured.
- Which plugins does it use?
- Does it use a particular theme?
- How are the widgets configured?
- Is it using a CDN?
- Are there other users, and if so, what are their roles and permissions?
It can be helpful to keep a list of things that are new to you, or that have complicated configurations.
3. Review User Permissions and Roles
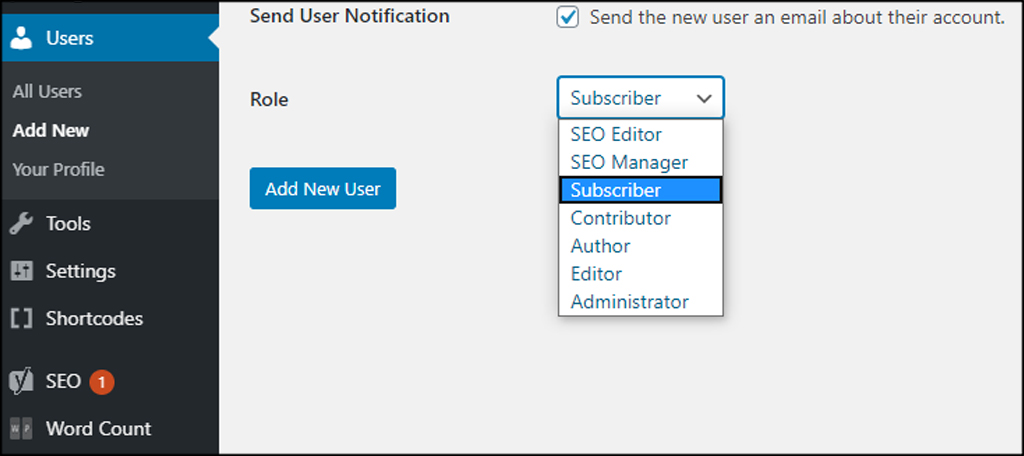
If the website has multiple contributors, you’ll want to take a look at their roles and permissions. Once you’ve familiarized yourself with the site, you may want to restrict admin permissions to yourself.
If you’re the sole author and administrator, there may still be content written in the past by other users. You’ll want to disable or block the users who you no longer wish to have access to the site.
The obvious solution would be to use your admin permissions to change the user email addresses and passwords. The problem with that method is you have to change the email to a valid address.
WordPress will send a verification email to the new address. If you don’t click the verification link, the old email address remains on the account.
You can see how that would be problematic if you acquire a WordPress website with more than a few users.
But there are a few more effective ways to disable users who should no longer have access.
- Delete the user. I don’t recommend this nuclear option because it erases the author information (or transfers it to admin). Only use this method if you intend to list yourself as the author of everything on the site.
- Change the user role to “No role for this site.” That prevents the user from changing anything, but they can still log into the back end of the site. They won’t see anything but a blank page, but you may not want them to have any level of access.
- Block users with a plugin. It’s easy to do, and as long as the plugin is installed, it will keep the blocked users out.
4. Review Plugin Settings
If you’re following along, then you made yourself familiar with the site you looked at the plugin configurations. But there are other plugin settings you should check.
For example, contact forms often have an email address defined in the configuration. Make sure you change that to an email address that you control.
Social media and SEO plugins also often point to specific social profiles or email addresses. Update any of those you come across.
5. Check Tracking and SEO Integration
If you can get the existing Google Analytics property and Search Console for the site transferred to you, that’s great. But if you have to start from scratch, you’ll have to update the tracking codes.
You can do that in your Analytics account, or with Tag Manager.
Services like heatmaps (such as CrazyEgg) or other visitor activity trackers also use website verification codes. If you can’t gain access to those existing accounts, you’ll have to set up new accounts with new tracking codes.
6. Get Out a Broom and Perform a Website Clean Up

A virtual broom, of course. You cant show up with a broom at the data center where your site is hosted. They won’t let you in the door, and they’ll probably call the police.
What you want to clean up are any unused plugins, themes, and users (as we discussed). You might also clean up and optimize the WordPress database.
Deleting plugins and themes is a pretty straightforward process. Cleaning and optimizing the database can be a bit more complicated. Not to mention, nerve-wracking, since everything on your WordPress site hinges on that database.
Do your nerves a favor and back up your database before you do anything to it. As far as database optimization is concerned, it’s often best to leave that job to an appropriate plugin.
7. Run Security and Performance Scans
When you acquire a WordPress website, you can’t trust that the previous owner took proper security measures. So, you’ll want to be sure security is up to snuff.
You can do that with a security scan from any number of commercial services. Or you can install a security plugin like Wordfence to not only scan but automatically plug security holes.
Website performance scans are sometimes useful in a general way. But most of them will present you with results or a score but no specific suggestions for fixes.
When I want to know about website performance, I go to Google tools. Search Console is very specific about website problems, and Page Speed Insights and Lighthouse are indispensable.
Following Google’s recommendations can sometimes be difficult and time-consuming. But if you take their advice when you acquire a WordPress website, your site’s performance will increase.
8. Set Up a Staging Site or Implement Version Control
Version control and staging sites make it possible to “rollback” changes that break something on your website. So if you edit a template and your site crashes, you can quickly revert to the last working version.
Version control is an essential developer’s tool. But the conversation can get a bit deep into the weeds when talking about it. Git, Subversion, CVS, TFS – all great once you know how they work, but there’s a learning curve.
If you don’t want to commit to learning traditional version control, there’s an easier way to test changes. With a staging site. I wrote a tutorial on WordPress staging sites, and it’s long, I know, but it really is easy to do.
Trust me, it’s worth a read.
A staging site or version control only has to save you once to convince you of its importance.
9. Setup an Automated Backup Solution
We talked about making a database backup in the website cleanup section. And the methods outlined in the article I linked to will work to back up your entire site.
But if you don’t want to rely on a plugin (or your host) for backups, consider a remote backup service. There are hundreds of services that will back up your sites and databases.
Which one you choose will depend on your tolerance for complicated configuration and your budget.
I like Dropmysite (and no, I don’t get paid if you click that link). Their web interface can be painfully slow at times, but the price is very reasonable. But most importantly, every time I’ve needed to retrieve a backup from them, it’s been there, and it’s been complete.
10. Upgrade Your Hosting Service

I talked about improving website performance, and everything you can do in that department will have a positive result. But what if you acquire a WordPress website and you’ve done all you can, but the site is still slow or erratic?
It could be time for a new host.
Look for one that specializes in, or is optimized for, WordPress hosting. Spoiler alert: I recommend GreenGeeks. Shocking, I know. But the platform really is crafted to make WordPress sing, and the support staff is sharp and attentive.
If you’re with a reliable host and your site is still sluggish, you may have outgrown your hosting plan. In the scheme of things, that’s a good problem to have. It usually means your site is busy and has a lot of visitors.
When it’s time to graduate from shared hosting, most people’s first stop is a VPS (Virtual Private Server). They’re more costly than shared hosting, but the increased resources are a thing of beauty.
GreenGeeks has you covered there, too.
If you think you’d like to move your WordPress site to GreenGeeks, it’s easy. I can guarantee it will be easy because we’ll do it for you. It doesn’t get any easier than that.
If you’d rather do it yourself, I understand. We can help you with that as well.
Now You’re Ready to Take Over Any WordPress Website
There are many things to be aware of, but if you’re methodical and keep a close eye on the details, you’ll be successful.
I took over a site years ago, and the owner said to me, “Don’t worry. Eventually, you’ll figure it out.” That wasn’t very helpful, but there wasn’t much I could do about it. He was washing his hands of the site and now it was my problem.
I did figure it all out, eventually, but I wish I’d had a list like this back then. It would have saved me a lot of time and frustration.
No list like this is complete, of course. All WordPress sites share common elements, but they’re all different. You may run into some things I didn’t include. (If so, tell me in the comments!) But for most sites, if you check off these steps, you’ll come out ahead.
